A bathroom floor has to do more than look attractive in a photograph. It is walked on with wet feet, cleaned frequently and interrupted by a toilet, vanity and shower entrance. The best design balances pattern, grout lines, water performance and a layout that still works with the room you actually have.
These bathroom floor tile ideas cover everything from classic mosaics to warm limestone-look porcelain and patterned squares. Before you buy, verify that the exact product is suitable for its location, particularly within a shower, and compare samples in the light your bathroom receives.
PART 01
Color and contrast
IDEA 01 / 20
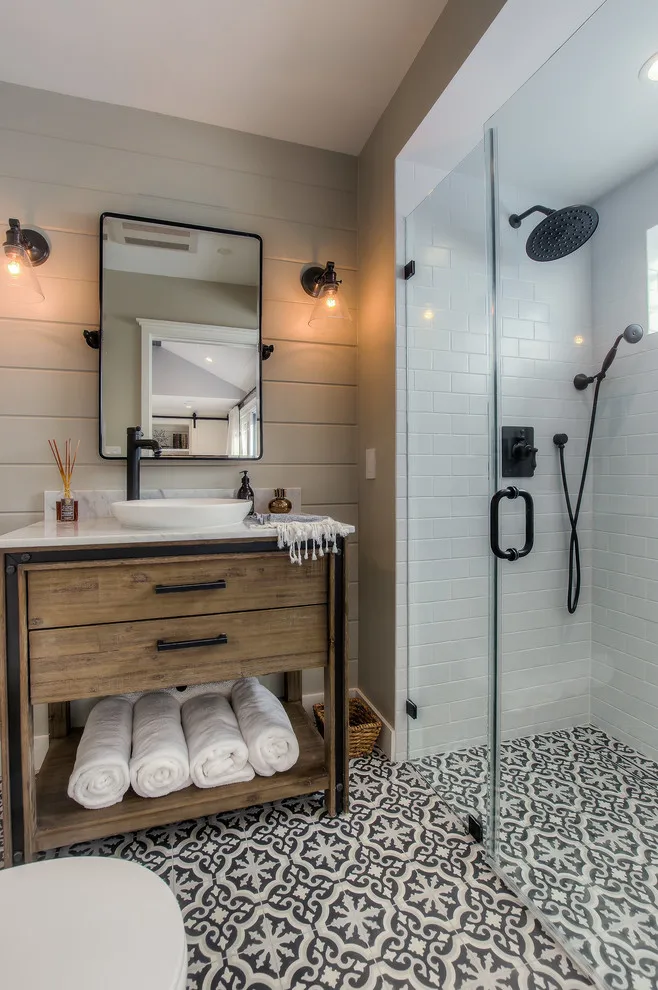
Use a Small Repeating Pattern
 SaveSupport Non AI Creator
Source: Spazio LA on Houzz.
Black-and-white patterned floor tiles sit beneath a timber vanity and glass shower. The floor supplies detail while the larger surfaces remain simple. Black fittings and a plain glass screen repeat the darkest parts of the motif without competing with it. The open timber vanity keeps more of the patterned floor visible.
View several tiles together before choosing a pattern. Confirm suitability for wet floors and compare grout with the whole repeating design, not a single tile. Ask for a sample panel that shows the full repeat, including where the edges join. A grout color close to the pale background can keep the intricate design from looking fragmented.
IDEA 02 / 20
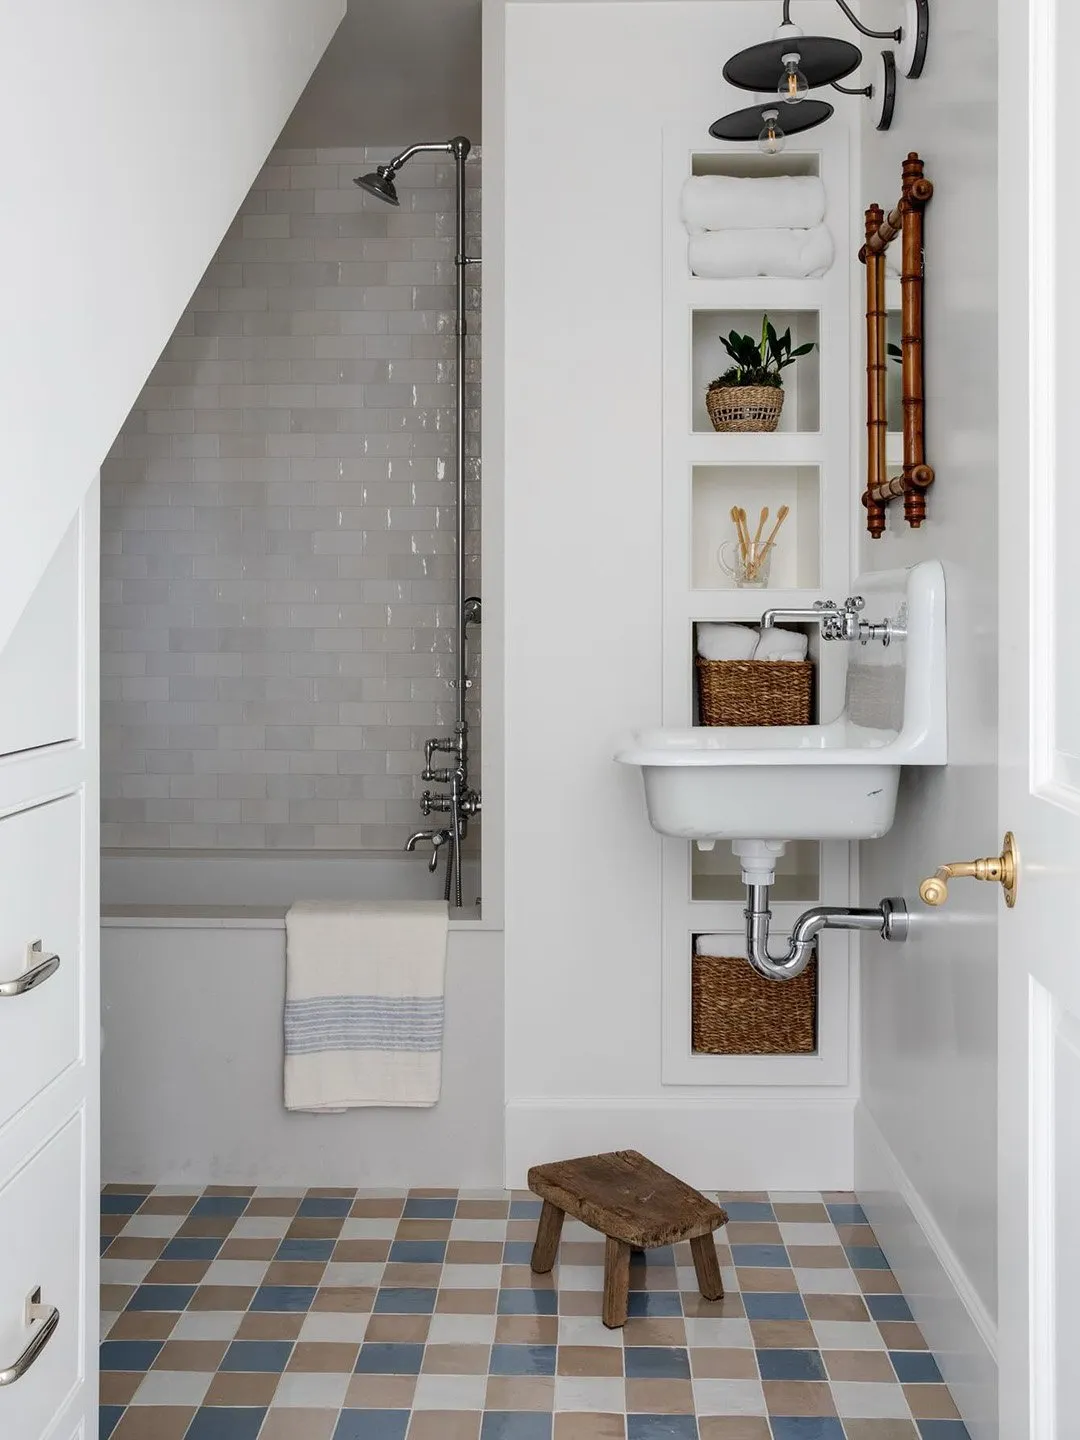
Try a Soft Check Pattern
 SaveSupport Non AI Creator
Courtesy of Design by Lane and Bass Interior Design
Muted blue, beige, and gray squares cover a small white bathroom floor. The gentle check adds color without a strongly contrasting motif. The small squares bring muted color into a room with white walls and very little spare floor. Their regular rhythm works around the simple basin and built-in storage.
Check the layout from the doorway before installation. Choose grout with the palette in view and confirm the tile’s floor and wet-area specifications. Mark the visible floor area with tape and check which squares will meet the threshold. Starting with a balanced arrangement can prevent a narrow strip of awkward cuts along one wall.
IDEA 03 / 20
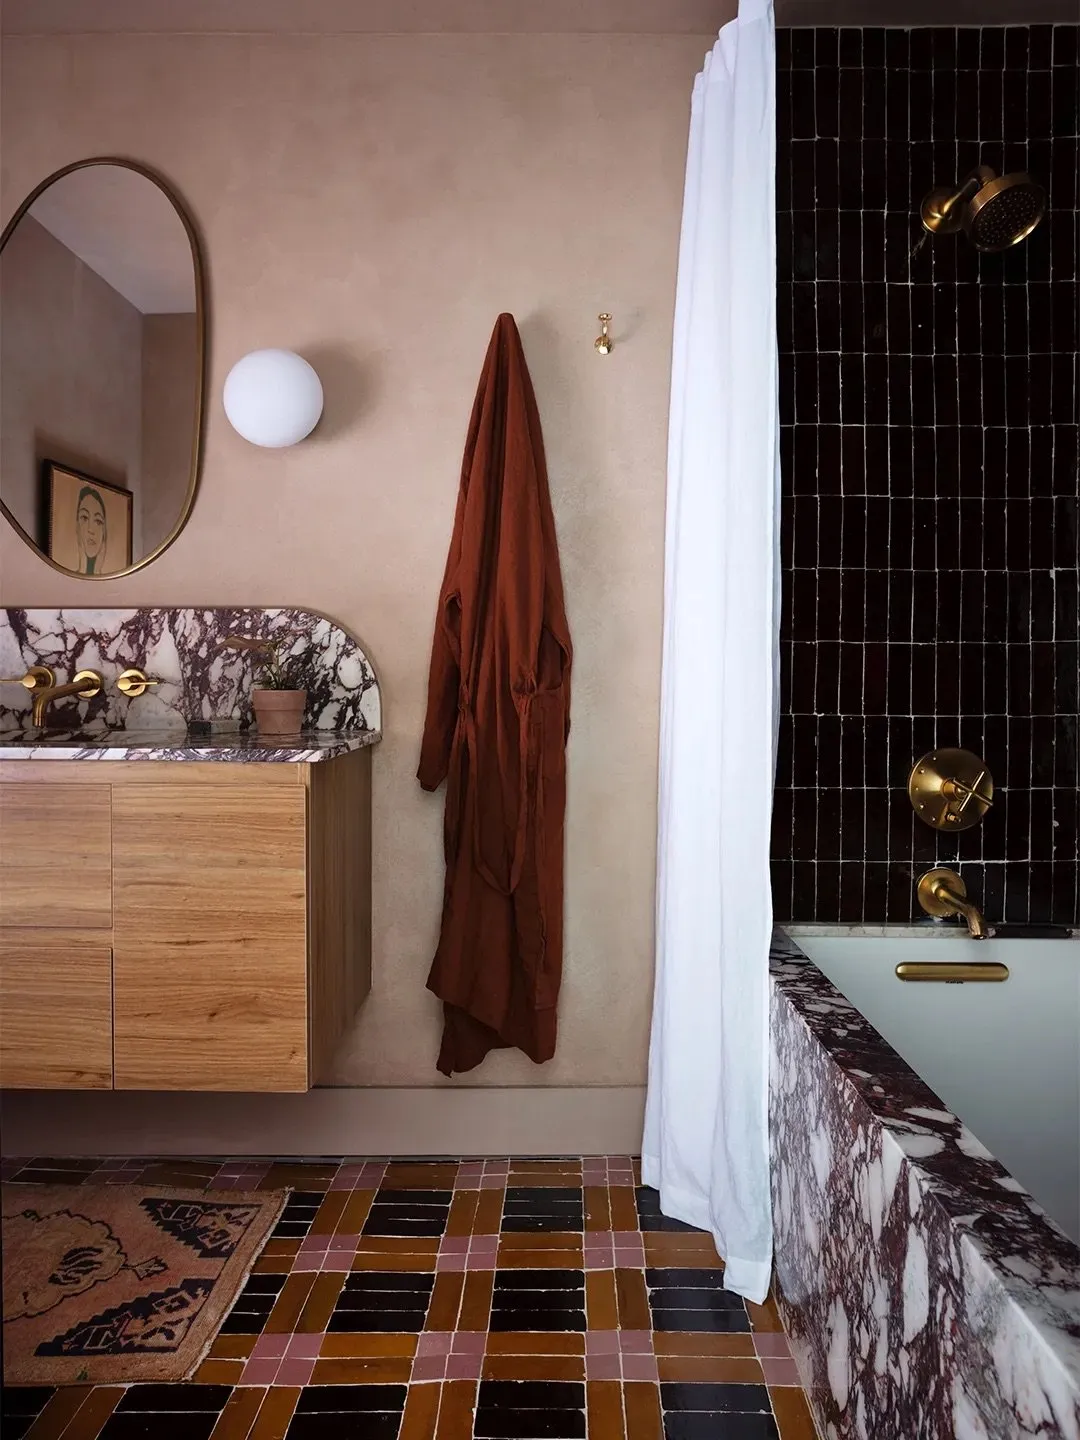
Bring Warm Color to a Striped Tile Floor
 SaveSupport Non AI Creator
Photography by Rett Peek; Design by Meet West Studio
Brown, black and pink rectangular tiles create a striped floor beside the timber vanity and pink walls. Narrow colored bands break up the darker blocks, while the strongly veined bath surround and countertop introduce a second pattern above the floor.
Compare the tile arrangement with a large sample of the veined surface before buying either material. Repeat a warm tone in the walls or towels to connect them. Keep other accessories simple, and check the full layout around the bath so the stripe pattern remains deliberate. To continue a warm palette above the floor, our pink bathroom tile ideas compare sink backsplashes, bath surrounds and shower walls.
IDEA 04 / 20
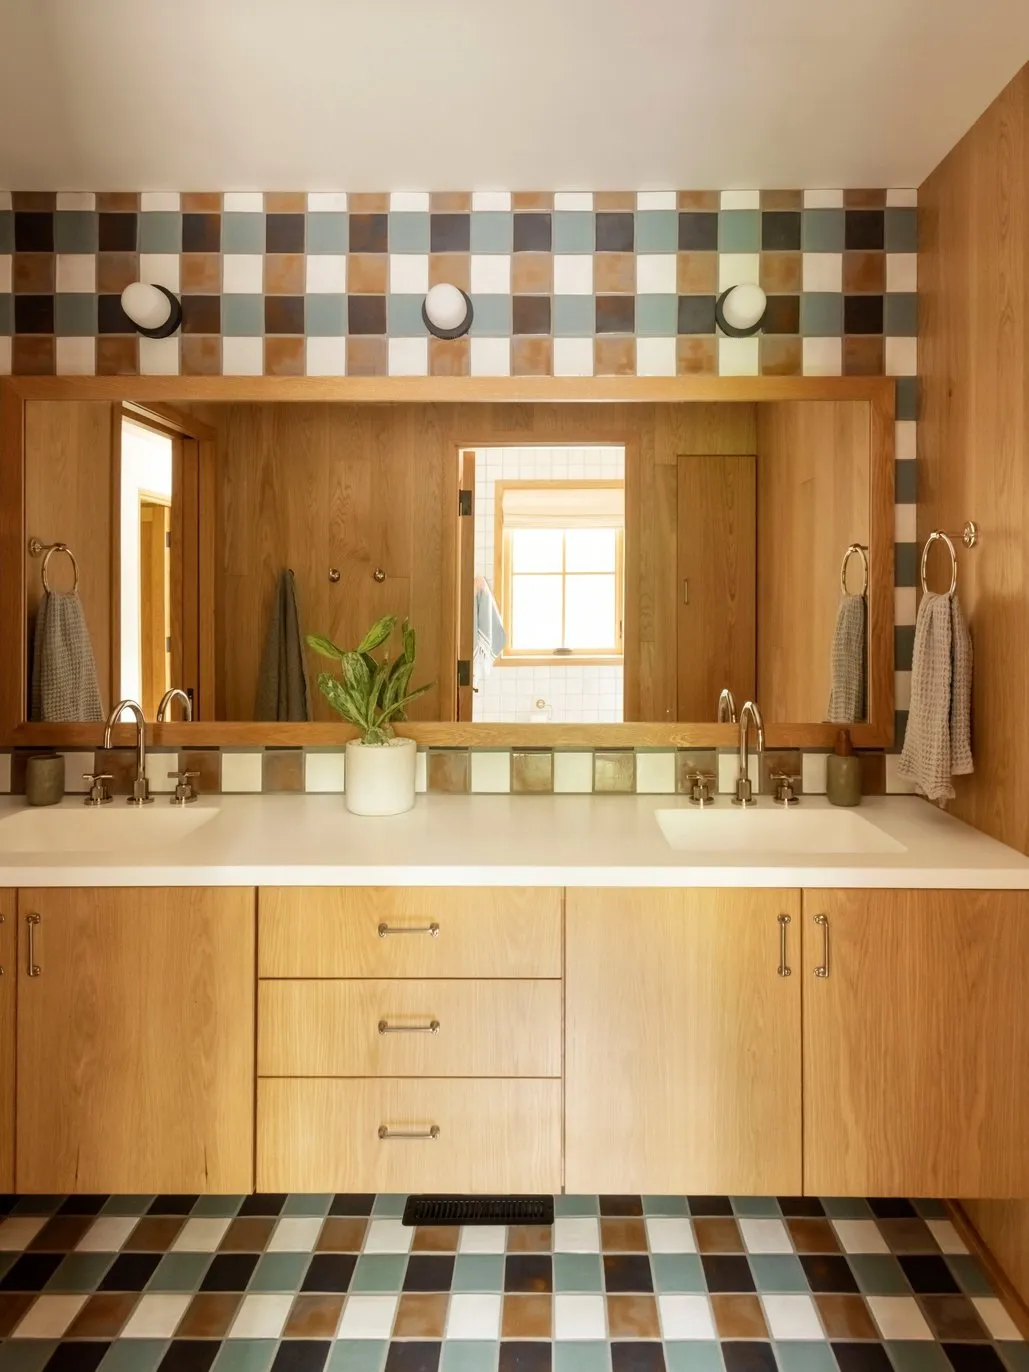
Repeat the Floor Pattern Sparingly
 SaveSupport Non AI Creator
Photography by Matthew Williams; Design by Prospect Refuge Studio
A checkered floor sits below a timber vanity with a related tiled band above the mirror. The small wall repeat connects the room without covering every surface. Warm timber separates the two areas of tile, so the motif reads as a repeated detail rather than one uninterrupted surface. The plain countertop gives the eyes a resting place.
Plan the wall band and floor as one composition. Keep the remaining walls quieter and assess each tile for the surface where it will be used. Sketch the band around the mirror and lights before setting its height. Check how much of the floor remains visible beneath the vanity so both areas receive a deliberate arrangement.
IDEA 05 / 20
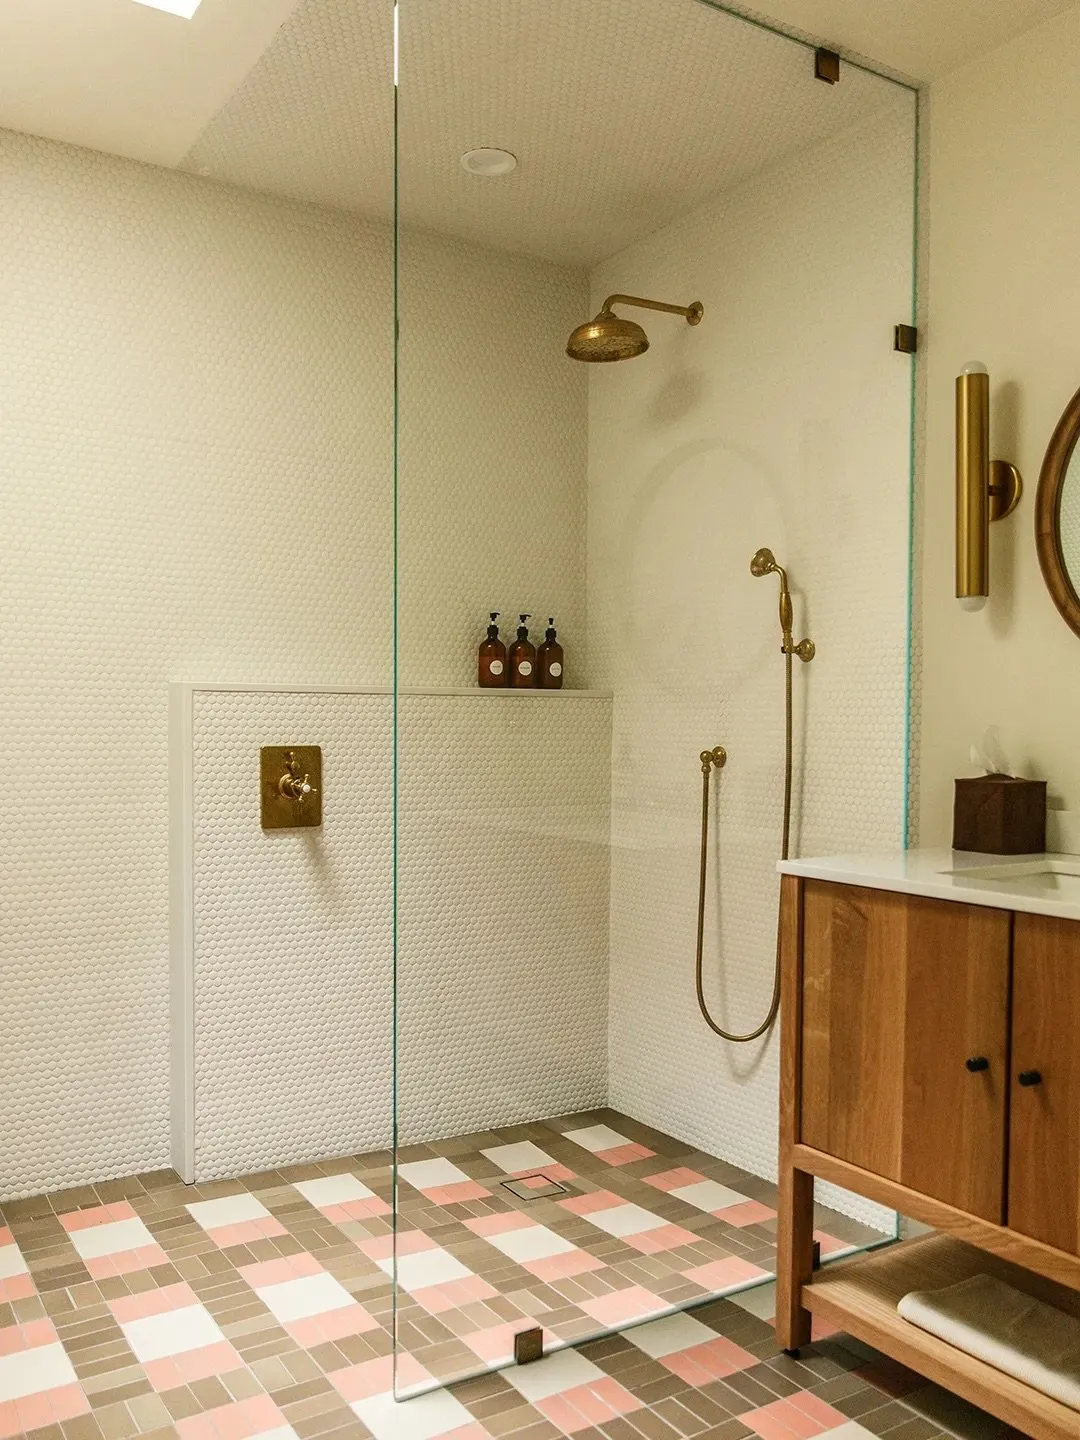
Use a Pale Multicolor Check
 SaveSupport Non AI Creator
Photography by Nikki Sebastian
Pink, brown and cream squares bring gentle color to the floor beside a timber vanity and clear shower screen. Smaller brown pieces break up the larger pale squares, while the light shower walls let the multicolor arrangement remain the main decorative detail.
View a full repeat under your bathroom lighting rather than judging one square by itself. Choose grout alongside the whole palette and check the product’s wet-floor suitability. A plain countertop and simple towels can help this detailed floor feel settled rather than crowded.
PART 02
Materials and texture
IDEA 06 / 20
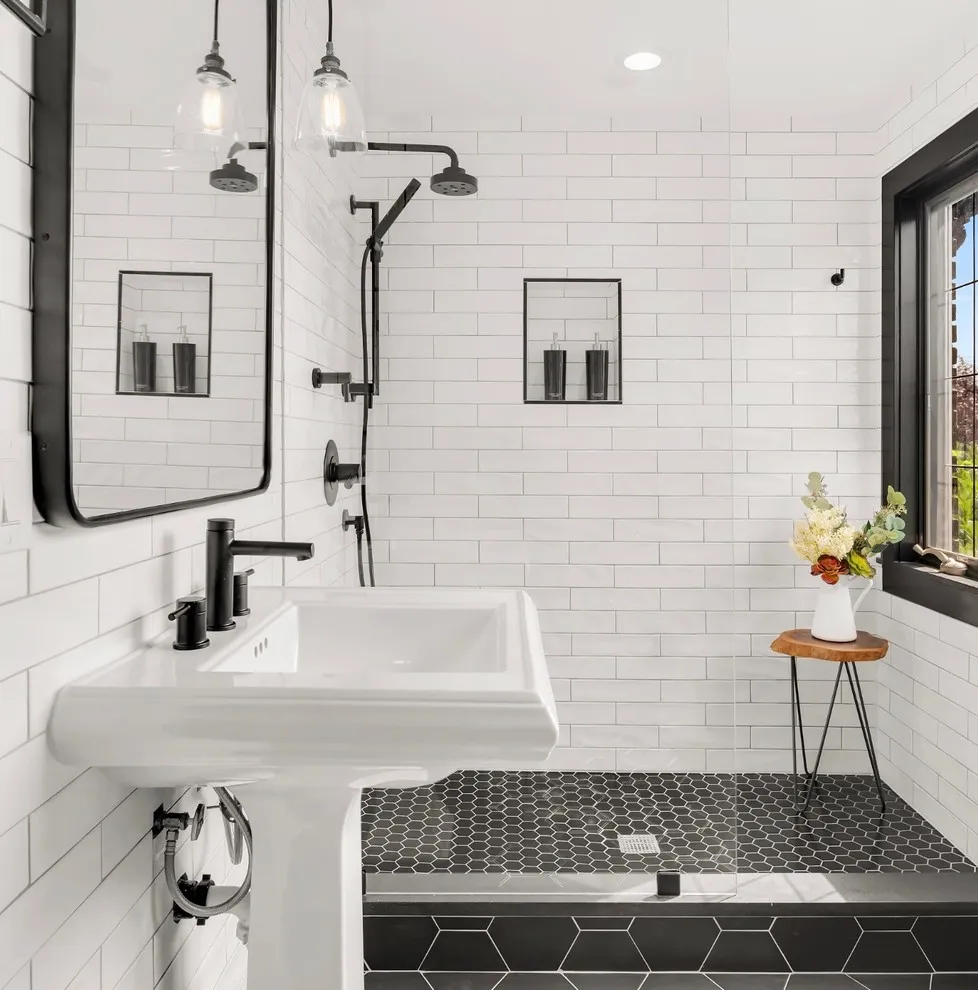
Mix Small Floor Tile With Larger Wall Tile
 SaveSupport Non AI Creator
Source: Tristan Gary Designs on Houzz.
Small dark tiles cover the shower floor beside white rectangular wall tiles. The difference in scale distinguishes horizontal and vertical surfaces. The shower uses small hexagons while larger dark shapes sit outside the threshold. Keeping the white wall tiles rectangular gives each surface a distinct role within the same simple palette.
Confirm the floor tile works with the shower slope and drainage plan. Choose grout that suits cleaning needs and use installation guidance specific to the selected products. Ask the installer how the chosen tile size will meet the drain and changes in level. Compare a grouted sample rather than judging loose pieces, because joint width changes the final appearance.
IDEA 07 / 20
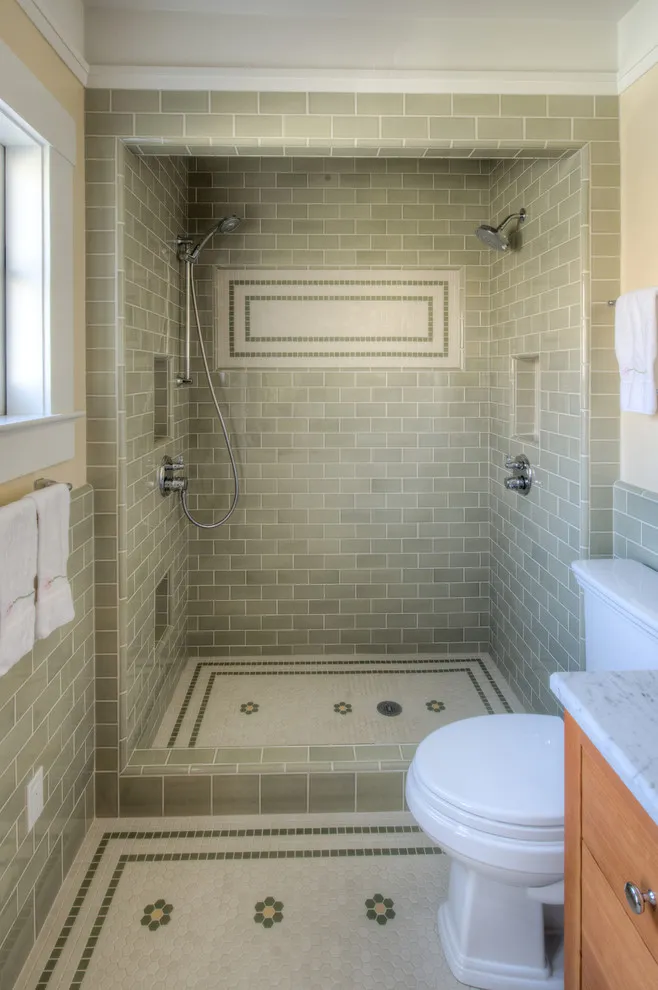
Frame a Mosaic Floor With a Border
 SaveSupport Non AI Creator
Source: Kirk E. Peterson & Associates on Houzz.
A pale mosaic shower floor contains small decorative motifs and a narrow border. The outline gives the compact floor a defined shape. Small flower-like motifs sit inside the border, adding decoration without covering the shower in a larger print. A related framed detail on the back wall ties the two surfaces together.
Plan the border around the drain and actual shower dimensions before laying tile. Keep the layout balanced and confirm that every component is suitable for wet flooring. Draw the arrangement using the finished shower measurements, including the threshold. Shifting the border slightly may give more balanced cuts, but its placement needs to suit the drainage layout as well.
IDEA 08 / 20
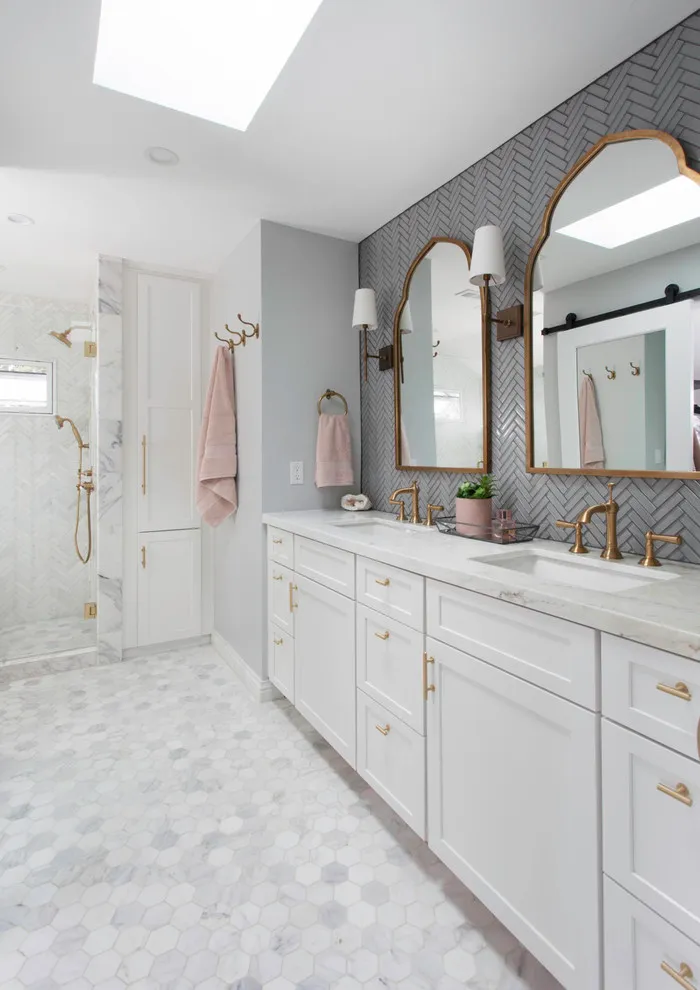
Keep a Pale Floor With Patterned Walls
 SaveSupport Non AI Creator
Source: Signature Designs Kitchen | Bath | Interiors on Houzz.
A light bathroom floor sits beside patterned walls and a long white vanity. The quieter floor gives the more detailed vertical surfaces breathing room. The pale hexagonal floor has gentle variation rather than a strong contrasting print. This lets the herringbone wall, arched mirrors and brass-colored fittings remain the most noticeable features.
Compare floor and wall samples together at full scale. Choose a floor finish for wet use rather than assuming that a matching wall material has the same specifications. Choose samples that include the floor’s lightest and darkest pieces, then place them beside the wall tile. A close grout match will help the gentle variation read as one surface.
IDEA 09 / 20
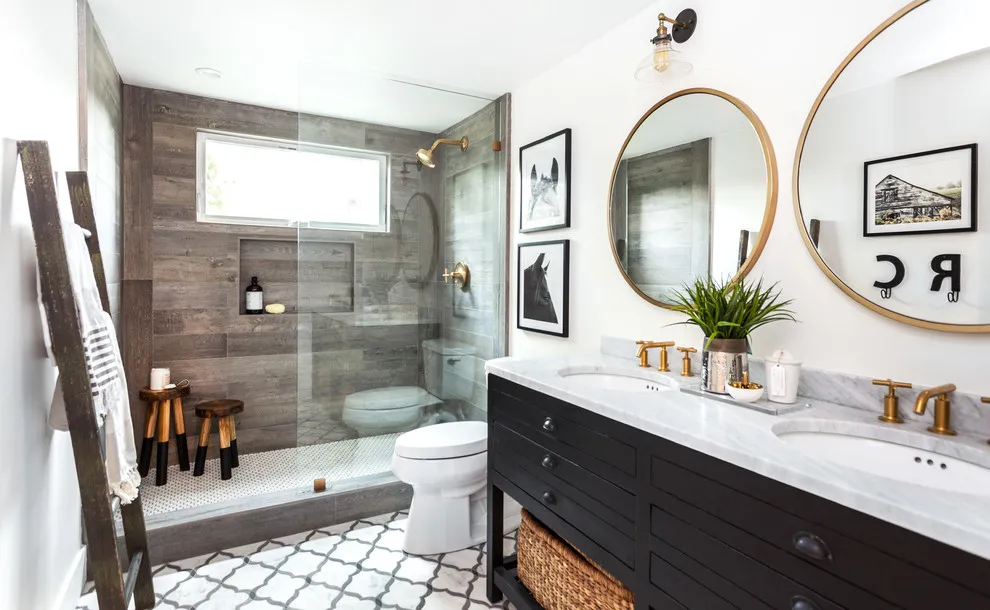
Use a Dark Trellis Outline
 SaveSupport Non AI Creator
Source: Juxtaposed Interiors on Houzz.
A pale floor with dark trellis lines sits beneath a long dark vanity and bright mirrors. The outline brings rhythm without a solid dark floor. The dark vanity and picture frames echo the outline beneath them, while the white countertop keeps the palette bright. The motif remains visible across the open strip of floor.
Plan cuts so the repeating outline remains balanced at the doorway. Keep surrounding patterns restrained and choose grout that supports the intended contrast. Check the repeat beside the toilet and shower step as well as at the doorway. Those interruptions can affect the balance more than the middle of the room, where whole tiles fit easily.
IDEA 10 / 20
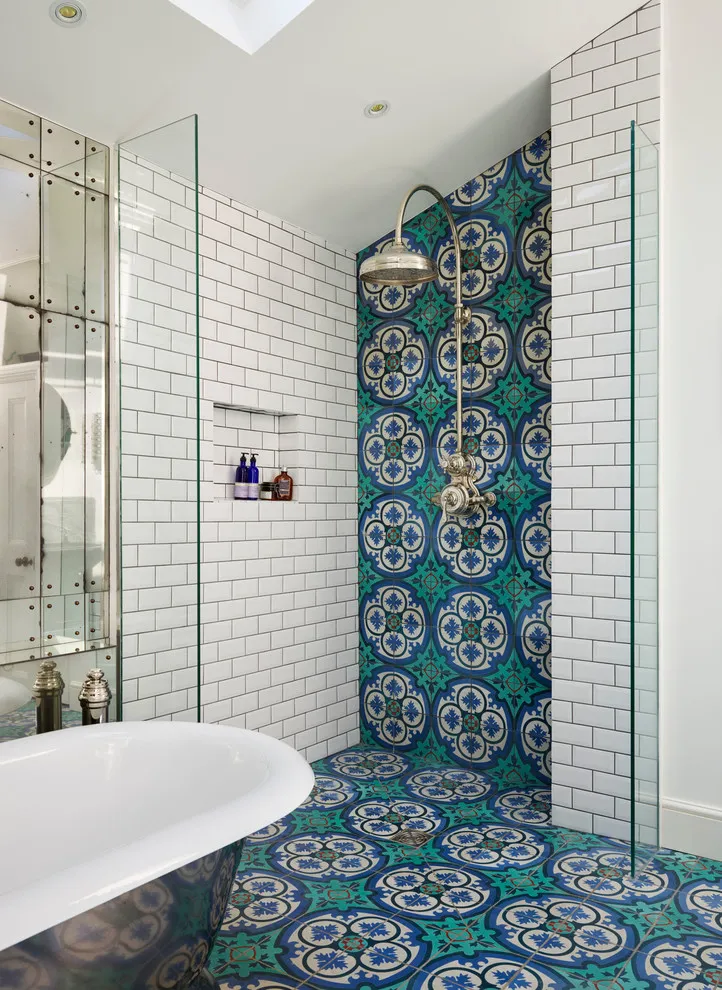
Carry a Bold Motif Into the Shower
 SaveSupport Non AI Creator
Source: Rustico Tile & Stone on Houzz.
Blue and green patterned tiles cover the floor and continue onto the shower’s back wall. The repeated motif makes the bathing zone the room’s main feature. White rectangular wall tiles provide a calm frame around the blue and green feature. The pattern becomes the connection between the shower’s vertical surface and the wider bathroom floor.
Check floor and wall specifications separately even when using related designs. Keep the remaining surfaces simpler and plan the pattern around corners and drainage. Lay several pieces together to check their orientation, especially where the wall meets the floor. Confirm the recommended cleaning products before choosing a finish with a detailed colored surface.
PART 03
Layout and everyday comfort
IDEA 11 / 20
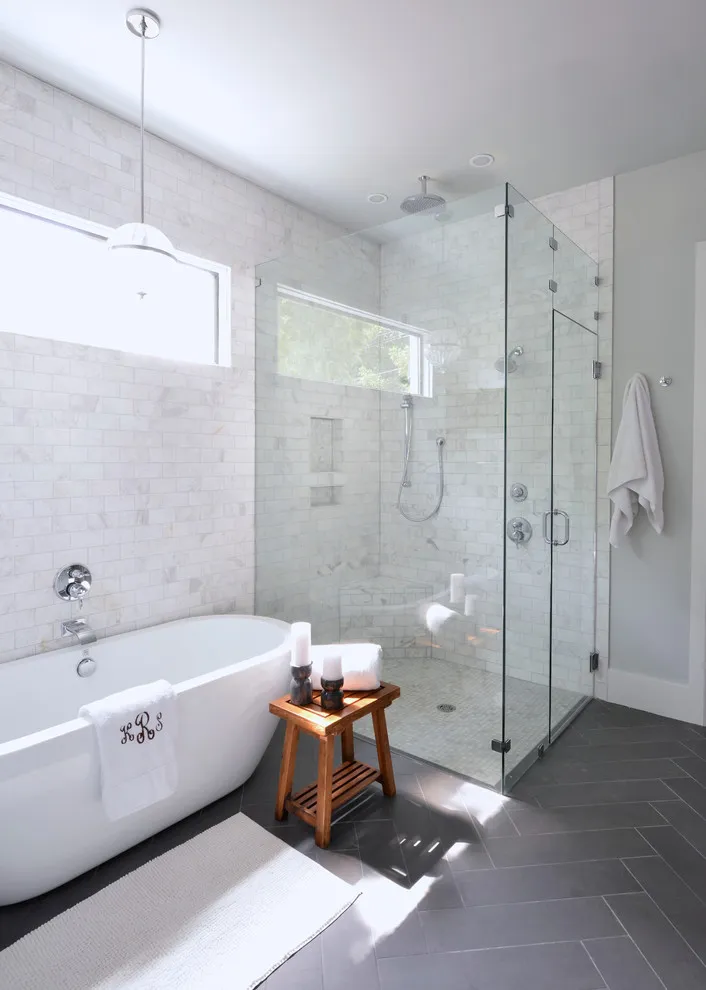
Use Dark Rectangular Floor Tile
 SaveSupport Non AI Creator
Source: Lilli Design on Houzz.
Dark rectangular tiles sit beneath a white freestanding bath and bright windows. The deeper floor gives the pale fixtures a clear base. The long dark tiles contrast with the white bath and smaller pale shower floor. Their staggered joints bring subtle movement without another decorative motif competing with the bright wall surfaces.
Look at the tile in both daylight and bathroom lighting. Check water-mark visibility, cleaning guidance, and wet-floor performance before choosing a dark finish. Try the laying direction on a room sketch before ordering quantities. Ask how the chosen size will meet the bath, shower threshold and doorway so small edge cuts do not dominate the finished floor.
IDEA 12 / 20
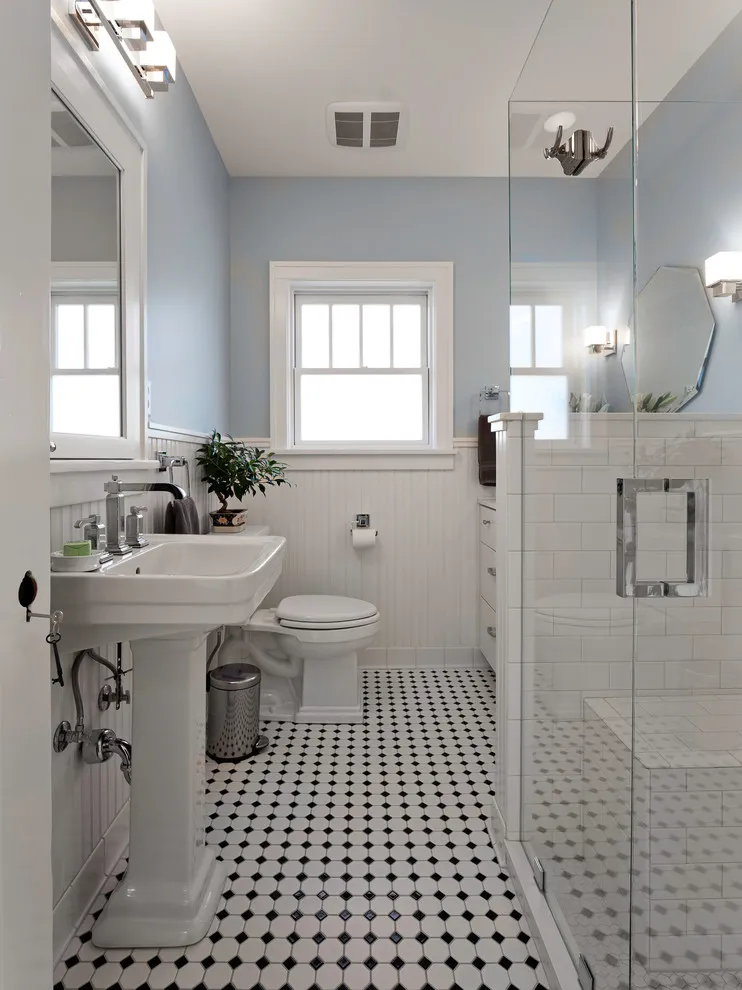
Choose a Small Black-and-White Grid
 SaveSupport Non AI Creator
Source: Christa Pirl Interiors on Houzz.
Small black-and-white tiles cover a narrow bathroom floor beneath a wall-mounted sink. The tight pattern supplies detail without another decorative wall treatment. Pale octagonal shapes and small dark inserts give the narrow floor an orderly rhythm. Because the sink is wall mounted, the pattern remains visible beneath it instead of disappearing under a cabinet.
Judge the pattern from standing height before installation. Plan cuts at the doorway and confirm a suitable grout and sealing routine for the chosen material. Look at the tile from the doorway as well as up close to judge the density of the contrast. Keep spare pieces from the same order for future repairs to this repeating arrangement.
IDEA 13 / 20
Keep the Floor Quiet Beside Veined Walls
 SaveSupport Non AI Creator
Source: Jaimie Nelson Design on Houzz.
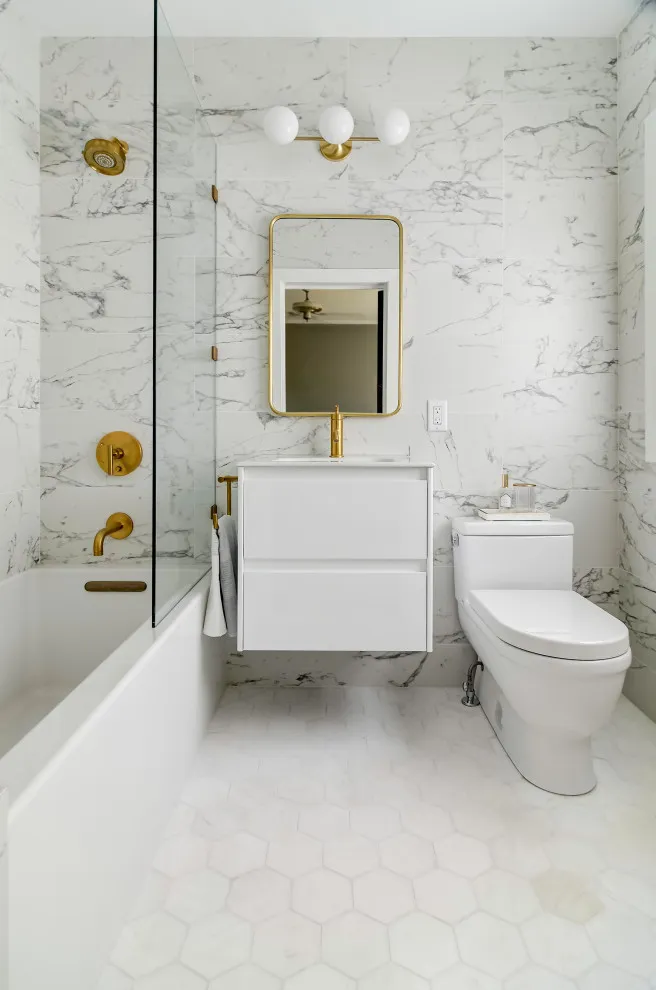
A pale floor sits beneath a compact vanity and strongly veined light walls. The restrained flooring lets the wall surfaces carry the pattern. The larger pale hexagons remain visible below the floating vanity without challenging the veining above. Gold-colored fittings repeat a warmer accent, keeping the nearly white room from feeling entirely uniform.
Compare a large sample of the veined wall material with the floor. Select the flooring for wet use and avoid adding another busy motif to a small room. Set the floor sample flat and the wall sample upright when comparing them. Their different angles catch light differently, so two materials that match on a table may look less related once installed.
IDEA 14 / 20
Try Larger Pale Hexagons
 SaveSupport Non AI Creator
Source: Hoffman Weber Construction on Houzz.
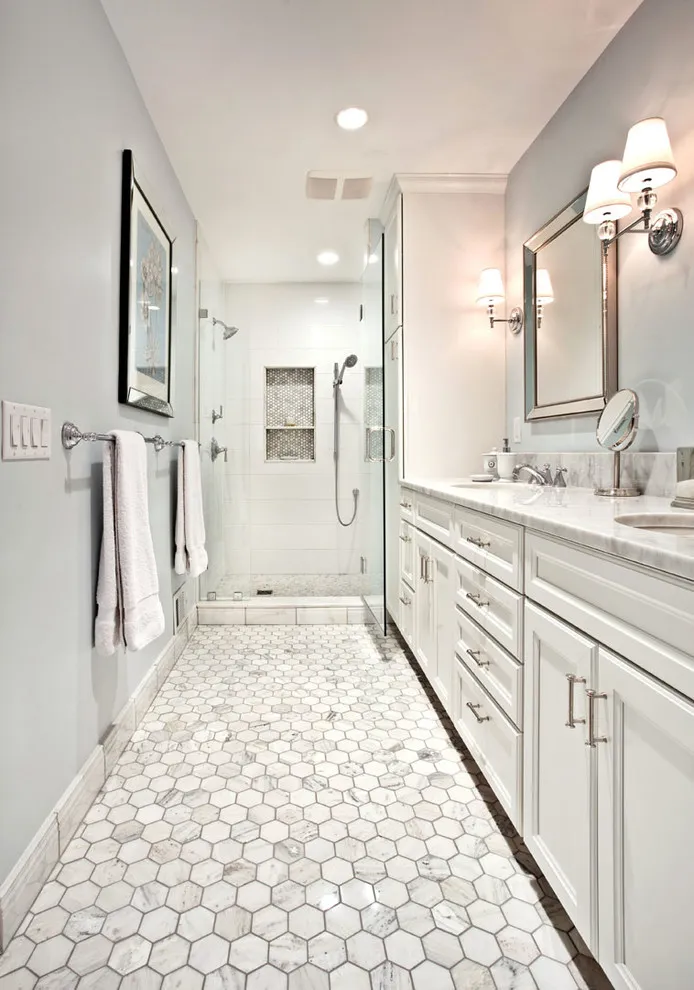
Pale hexagonal tiles cover the passage beside a long white vanity, with gentle variation adding interest to the quiet palette. A dark perimeter line outlines the floor against the cabinetry and walls, making the six-sided shapes easier to read from the doorway.
Lay out several tiles with the proposed grout before ordering, including pieces with different tones. Decide whether you want the joints to outline each hexagon or blend into the floor. Plan the perimeter and cuts together so the border stays balanced beside the cabinet run.
IDEA 15 / 20
Use Dark Hexagons for Contrast
 SaveSupport Non AI Creator
Source: JDL Development Inc. | Builders & Remodelers on Houzz.
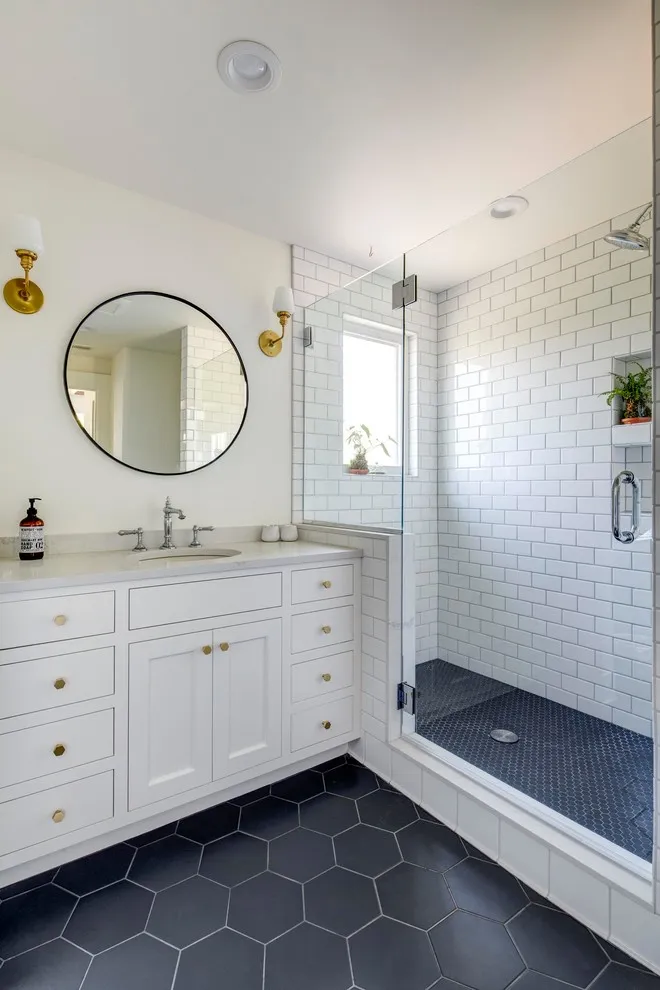
Dark hexagonal tiles sit beneath a white vanity beside a glass shower. The clear shape gives the pale room a stronger base. White cabinet fronts and wall tiles make the dark floor feel deliberate rather than gloomy. Smaller dark mosaic pieces in the shower repeat its color while adapting to a different area.
Choose grout with the intended pattern in mind: contrast outlines each tile, while a closer color makes the floor quieter. Confirm wet-area suitability and cleaning guidance. Compare a light and a darker grout sample before making the decision. Also ask how the larger hexagons will be cut beside the vanity and threshold, where their shape becomes most noticeable.
PART 04
Finishing details
IDEA 16 / 20
Define the Room With Gray Rectangles
 SaveSupport Non AI Creator
Source: YAMINI DESIGNS on Houzz.
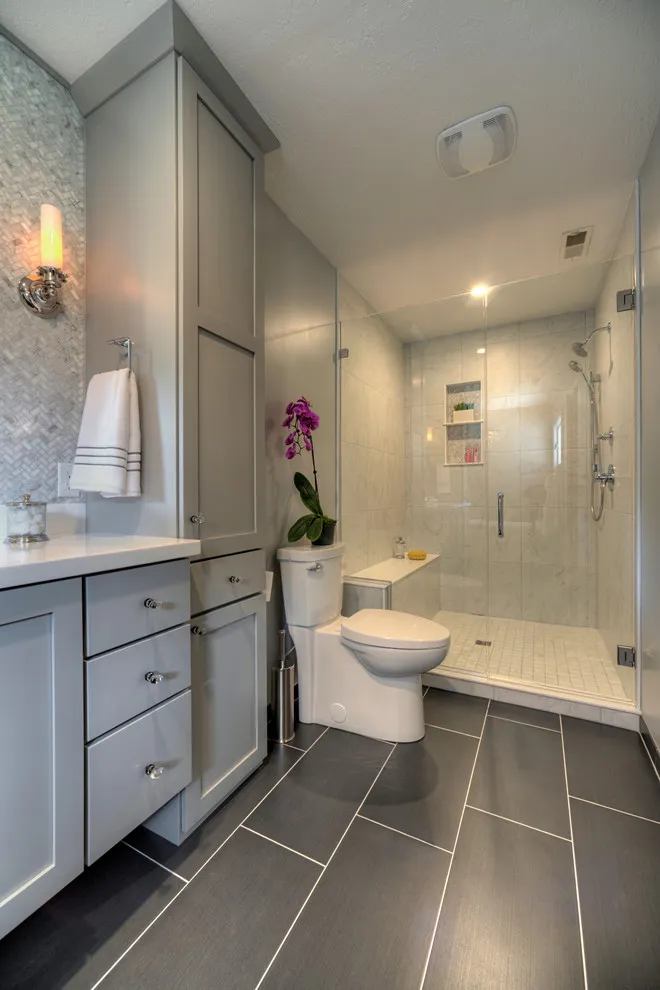
Large gray rectangular tiles cover a long bathroom floor below gray cabinetry. The repeated neutral tones connect the floor and vanity. A lighter shower floor separates the bathing area from the dark gray room floor. The tall gray cabinet repeats the neutral color while storing items vertically in this narrow bathroom.
Compare tile and cabinet undertones under the actual lights. Plan the laying direction around the room dimensions and check that cuts remain sensible near fixtures. Check the layout with the vanity footprint included, because much of the floor will be hidden by furniture. Keep a consistent joint arrangement through the visible passage rather than centering it on concealed areas.
IDEA 17 / 20
Use Gray Around a Freestanding Bath
 SaveSupport Non AI Creator
Source: Siberian Floors on Houzz.
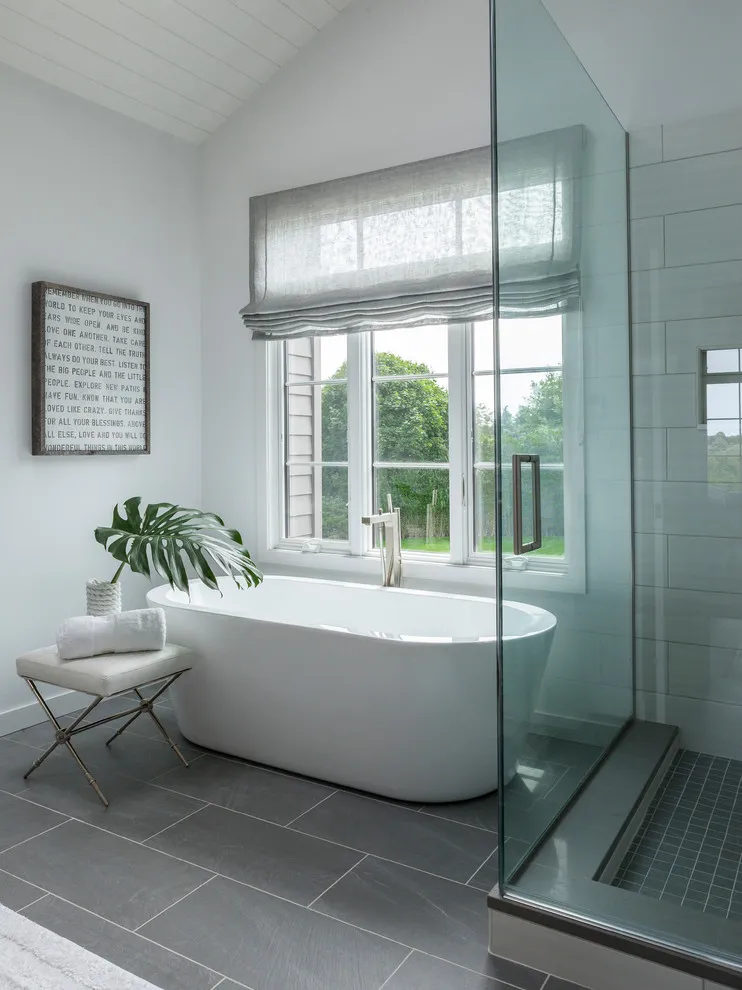
Gray rectangular floor tiles sit below a white bath beside a large window. The darker surface separates the bath from the pale walls. The rectangular floor tiles give the white bath a clear outline, while the window shade softens the bright end wall. Smaller shower tiles repeat the gray without copying the same scale.
Measure maintenance access around the bath before choosing its position. Confirm the floor material’s wet-use specifications and choose shading if direct sun creates glare. Allow enough room to clean beside and behind the bath, not just to step into it. Compare how the tile looks with water spots and use only the cleaning products recommended for its finish.
IDEA 18 / 20
Add Pattern Below a Timber Vanity
 SaveSupport Non AI Creator
Source: Maven Home Interiors on Houzz.
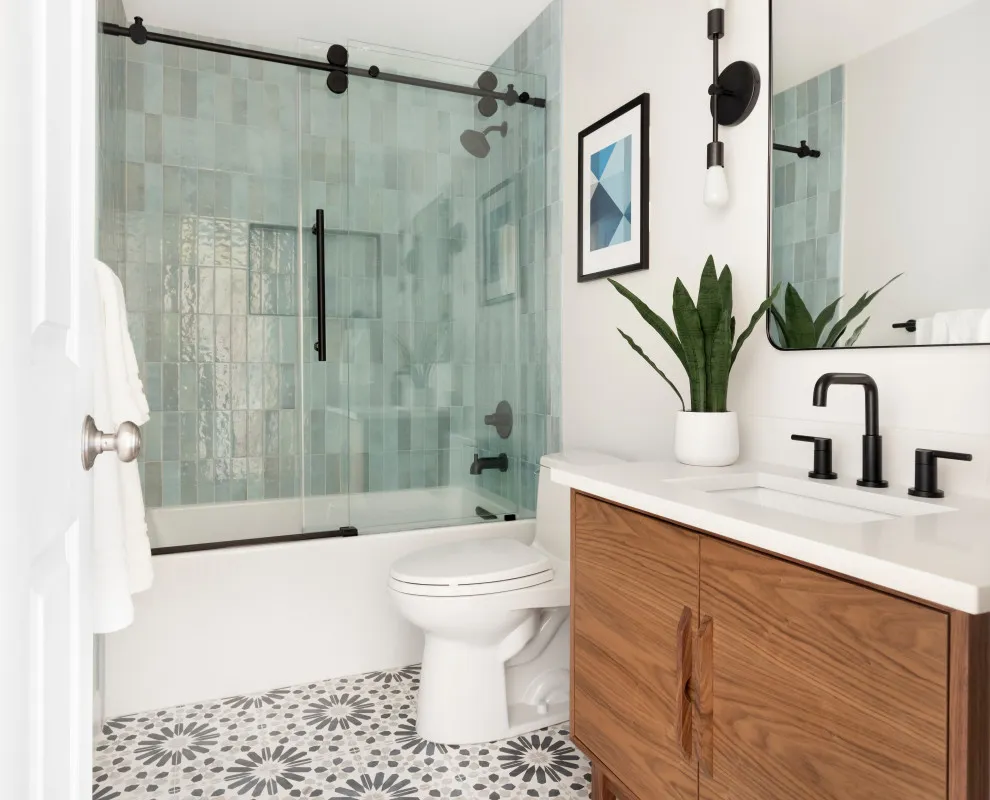
Black-and-white floral floor tiles sit beside a timber vanity and pale green shower tile. The floor gives the warm wood a graphic companion. Black fittings repeat the dark parts of the floral motif, and pale green wall tiles add a gentler second color. The timber cabinet keeps the compact room from feeling entirely graphic.
Compare all three finishes together before ordering. Keep the patterned floor as the main motif and confirm the product’s wet-floor suitability rather than judging only the photograph. Place the cabinet finish, green tile and a full floor repeat together when checking samples. Use plain towels and a simple shower screen if you want the floor to remain the main decorative feature.
IDEA 19 / 20
Outline a Small-Tile Floor
 SaveSupport Non AI Creator
Source: Michelle Dirkse Interior Design on Houzz.
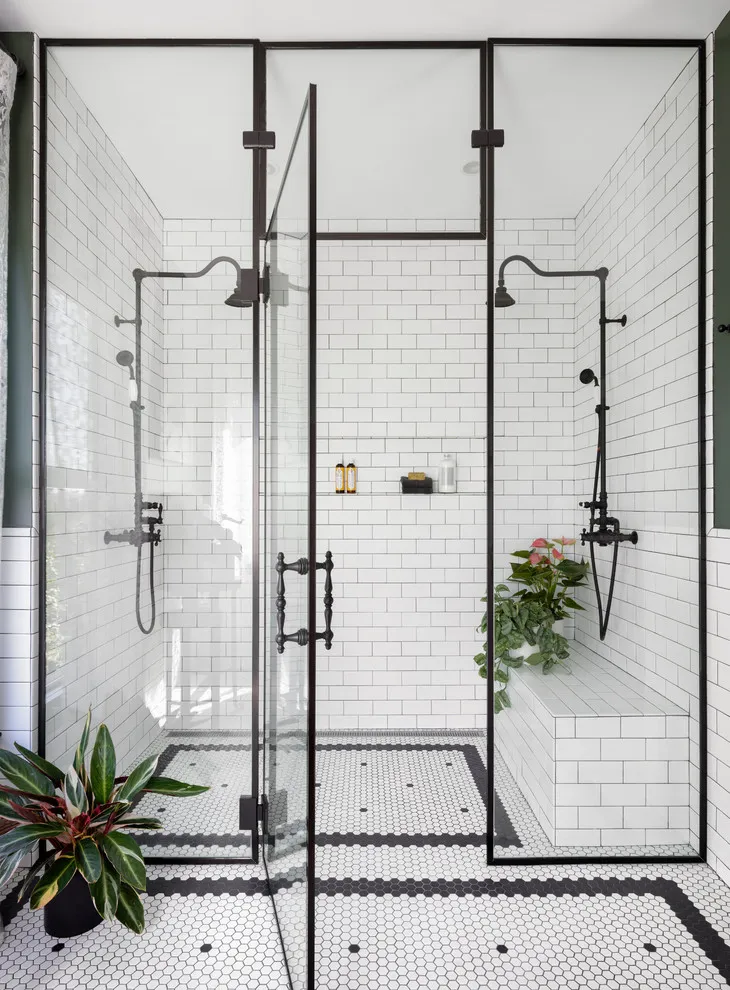
Small pale tiles with dark borders sit inside a black-framed shower. The floor outline repeats the strong lines of the enclosure. The black enclosure and dark mosaic border share a strong outline, while white wall tiles keep the shower bright. Scattered dark dots add detail within the quieter pale central areas.
Plan the border around the shower opening and drain. Check the whole installation system for wet use and keep the surrounding wall tile simpler. Set out the mosaic sheets before installation to check whether their joins show. Coordinate the border with the screen position so its lines look intentional when viewed through the closed shower doors.
IDEA 20 / 20
Use Repeated Geometric Outlines
 SaveSupport Non AI Creator
Source: Etch Design Group on Houzz.
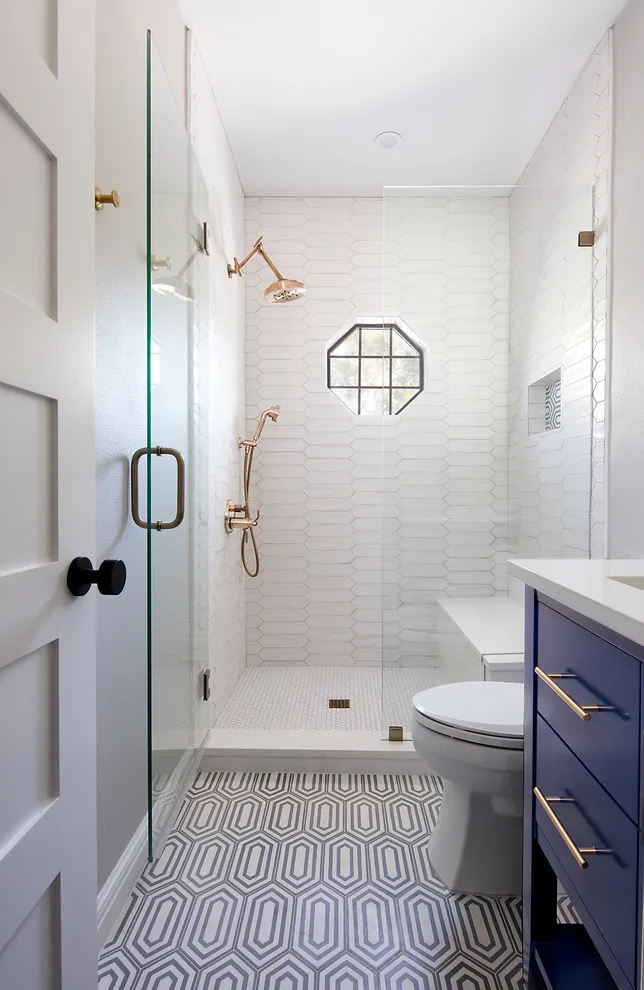
Repeated gray geometric outlines bring a bold pattern to the floor of this narrow bathroom. The blue vanity gives the room one solid block of color, while elongated pale wall tiles and a quieter shower floor keep the two bathing areas distinct.
Check a complete pattern repeat from the doorway before choosing tile quantities and grout. Plan the transition at the shower step so the geometric lines finish cleanly. Keep additional prints restrained, and confirm the selected floor tile’s wet-use specifications separately from the wall products.
BRING IT ALL TOGETHER
Choose a tile that suits the room and the water
Pick three tile samples and compare them beside the vanity, walls and fittings in daytime and at night. The right floor is the one whose pattern works at full-room scale and whose surface is suitable for the intended wet area.
Ask for written product information about floor use, cleaning and slip performance before installation. A beautiful tile is only a successful bathroom floor when its layout, drainage and maintenance make sense for the household.