IDEA 04 / 25
Let warm timber and terracotta provide the texture
 SaveSupport Non AI Creator
Photo credit: Petra Ford. Source: Apartment Therapy.
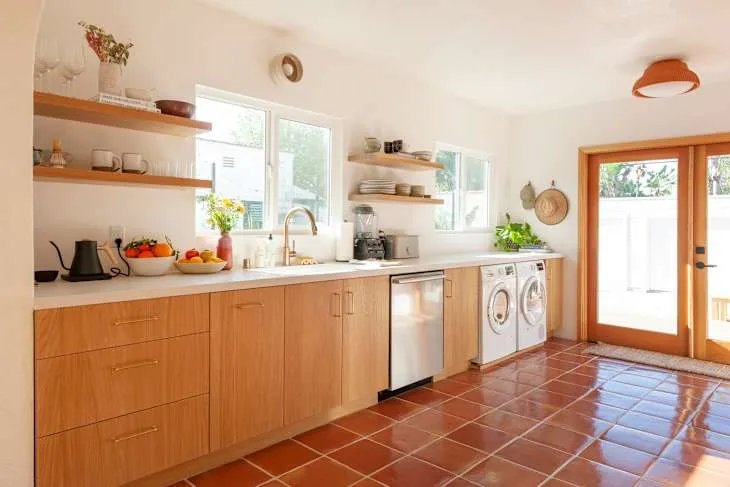
Natural timber looks fresh when it is paired with unassuming worktops. The timber cabinet fronts in this renovation introduce texture, while the white counter and wall keep the room from reading as a wood-heavy rustic set. The terracotta floor adds contrast without fighting the cabinetry. Open shelves continue the warm cabinet tone above the white work surface.
When choosing new wood-front doors, bring samples home and look at them beside the floor in daylight. An orange-leaning timber and a cool gray floor may compete; repeating a warm note in the hardware, tile or stool legs can tie them together. Let the grain be the decoration instead of adding distressed finishes. Leave room to open appliance doors fully along the shared cabinet run.
The most inviting boho farmhouse kitchens balance comfortable, everyday function with natural textures and personal details. Think well-made cabinets, warm timber, collected ceramics and lighting that suits the way you cook, eat and gather.
These kitchens show how to bring that relaxed character into your own space. Each photograph highlights one specific idea, with useful advice on materials, storage, upkeep and the small decisions that make a difference.
PART 01
Colors & materials
Choose one or two natural finishes to lead the room. Muted cabinet colors, honest wood grain and simple tile are easier to live with than a collection of competing effects.
IDEA 01 / 25
Let sage cabinetry set the relaxed farmhouse tone
 SaveSupport Non AI Creator
Photo credit: Sheryl Sanders. Source: Apartment Therapy.
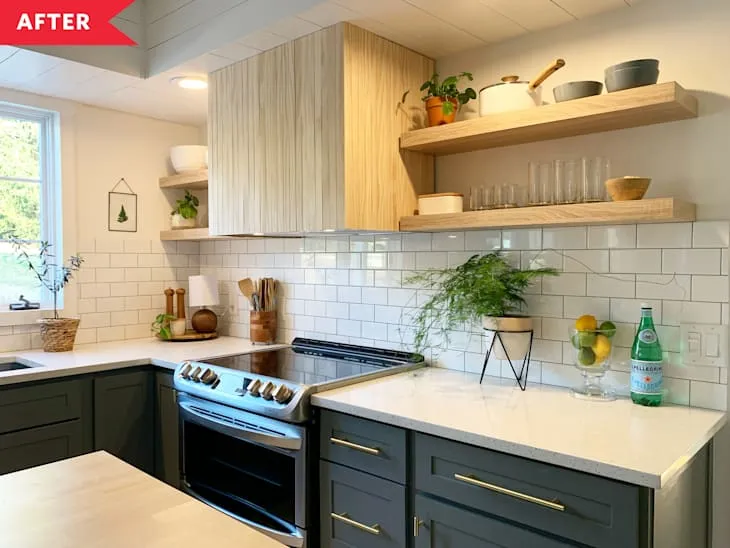
The muted-green cabinets, warm timber shelves and white tile in this finished kitchen are an effective starting point for a boho farmhouse look. The wood adds texture, while the light backsplash keeps the cooking wall calm and easy to wipe down. Instead of relying on themed ornaments, the room feels personal through materials you can use every day. Long gold-toned pulls connect the drawers with the quieter cabinet fronts.
For a similar result, test sage and gray-green samples beside your actual countertop and floor before painting cabinets. Start with a functional storage layout, then add one timber detail, such as floating shelves or a chopping board, to carry warmth across the space. Open shelving should be securely mounted and placed where grease will not become a constant cleaning problem. Keep shelf brackets and fixings suitable for the wall beneath the tile.
IDEA 02 / 25
Layer warm timber and rattan against muted cabinetry
 SaveSupport Non AI Creator
Photo credit: Sheryl Sanders. Source: Apartment Therapy.
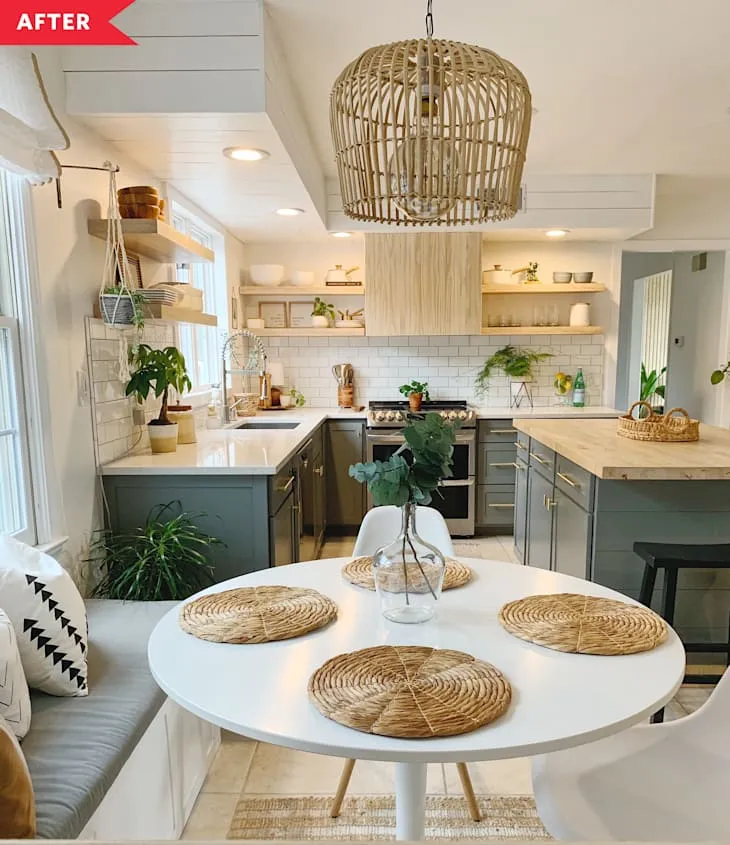
Start with a restrained foundation: warm white or soft cream on the walls, muted olive or sage on the cabinets, and a medium-toned wood for the worktops or furniture. The kitchen in this photograph shows how green cabinetry can provide color without making the room feel busy. In a small space, use green on the lower units and a lighter finish above so the eye travels toward the ceiling rather than stopping at a solid block of color. The woven shade and round placemats repeat texture at two different heights.
Test paint swatches on two cabinet doors or boards before committing. Check them in morning daylight and again with the evening lights on; gray-green paint can shift noticeably under cool LEDs. If your cabinets are sound, painting the fronts and changing the hardware is usually less disruptive than replacing the entire carcass. For a more traditional direction, our warm wood kitchen ideas explore similar rustic foundations. Allow enough room behind dining chairs before deciding to enlarge the island.
IDEA 03 / 25
Refresh sage cupboards with small brass details
 SaveSupport Non AI Creator
Photo credit: Zoë Schulz. Source: Apartment Therapy.
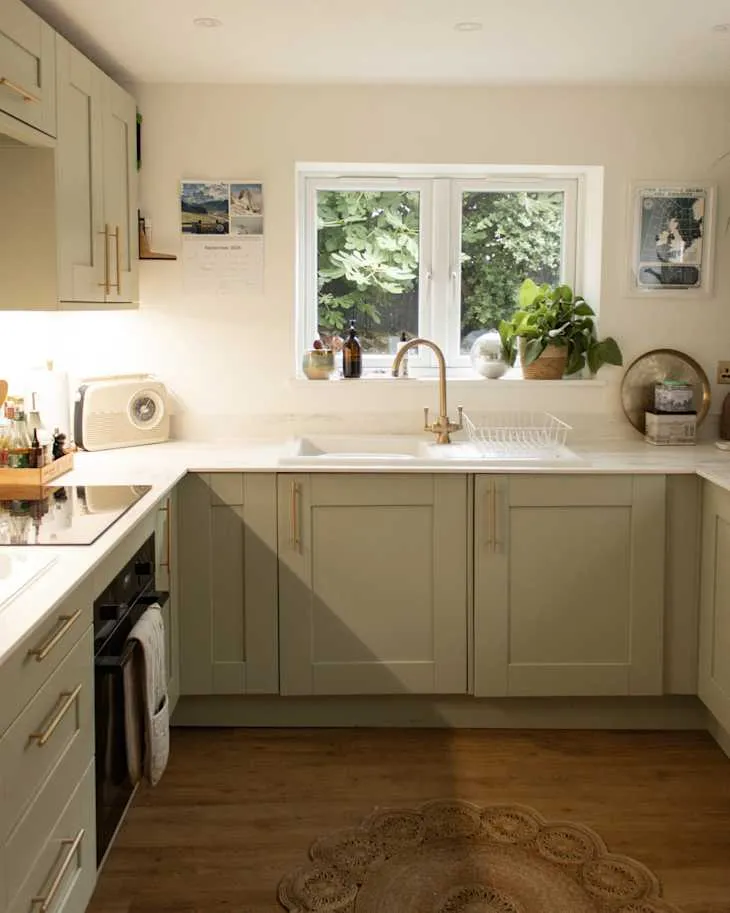
Here, soft sage cabinet doors give a functional U-shaped kitchen its personality while the white counters keep the room bright. The brass handles are small, repeated accents; they do not need to match the kettle, rack, and every other metal object in sight. The sink window leaves the pale counter bright and largely open.
To borrow the look, put three potential paint colors next to your actual countertop rather than judging swatches in isolation. Check how the shade changes beside flooring and daylight. Even when a finish looks subtle in photographs, the undertones may be much stronger in your space. Keep plant pots on trays so watering does not mark the countertop.
IDEA 05 / 25
Keep the cooking wall simple with handmade-look tile
 SaveSupport Non AI Creator
Photo credit: Petra Ford. Source: Apartment Therapy.
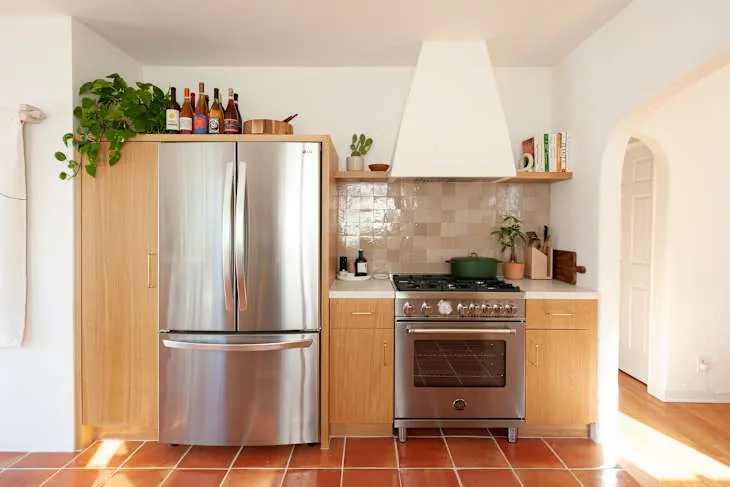
This cooking wall demonstrates how a streamlined extractor hood can become an architectural feature without feeling overly decorative. Warm cabinetry frames the stainless range, while lightly irregular backsplash tile gives the wall enough surface character for a collected look. The pale hood stands out without a contrasting paint color.
If your renovation budget is limited, put money into sound ventilation, easy-to-clean surfaces and good task lighting before custom hood shapes. A similar visual balance is possible with a simple vent hood surround and a handful of wood or ceramic accents elsewhere in the room. Confirm any hood enclosure follows its required ventilation and clearance specifications.
PART 02
Shelves & everyday storage
The best-looking shelves hold things that actually belong in your kitchen. Build the layout around daily use, then leave enough room for cleaning and movement.
IDEA 06 / 25
Give open shelves a practical everyday purpose
 SaveSupport Non AI Creator
Photo credit: Sheryl Sanders. Source: Apartment Therapy.
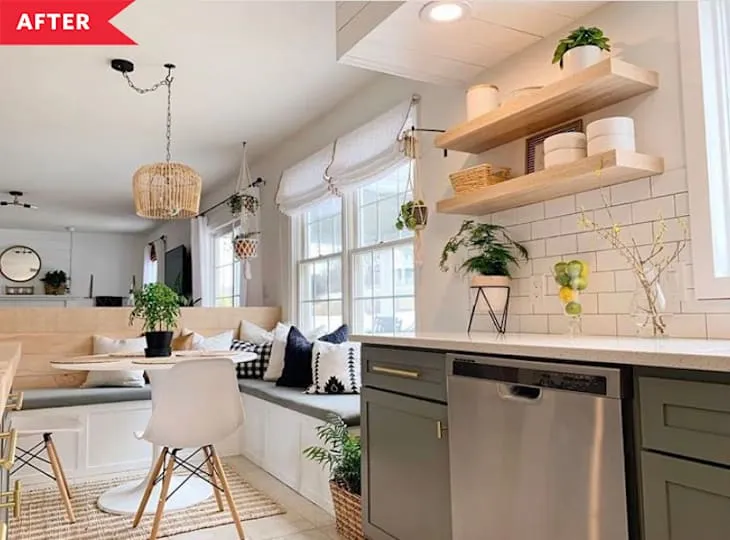
The most useful open shelving holds items that are reached for every day: mugs, water glasses, cereal bowls, and jars of dry ingredients. In this kitchen, wood shelves, crockery and greenery create a pleasant mix of heights and textures. Repeating a material, such as white ceramics or clear glass, prevents the arrangement from feeling like unrelated objects gathered on a wall. A fitted dining bench makes the bright window corner useful beyond cooking.
Do not sacrifice storage just to achieve the look. Keep upper cabinets for infrequently used items and introduce one or two open shelves where they genuinely improve access. Mount shelves into suitable wall structure using hardware rated for the fully loaded weight, and avoid crowding them next to a range where cooking grease will accumulate. Leave a little empty space so shelves can be cleaned easily. Choose removable bench covers if this seat is used for everyday meals.
IDEA 07 / 25
Mix reclaimed-style shelves with jars and hanging mugs
 SaveSupport Non AI Creator
Photo credit: Zoë Schulz. Source: Apartment Therapy.
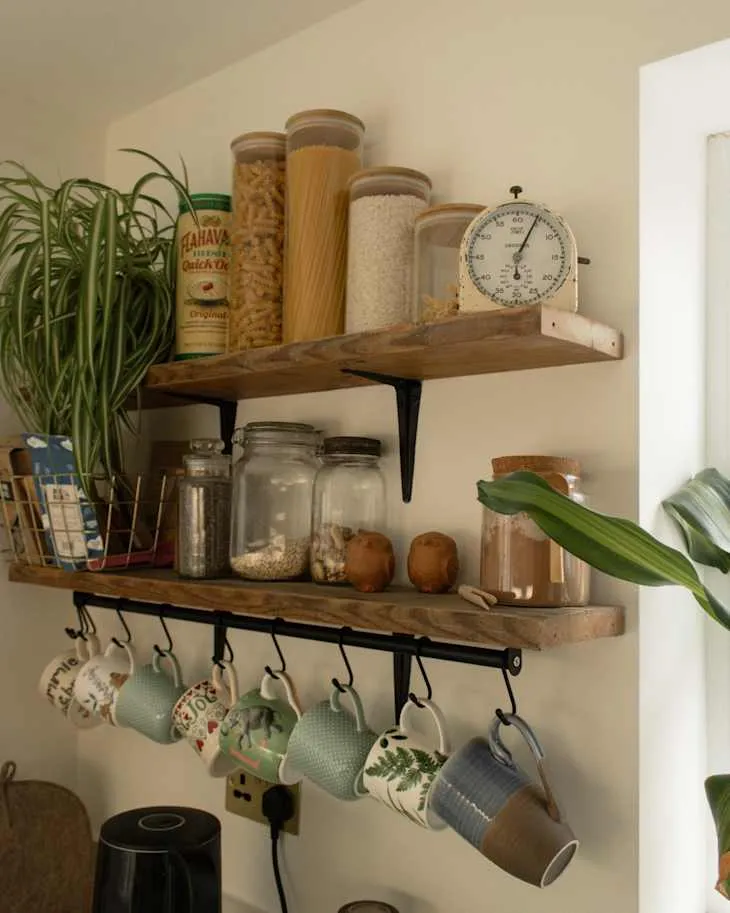
These reclaimed-style shelves mix useful storage with a little character: dry goods in jars, mugs hanging beneath, and plants that soften the hard corners. The timber grain supplies the farmhouse feeling while the colorful mug collection adds a relaxed bohemian note. The black brackets and mug rail give the shelves a consistent outline.
Use the front edge of a shelf for items you reach for often, with seldom-used containers tucked farther back. Keep heavy jars on lower or sturdier surfaces, avoid installing shelves over intense cooking heat, and wipe down exposed storage routinely so the styling stays practical. Test the mug spacing with your largest handles before installing the hooks.
IDEA 08 / 25
Build a coffee station around your daily routine
 SaveSupport Non AI Creator
Photo credit: Sheryl Sanders. Source: Apartment Therapy.
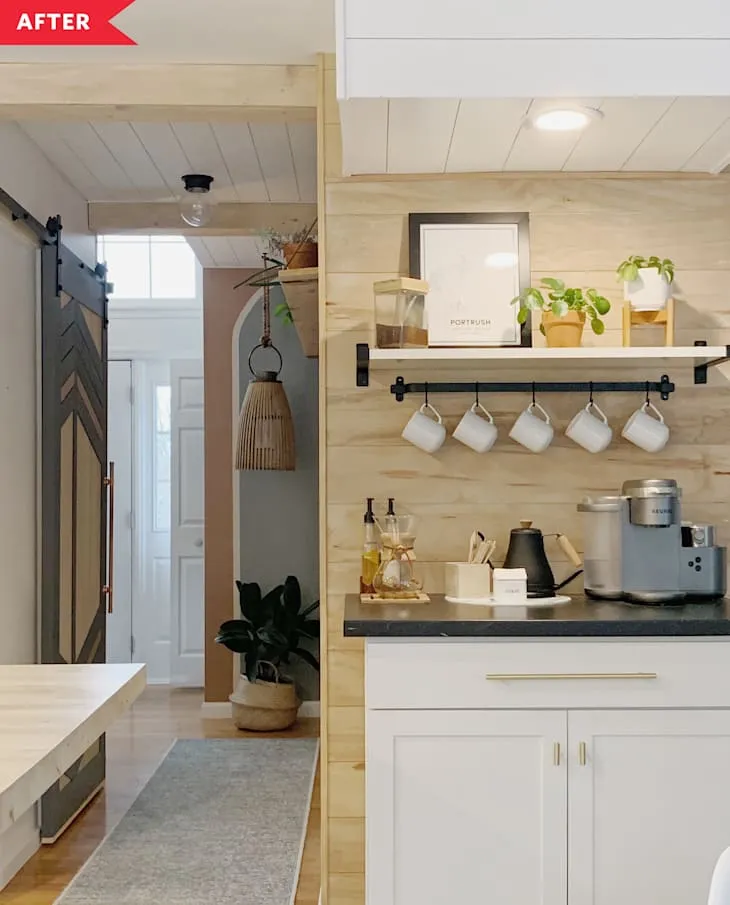
A dedicated coffee station is an easy way to make a busy kitchen feel more collected. In this photograph, a narrow open shelf displays hanging white mugs and a few small plants, while the countertop below holds the coffee machine and daily essentials. The restrained display works because every object has a role. The pale wood wall and black rail give it warmth without needing ornamental signs or clutter. Enclosed drawers below the counter keep less attractive supplies out of sight.
Build the same idea around where you actually make drinks. Keep mugs, filters, coffee and tea within one step of the appliance, leaving a clear landing zone for hot cups. A wall-mounted mug rail can free up counter space, but secure it into appropriate framing or wall anchors and allow enough clearance so handles do not collide. If your kitchen is narrow, a slim shelf above a low cabinet is often more practical than a full-height coffee cupboard. Leave space above the machine for filling and removing its water reservoir.
IDEA 09 / 25
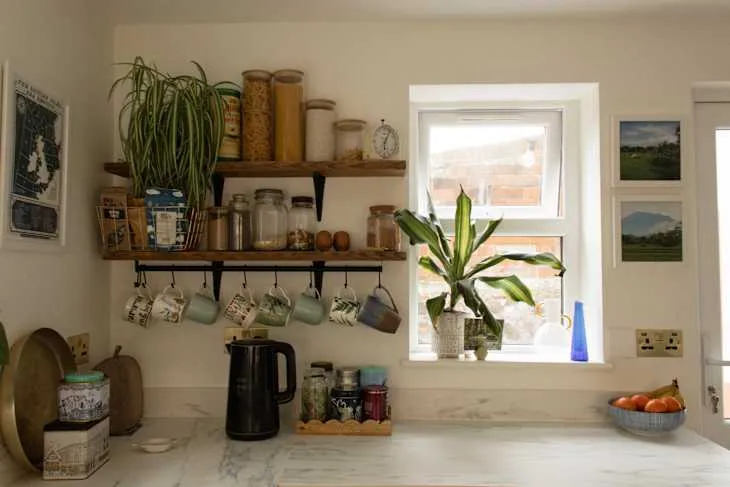
Turn a pantry corner into useful visible storage
 SaveSupport Non AI Creator
Photo credit: Zoë Schulz. Source: Apartment Therapy.
A well-used kitchen can be attractive precisely because everyday objects are visible. In this corner, mugs hang from a rail beneath rustic timber shelves and jars sit close to the counter where they are needed. The arrangement has purpose rather than appearing styled solely for a photograph. A small window separates the mug collection from the adjacent wall pictures.
Try grouping breakfast or drink-making supplies into one zone. Hang only cups that tolerate repeated handling, check that hooks cannot slip off their rail, and keep delicate items away from busy door swings. The aim is fewer steps when making tea, not a display that takes ten minutes to tidy. Keep the kettle cord clear of the sink and counter edge.
IDEA 10 / 25
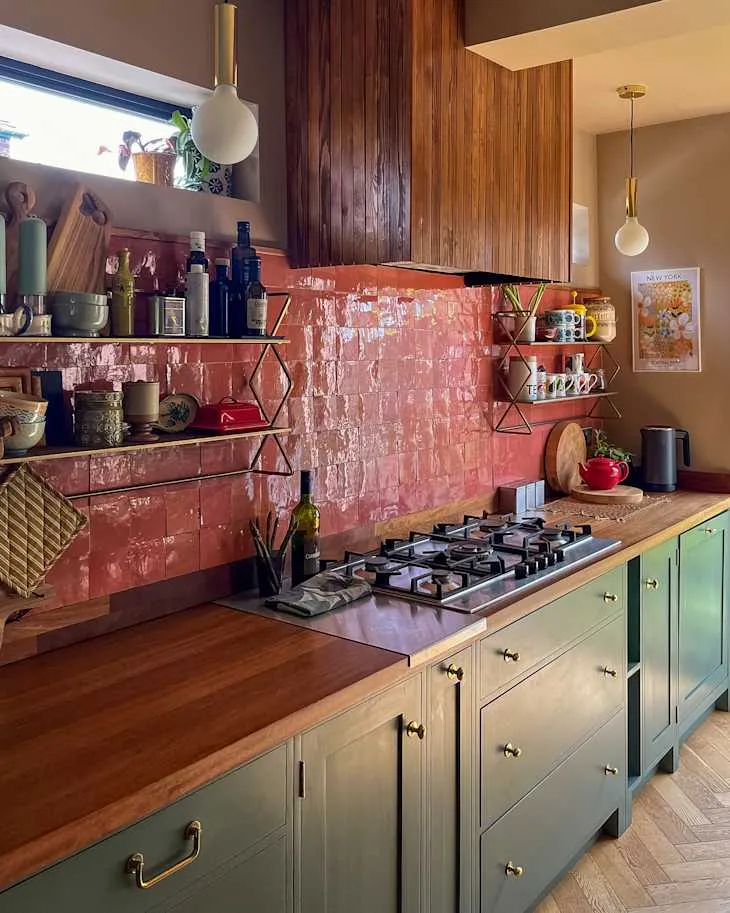
Display collected crockery without overcrowding
 SaveSupport Non AI Creator
Photo credit: Ella Moore. Source: Apartment Therapy.
The narrow shelves in this close-up show how varied crockery can look intentional. Patterned mugs, bowls and small jars make a lived-in collection, but their heights are staggered and the bulkier cutting boards stay close to the work surface rather than filling the shelf above. The reflective pink wall creates a warm backdrop for the varied collection.
Try organizing display shelves by use before styling them by color: group drinking vessels together and store the heaviest ceramics low. Then edit the mix so one material or color appears more than once. Avoid crowding the area around a hot cooktop, where oil splashes and steam make open storage harder to maintain. Keep regularly used mugs reachable without stretching over the cooking surface.
PART 03
Pattern & personal texture
Pattern does not have to mean visual clutter. A handcrafted tile, familiar texture or meaningful object can do more than an entire shelf of decorative purchases.
IDEA 11 / 25
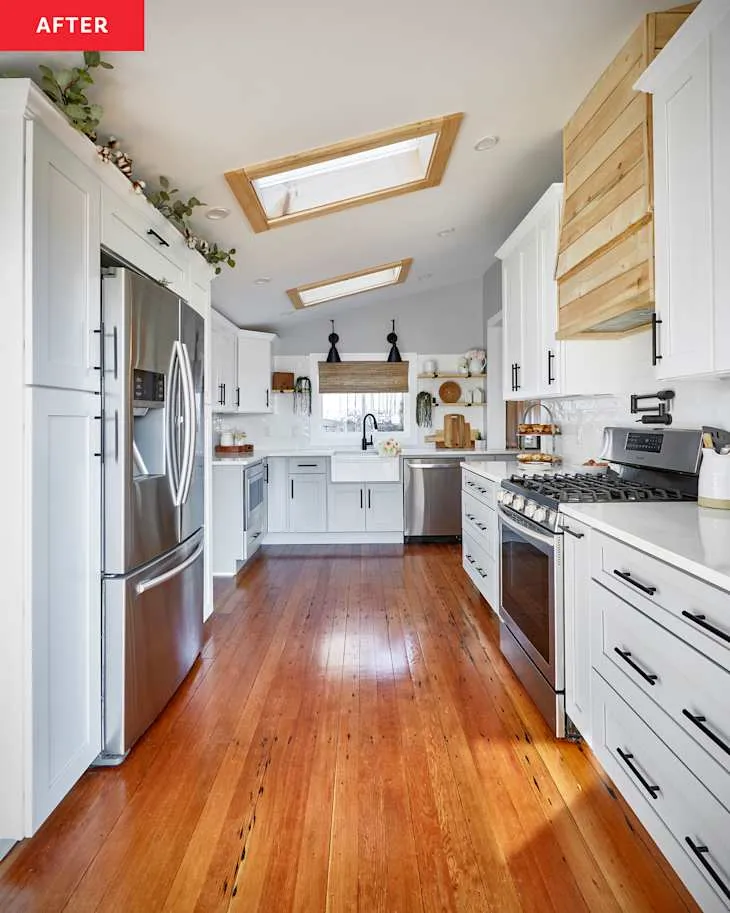
Balance a white backdrop with genuine natural texture
 SaveSupport Non AI Creator
Photo credit: Erin Derby. Source: Apartment Therapy.
This kitchen shows how a quiet base can make real materials stand out. The white cabinetry recedes so the aged floorboards, rough timber hood and skylight frames give the room a sense of history. The layout still feels contemporary because the work surfaces and storage lines are straightforward. Black handles and fixtures supply small repeated accents against the white fronts.
If you like both farmhouse warmth and Scandinavian simplicity, let one or two natural materials carry the story. You do not have to distress new cabinet fronts to create character. Keep visual noise low at eye level and introduce an interesting weave or grain at floor level or around a window. Preserve easy access to the skylight controls when arranging the upper shelves.
IDEA 12 / 25
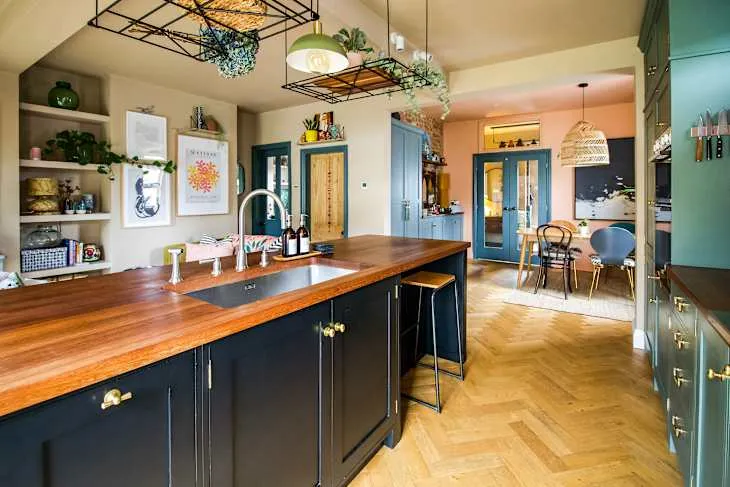
Allow one personal feature to create character
 SaveSupport Non AI Creator
Photo credit: Ella Moore. Source: Apartment Therapy.
The character of this kitchen comes from deliberate variety: a substantial timber island, green cabinets, a patterned art print and informal display shelving. Because the strongest pieces are distributed rather than crowded together, the room feels collected instead of themed. Dark cabinet fronts make the broad timber island a clear center.
Before shopping for decorative accessories, identify what your room already has in abundance. If your island brings significant wood grain, use only a few smaller wood objects on surrounding shelves. Add a single contrasting item, such as a framed print or ceramic bowl, and see whether the room needs anything else. Reserve an uncluttered counter section for preparing food beside the sink.
IDEA 13 / 25
Use classic subway tile as a quiet backdrop
 SaveSupport Non AI Creator
Photo credit: Lauren Yacht / Minimal Domesticity. Source: Apartment Therapy.
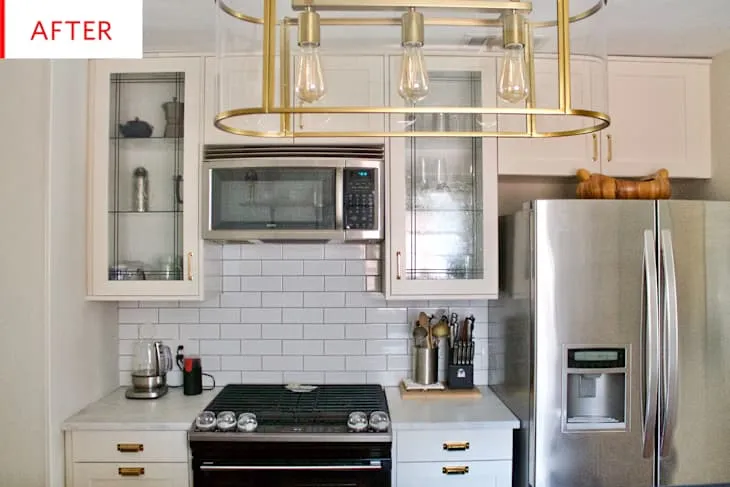
The white subway tile and fine grout lines in this kitchen give the cooking wall a clean rhythm, allowing the wood and brass details to provide the character. It is a useful reminder that a boho farmhouse backsplash does not need a colorful, attention-grabbing print. A simple field of tile can be the calm backdrop for collected ceramics, natural timber and statement lighting. Glass-front upper cupboards add storage without another strong wall color.
If you do want a patterned backsplash, start with a sample beside your countertop and cabinet color before committing to an entire wall. Ceramic and porcelain are practical choices around cooking splashes, but grout is often the part that requires the most care. Where the room already contains open shelving, an interesting rug and multiple textures, a quiet tile pattern will usually wear better than another competing focal point. Choose appropriate tile and grout cleaning methods for their actual finish.
IDEA 14 / 25
Pair deep green cabinetry with warm blush tile
 SaveSupport Non AI Creator
Photo credit: Ella Moore. Source: Apartment Therapy.
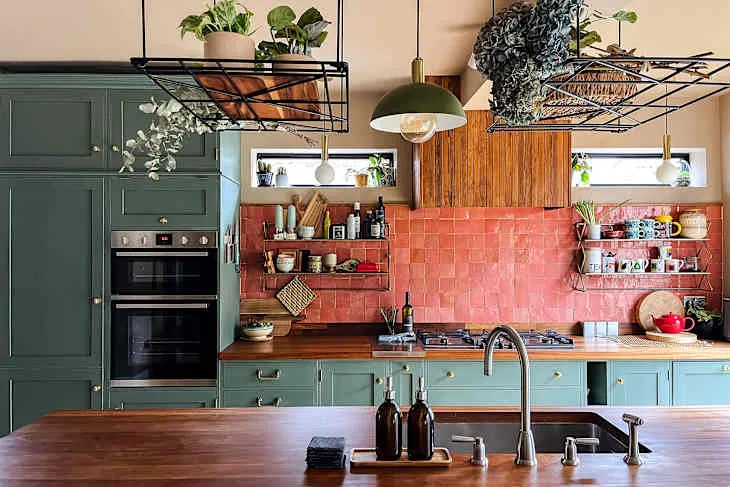
Here, an imperfectly reflective pink tile sits beside green painted cabinets and a generous timber countertop. The color contrast is bold, but the natural wood prevents it from feeling overly graphic. Smaller wall shelves hold useful jars and cups, breaking up the solid field of tile. Green pendant shades link the ceiling fixtures with the painted cabinet fronts.
For a similar result, view a tile sample under the lighting you will use in the finished kitchen. Handmade-look glazed tiles can reflect warm lamps and cool daylight quite differently. Plan for washable surfaces around the range and choose a grout color that supports the tile rather than dividing it into an aggressive grid. Leave the prep counter clear of display pieces that need moving for every meal.
IDEA 15 / 25
Choose backsplash texture as carefully as color
 SaveSupport Non AI Creator
Photo credit: Ella Moore. Source: Apartment Therapy.
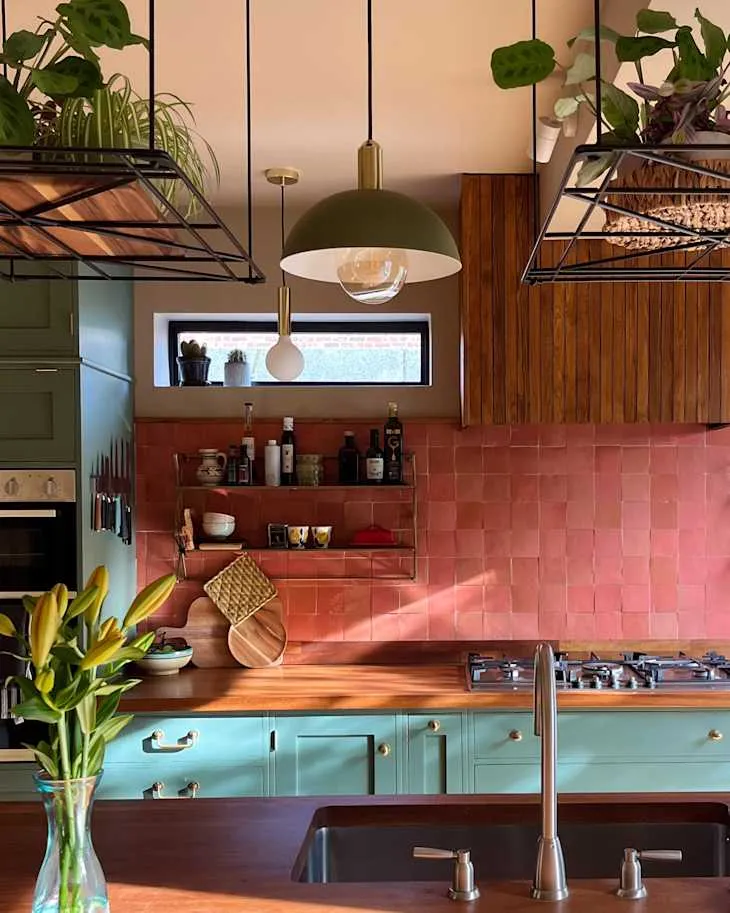
A close view of this cooking zone reveals why texture matters as much as hue. The slightly uneven tile surface catches light differently from the smooth cabinet paint, while the vertical timber slats over the extractor add a quieter, repeating rhythm. Overhead racks add a separate layer above the smaller wall shelves.
You can introduce that contrast without changing the entire kitchen: tile one main cooking wall or use a textured ceramic sample as a small backsplash zone. Keep grout, sealants and the extractor surround compatible with heat and moisture requirements; those functional details are more important than matching the photo exactly. Check rack fixings for the complete wet weight of any planted containers.
PART 04
Lighting & work zones
Light, sinks and prep space determine how a kitchen works. These renovations show how to give hardworking zones warmth without making upkeep more difficult.
IDEA 16 / 25
Repeat earthy tones through practical lighting
 SaveSupport Non AI Creator
Photo credit: Petra Ford. Source: Apartment Therapy.
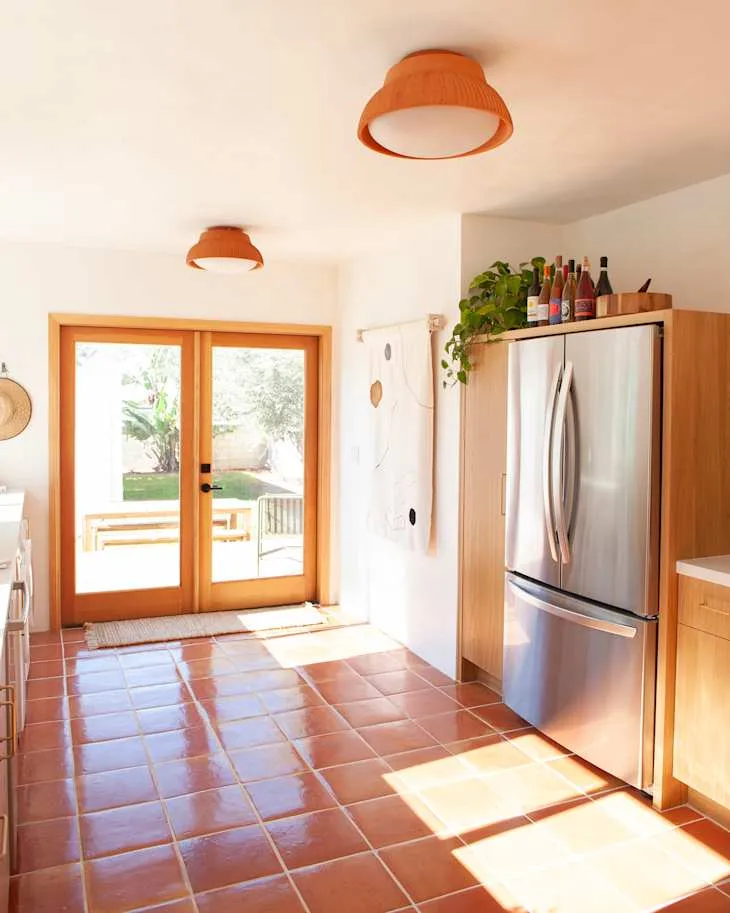
Even a simple kitchen gains warmth from its lighting and sightlines. Here, low-profile terracotta-colored ceiling fixtures repeat the orange-red tone of the floor, while glazed doors bring daylight and a view outside. That repeated color makes the space cohesive without extra decorative pieces. The light-colored ceiling keeps the orange fixtures visually distinct.
For overhead lighting, think first about coverage: combine an ambient fixture with dedicated light over the sink, prep surface and range. Check manufacturer guidance for electrical, clearance and moisture requirements. In narrow kitchens, flush or semi-flush fixtures can keep the room feeling open. Choose compatible bulbs that provide useful light rather than color alone.
IDEA 17 / 25
Make an apron-front sink part of the working kitchen
 SaveSupport Non AI Creator
Photo credit: Lauren Yacht / Minimal Domesticity. Source: Apartment Therapy.
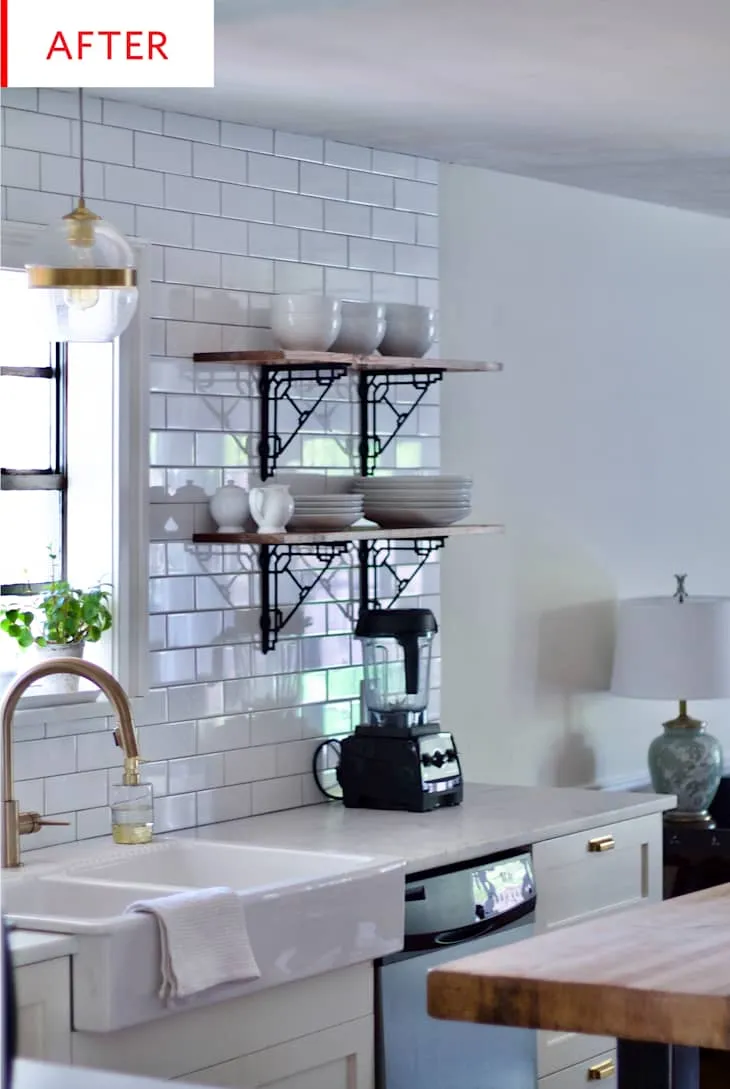
This kitchen places a white apron-front sink beneath dark-bracketed open shelves and a tiled wall. The sink reads as part of a complete working zone: the faucet, dishware, open storage and nearby island all serve actual daily tasks. The contrast of white tile, dark metal and warm wood creates the collected farmhouse effect without needing a decorative sign or a heavily distressed finish. The nearby dishwasher keeps washing tasks together below the open crockery shelves.
Before replacing an existing sink, check the base cabinet opening, the countertop cutout, drainage positions and the support required for heavy fireclay models. A deep bowl is useful for large cookware but can also make washing uncomfortable if it sits too low. If replacing the sink is not realistic, you can still borrow this look through a refined faucet, tidy drying space, simple wall tile and a wooden board kept clear of splashing. Check appliance access with the island seating occupied, not only when it is empty.
IDEA 18 / 25
Soften the sink area with a woven window shade
 SaveSupport Non AI Creator
Photo credit: Erin Derby. Source: Apartment Therapy.
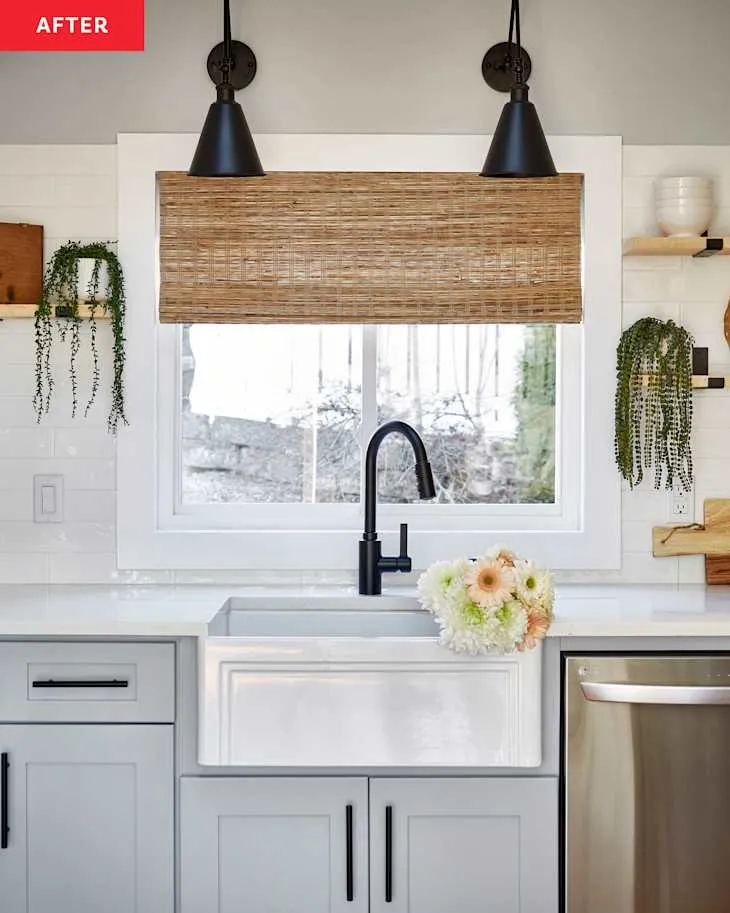
The sink becomes the focal point here through placement rather than ornament. It sits below a window, with a woven shade and dark metal lights adding texture and definition. The white apron front reads as part of the work surface, not as a standalone display feature. Two black sconces repeat the faucet color above the woven shade.
If you are considering an apron-front sink, verify the support structure, cutout, existing plumbing and cabinet dimensions before ordering. The basket-weave look above the window can be borrowed independently with a moisture-tolerant shade even if you keep your current sink. Make sure the shade can be operated without reaching across wet dishes.
IDEA 19 / 25
Frame a bright work zone with light timber
 SaveSupport Non AI Creator
Photo credit: Petra Ford. Source: Apartment Therapy.
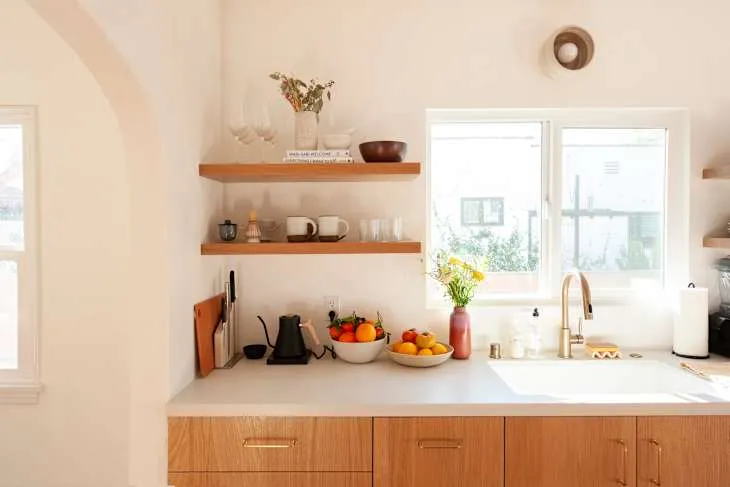
An ordinary sink wall can feel like a calm composition. In this photograph, a bright window sits between floating shelves; below it, timber cabinetry and a clear pale worktop leave the visual emphasis on daylight, simple crockery and fresh produce. The shelves hold smaller crockery while fruit bowls stay on the counter.
Keep the zone around the sink easy to wipe and make sure windows, taps and shelf brackets do not collide. If you are replacing upper cabinets with shelves, measure their usable capacity first. A lighter visual effect is appealing only if the remaining storage still accommodates daily cooking equipment. Leave the sink window opening clear of tall vases or countertop appliances.
IDEA 20 / 25
Give a timber island room to work and gather
 SaveSupport Non AI Creator
Photo credit: Lauren Yacht / Minimal Domesticity. Source: Apartment Therapy.
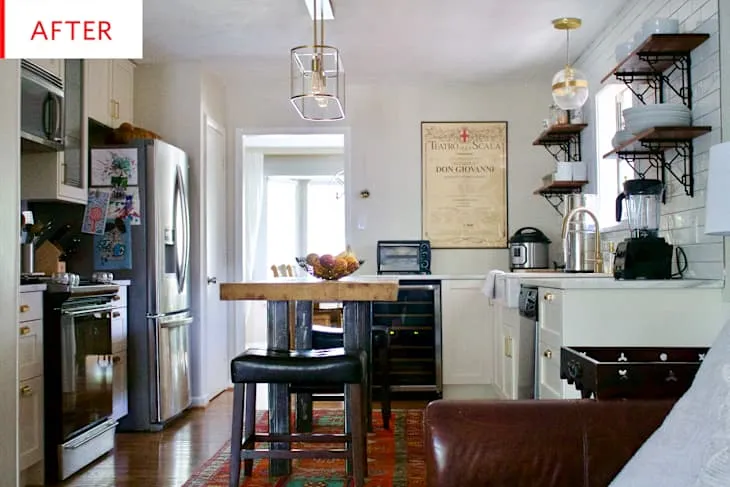
A practical island can introduce as much farmhouse warmth as new cabinetry. Here, a thick wooden worktop sits alongside a vintage-style runner, dark leather seating and open shelves. Those contrasts stop the freshly renovated kitchen from looking like a showroom: hard surfaces feel grounded by wood and worn-in details, while the island offers a surface for both cooking and conversation. Small overhead fixtures keep the narrow room visually open above the island.
Before installing an island, measure circulation with oven, dishwasher and refrigerator doors open rather than relying only on the floorplan. Allow room for stools to pull back without blocking the main walking route. In a smaller kitchen, a narrow freestanding butcher-block table or a movable cart may give you the same warm visual anchor with more flexibility. Choose durable finishes suitable for food preparation, and clean and maintain them according to the manufacturer’s instructions. Check that the stool can tuck away without catching the runner underneath.
PART 05
Layouts & finishing touches
Finish by checking the layout, daylight and material durability. A restrained final edit often makes a modest renovation more convincing than additional styling.
IDEA 21 / 25
Use a dark island to ground a spacious kitchen
 SaveSupport Non AI Creator
Photo credit: Ella Moore. Source: Apartment Therapy.
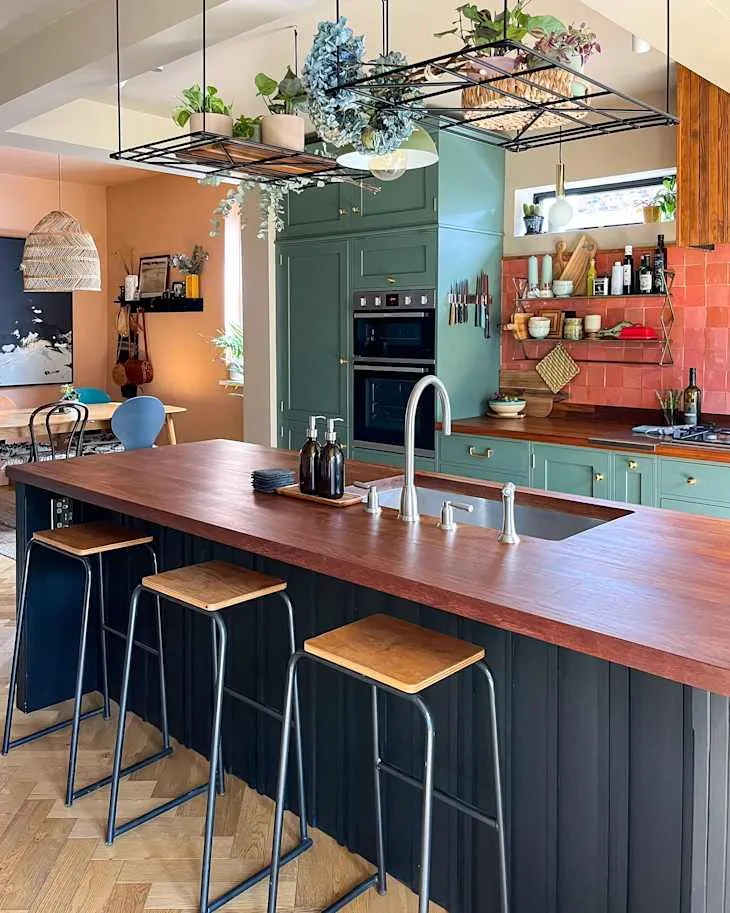
This island earns its place as the working and social center of the kitchen. There is a sink and space for food prep on the broad wood top, while stools allow people to gather. Overhead plant racks make use of high space without adding another full wall of cabinets. Slim stool frames let the island remain the strongest dark shape.
When planning an island, mark its footprint with tape before buying or rebuilding anything. Test how two people move between it and the opposing cabinets, then check that appliance doors can open fully. If it will contain a sink or electrical outlet, factor in professional plumbing and wiring before settling on the position. Keep hanging foliage clear of lighting and preparation surfaces below the racks.
IDEA 22 / 25
Add softness with easy-care textiles and greenery
 SaveSupport Non AI Creator
Photo credit: Erin Derby. Source: Apartment Therapy.
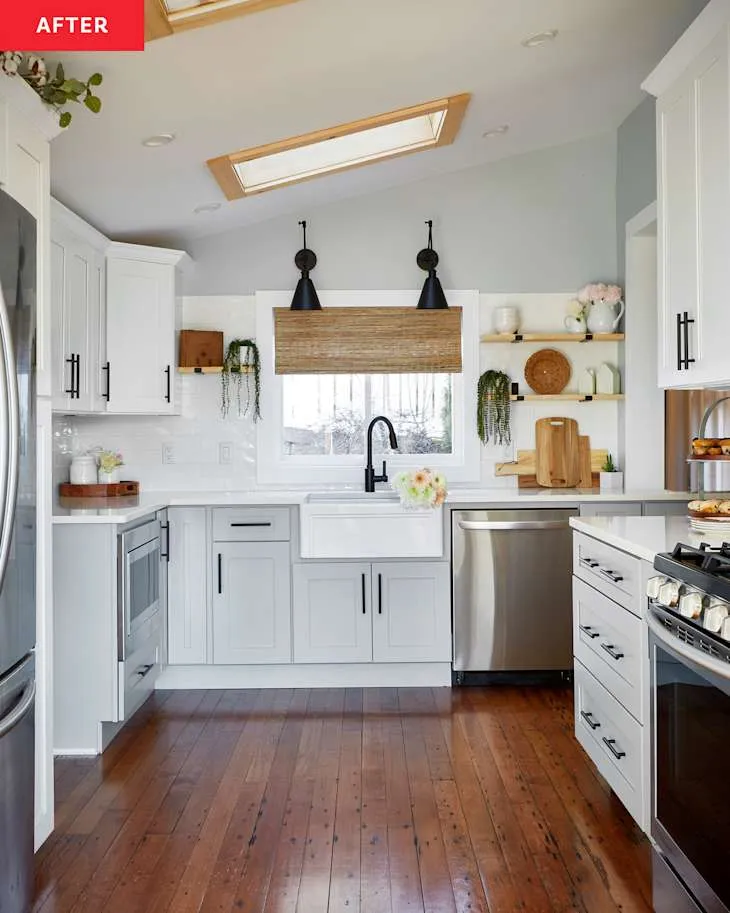
Softness in a hardworking kitchen does not have to come from a fragile rug. A woven window shade, a small plant and a vase of flowers add natural texture around this otherwise crisp white sink wall. These details are visually gentle without occupying the main preparation counter. Timber floorboards balance the white cabinets and cooler appliance finishes.
Choose window treatments that are easy to clean and that will not drag through a sink splash zone. For washable textiles, simple cotton towels or flat-weave mats are a better choice than thick piled fabrics. Keep botanical displays where leaves will not touch burners or block ventilation. Use splash-resistant surfaces near the sink instead of relying on decorative texture.
IDEA 23 / 25
Make a small U-shaped kitchen feel open
 SaveSupport Non AI Creator
Photo credit: Zoë Schulz. Source: Apartment Therapy.
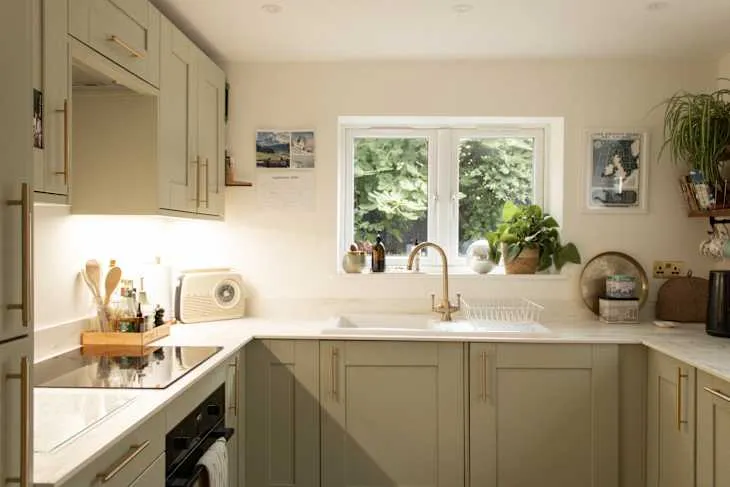
This kitchen makes a compact U-shape feel usable through consistent cabinet fronts and bright countertops. The pale surfaces bounce light from the window, while the green doors make the lower storage feel deliberate rather than anonymous. The repeated cabinet finish avoids a sharp change at the corner.
In a small kitchen, minimize how many finishes change at the corners. One calm cabinet color and uninterrupted worktop material usually create more visual space than alternating finishes on each wall. Leave a clear patch of counter beside the main prep area before adding jars, plants or display pieces. Check corner storage access before assuming every cupboard offers equal usable capacity.
IDEA 24 / 25
Update Shaker cabinets without chasing a trend
 SaveSupport Non AI Creator
Photo credit: Erin Derby. Source: Apartment Therapy.
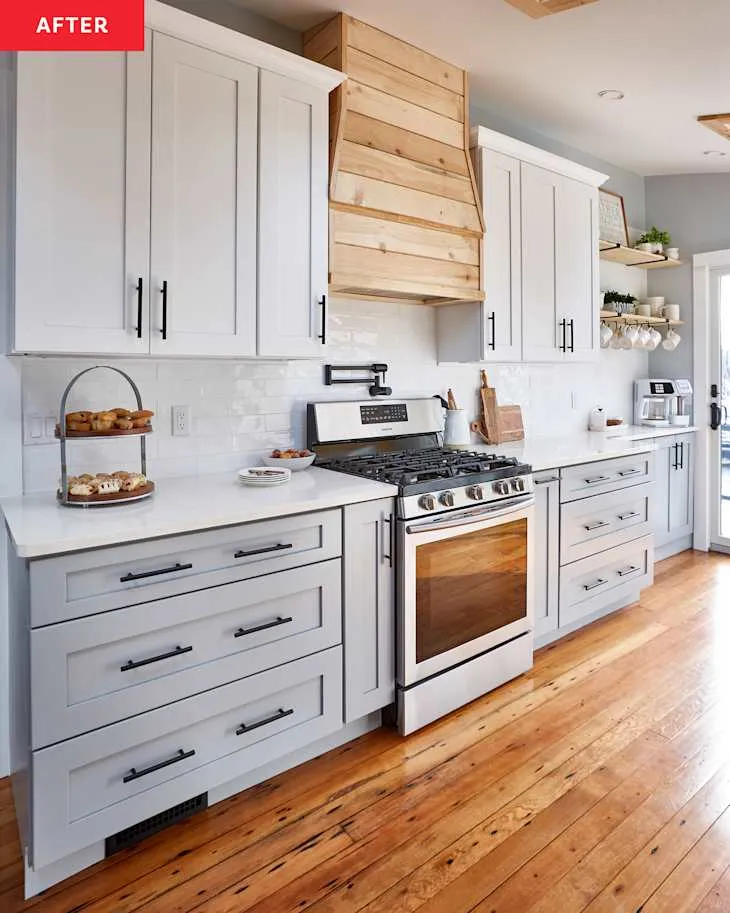
Painted Shaker fronts feel contemporary here because the surrounding details are selective: black handles create a repeating line and the timber-clad vent hood supplies one rougher material. The cabinetry itself stays relatively quiet and consistent across the wall. Long black pulls add definition to the pale drawers beside the range.
If existing cabinet doors are structurally sound, a careful preparation and paint job may achieve this effect without replacing every unit. Degrease, test adhesion on a hidden area, follow the coating manufacturer’s instructions and allow proper curing time before reinstalling hardware. Do not alter the hood surround without checking the extractor requirements first.
IDEA 25 / 25
Finish with daylight and a little breathing room
 SaveSupport Non AI Creator
Photo credit: Erin Derby. Source: Apartment Therapy.
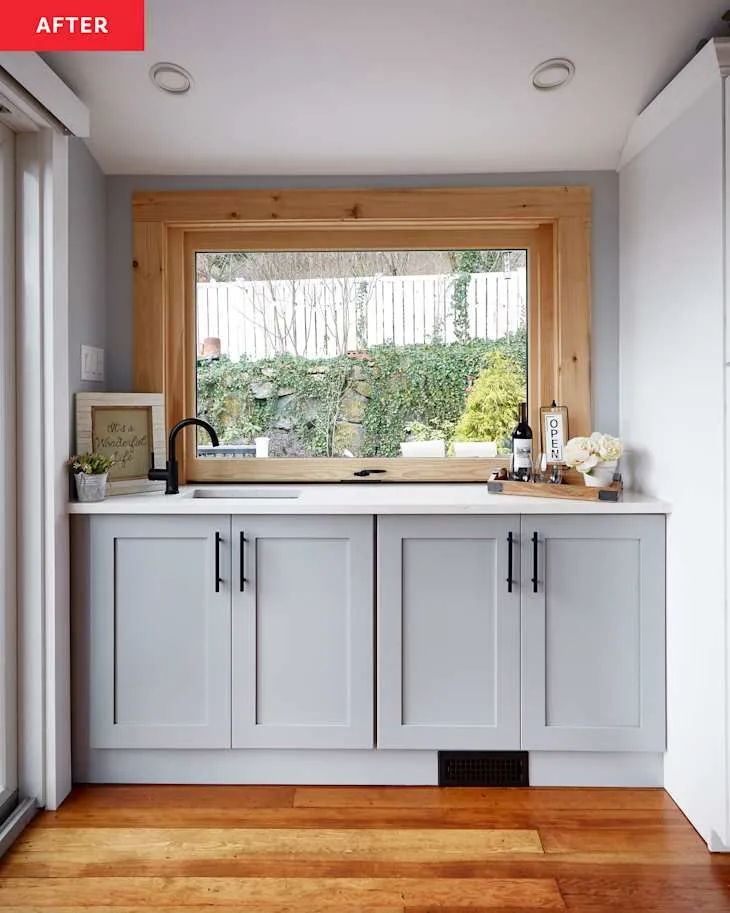
A generously sized window is the main feature in this corner. Its wood frame repeats the floor tone, while simple cabinetry keeps attention on the outdoor view. This is a useful example of restraint: the kitchen does not need an extra decorative layer to look warm. The wide timber window frame provides warmth above the pale sink cabinets.
If you cannot change window openings, preserve the daylight you already have. Avoid putting tall jars or large plants directly in front of the glazing, use low-sheen finishes to soften reflected glare, and position a small number of objects where they are genuinely used. Keep the tap and window movement clear of any decorative tray or vase.
BRINGING IT ALL TOGETHER
Build the room for daily life first.
Start with what already works: the cabinet boxes, daylight, circulation and task lighting. Then choose a limited palette of timber, warm neutrals and one muted color. Let open shelving, collected ceramics and woven pieces bring character without consuming useful storage or preparation space.
For a budget refresh, prioritize cleaning, hardware, paint samples, lighting and one carefully chosen textile. For a renovation, invest first in layout, electrical safety, durable finishes and storage. The boho farmhouse look should be the result of sensible choices, not a reason to replace perfectly serviceable materials.