Kitchen tiles can give a working wall color, pattern or a quieter background beside your cabinets. Begin with the surface’s real use, then compare tile and grout samples together in the room. A glossy finish, raised texture or strong repeat each brings a different appearance and cleaning routine.
These photographs show upright grids, herringbone, smaller motifs and combinations of wall and floor patterns. Use the visible arrangement to compare possibilities, then confirm the actual product’s suitability with the supplier and installer. A photograph cannot establish its material, heat rating, slip performance or maintenance requirements.
PART 01
Compare quieter grids and stronger colors
IDEA 01 / 20
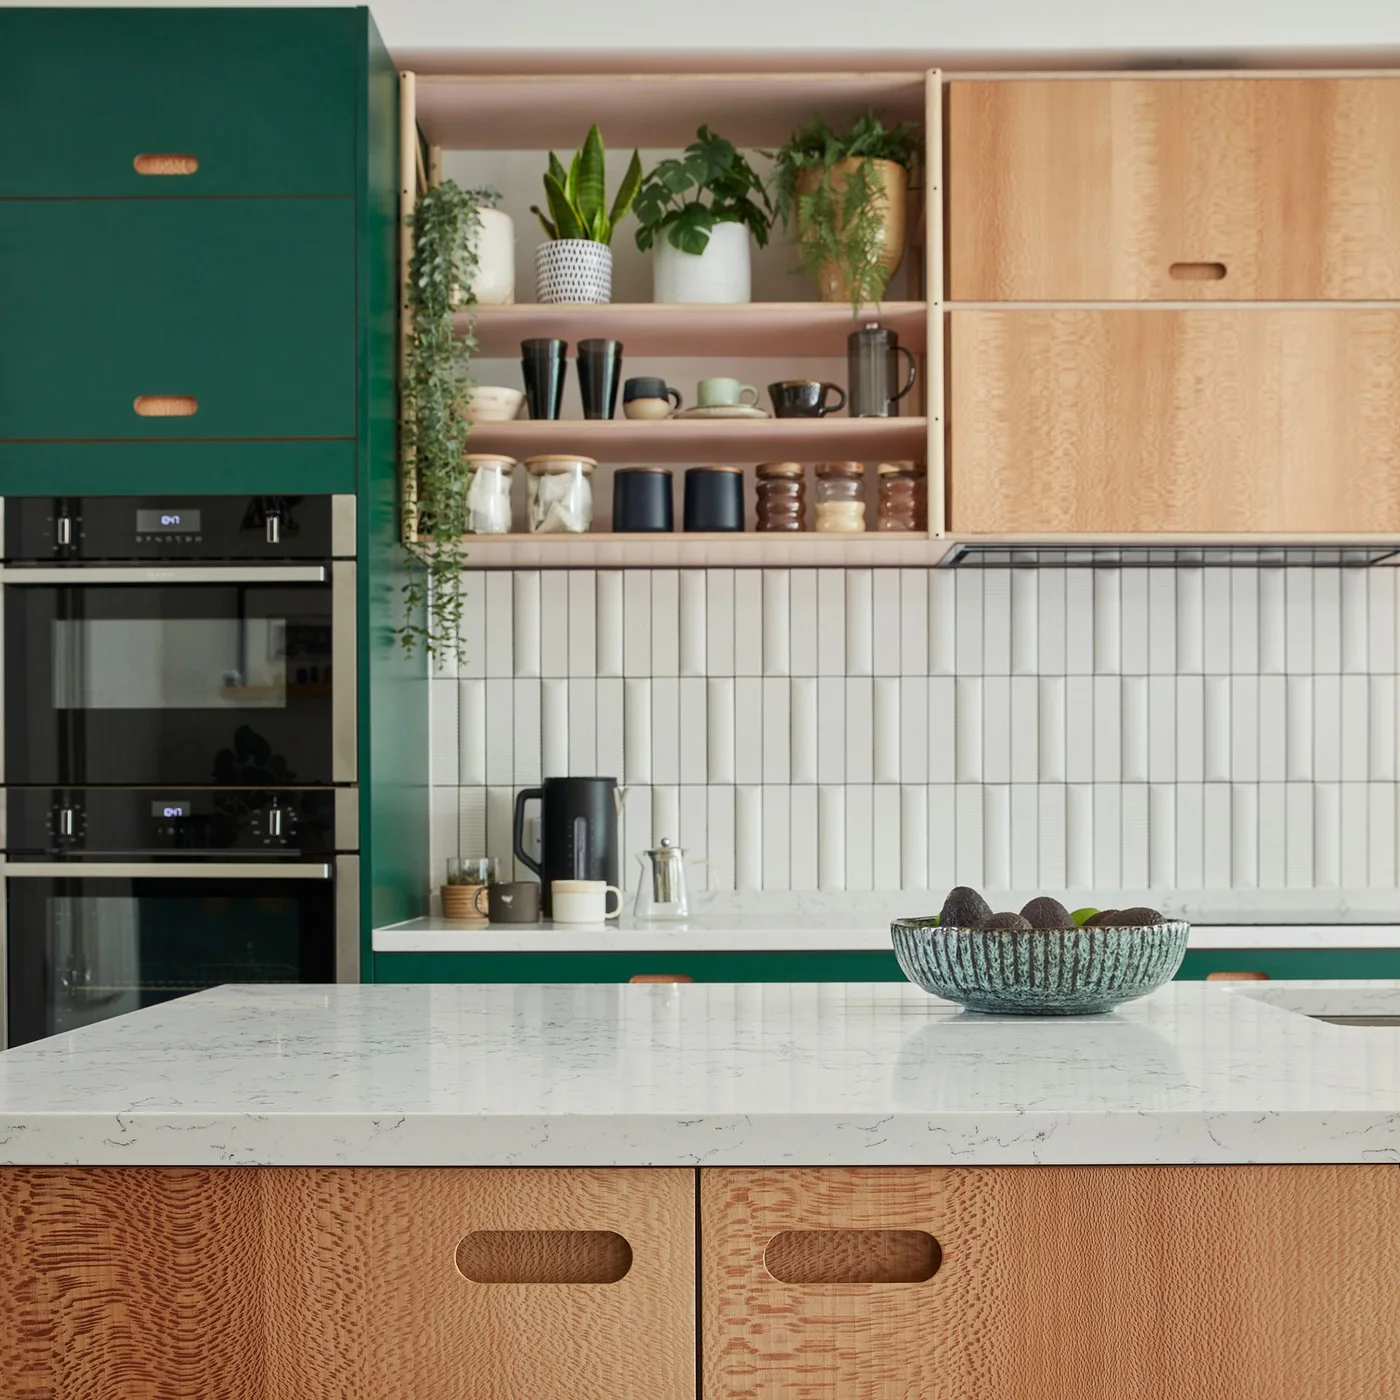
Stack Pale Tiles Vertically Behind Warm Wood
 SaveSupport Non AI Creator
Image credit: Future PLC
The pale rectangular tiles form a repeated upright grid beneath the wooden shelves. Their quieter color separates the wall from the green cabinets, while darker grout makes each tile outline visible. Warm wood gives the upper storage another surface without competing with a patterned backsplash.
Lay out a sample of the tile and grout together before choosing the final joint color. Check the cuts below shelves and around sockets rather than assuming every upright row will end neatly. Green kitchen cabinet ideas compare more painted backgrounds if you want to judge how much contrast this pale tiled wall creates.
IDEA 02 / 20
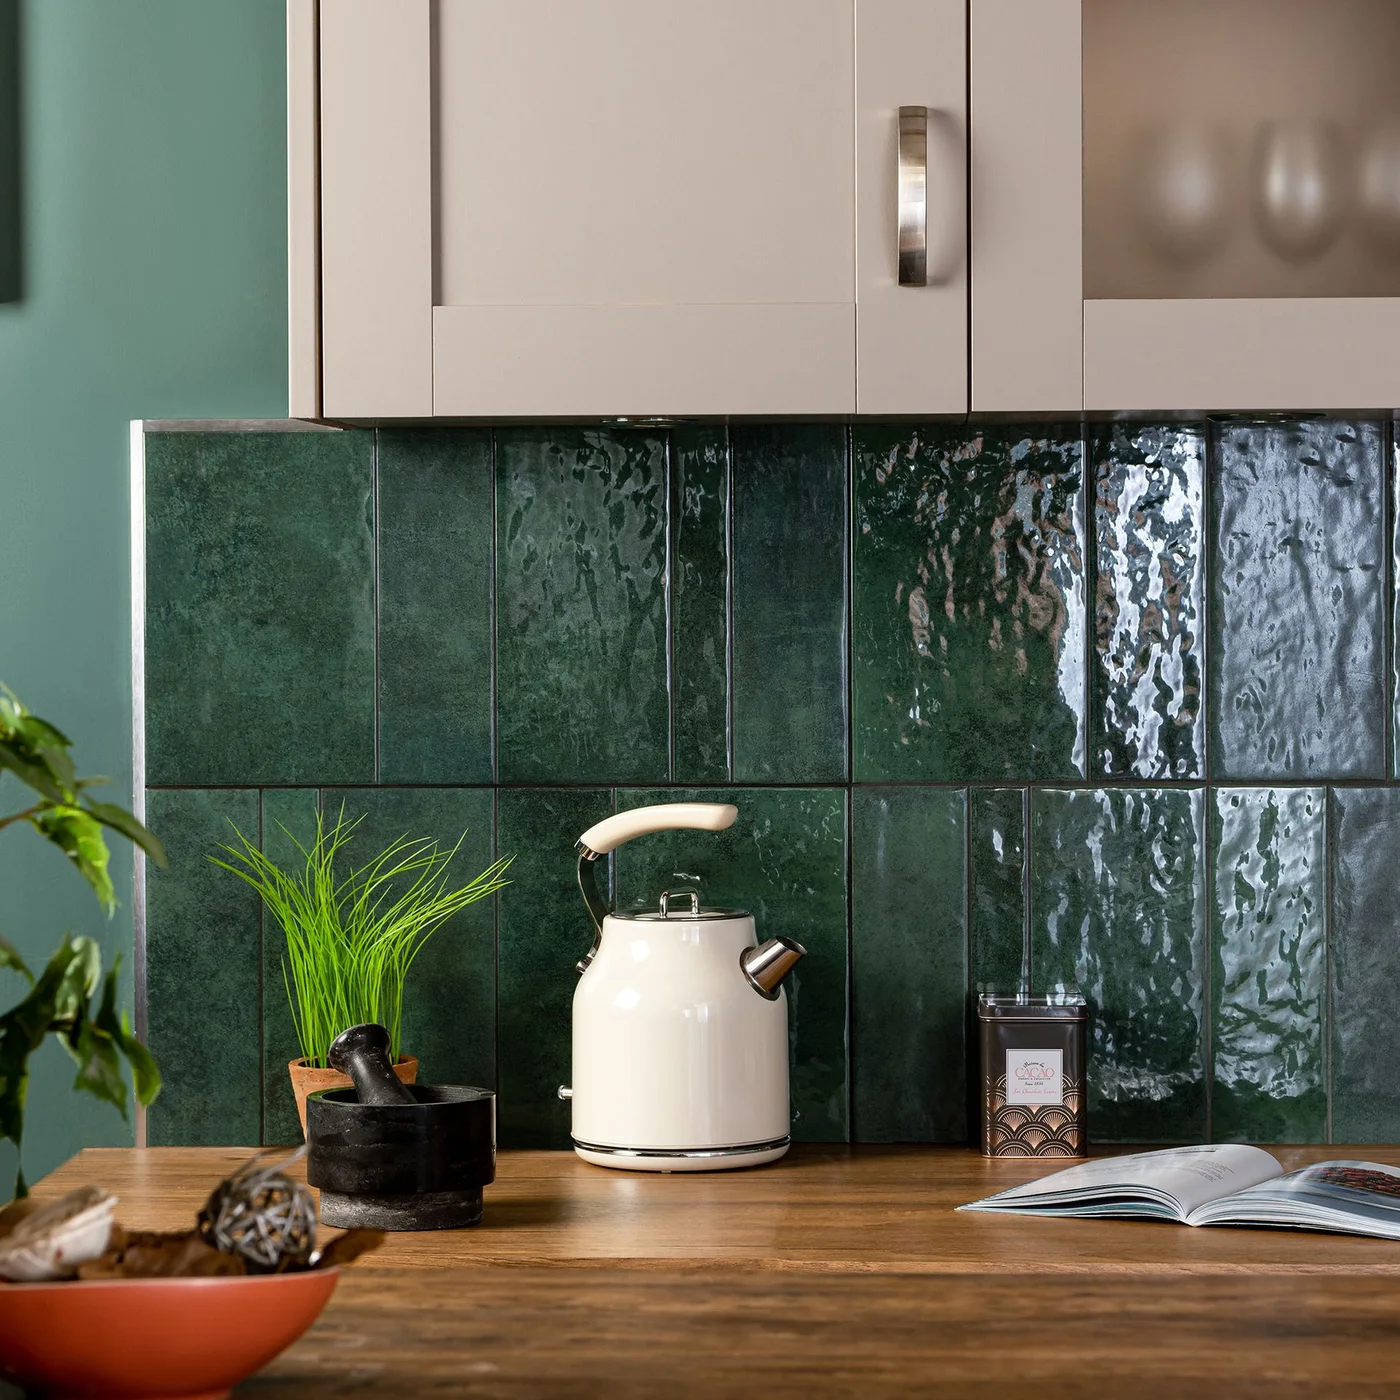
Use Deep Green with a Reflective Finish
 SaveSupport Non AI Creator
Image credit: Walls & Floors
Deep green tiles give this counter area a stronger background beneath the pale wall cabinets. Reflections move across their uneven-looking glossy faces, so the wall has variation without a printed pattern. The wooden counter and cream kettle introduce lighter, warmer shapes against the green.
View samples in the room’s daylight and under the lighting you use at night, checking how much reflection you enjoy. Confirm cleaning and grout guidance for the actual product. Keep the backsplash accessible for wiping instead of filling its entire lower edge with canisters, plants and appliances that must be moved each time.
IDEA 03 / 20
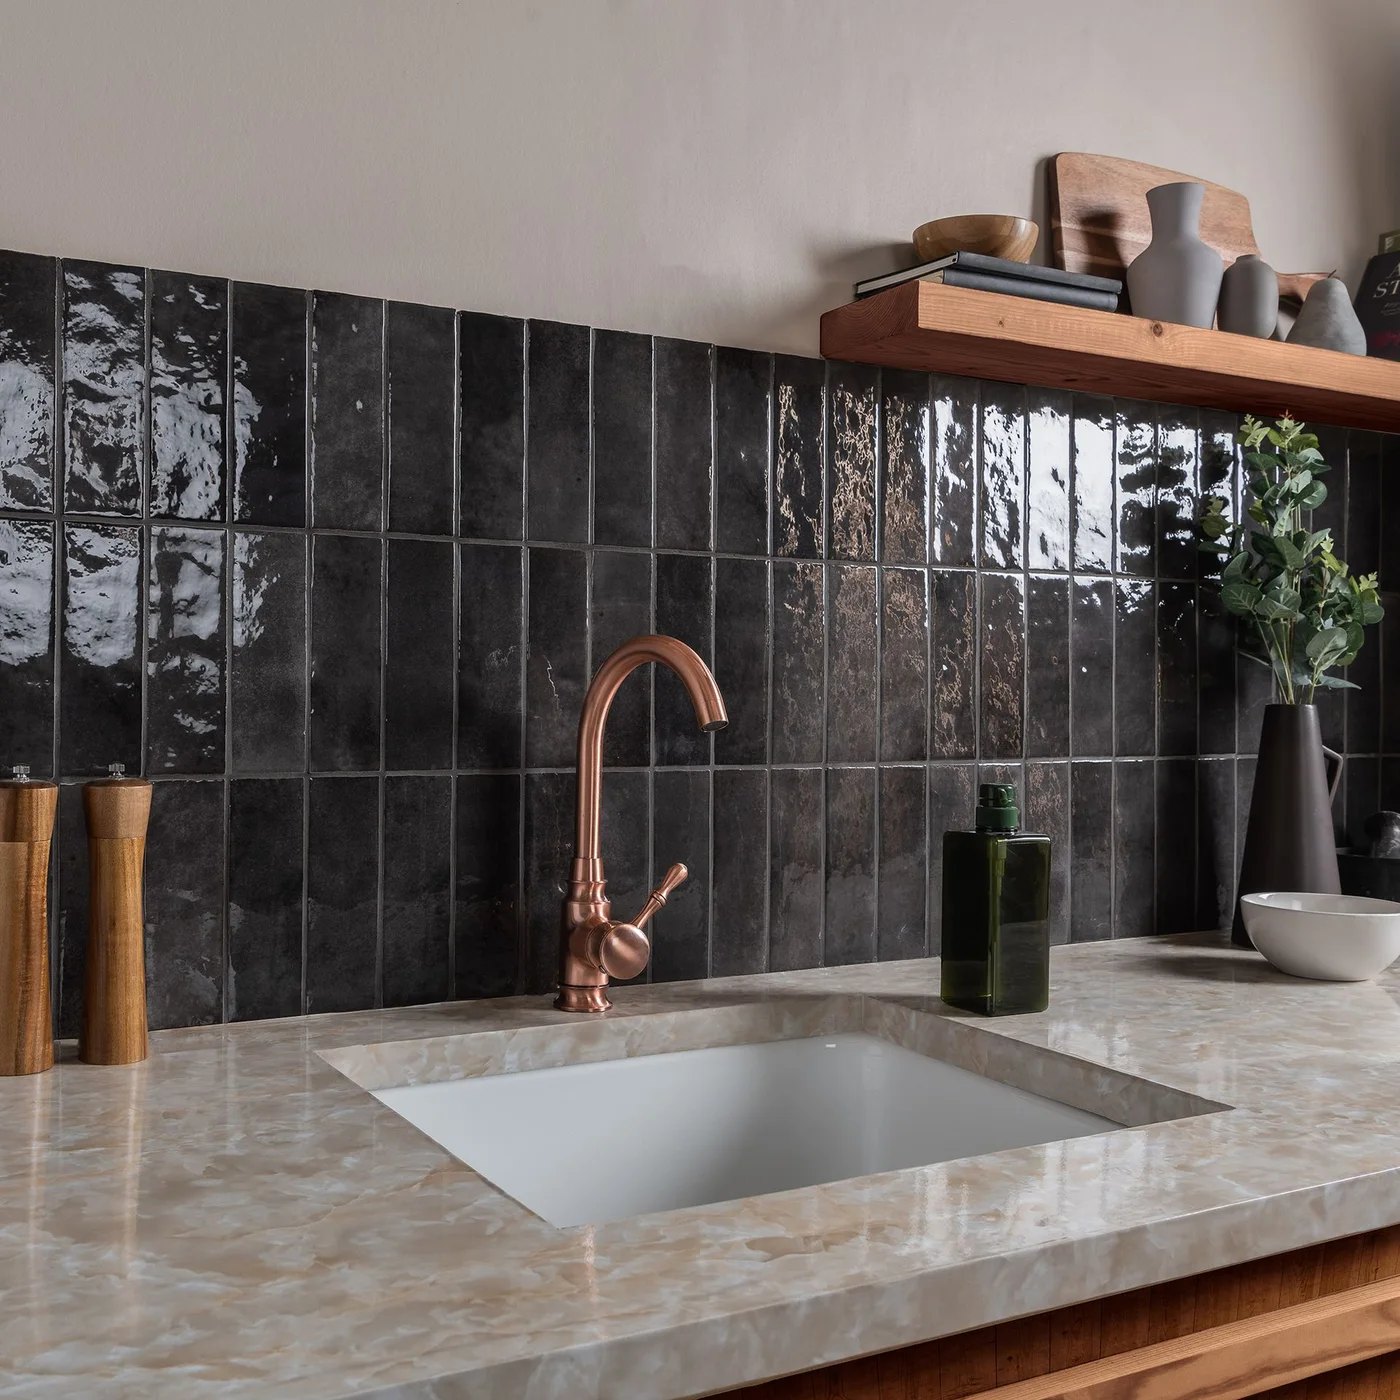
Give a Pale Sink Area a Darker Grid
 SaveSupport Non AI Creator
Image credit: Tile Mountain
The black backsplash creates a defined grid behind this pale sink counter. Its glossy finish adds reflected light to the darker surface, with the copper-toned tap supplying a warmer outline. A wooden shelf breaks the transition to the plain wall above without adding another tile pattern.
Check whether water marks and reflections on the sample suit your cleaning routine before choosing a large dark glossy area. Plan the tile edge and shelf fixings together, avoiding improvised drilling after installation. Keep the sink-wall junction detailed appropriately by your installer instead of treating the visible grout grid as the entire moisture protection system.
IDEA 04 / 20
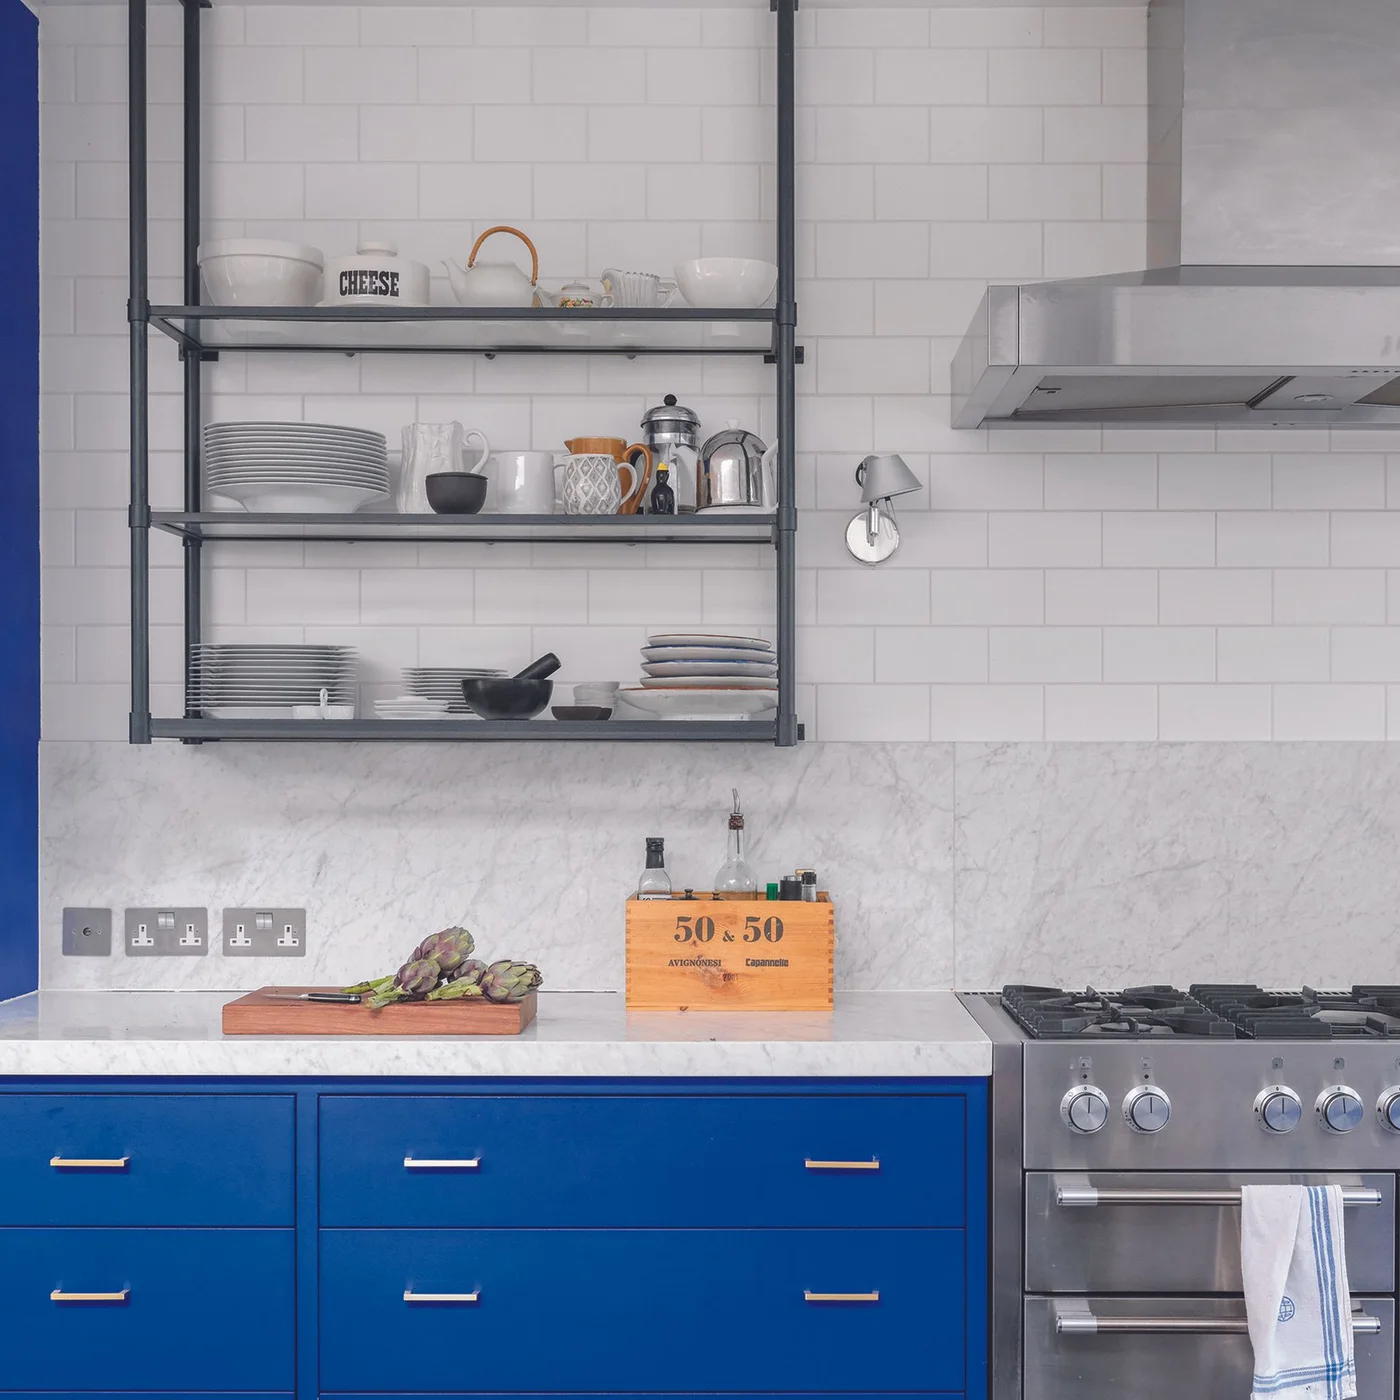
Carry White Tiles Higher Behind Open Shelves
 SaveSupport Non AI Creator
Image credit: Future PLC
White rectangular tiles continue behind the open shelves and hood rather than stopping just above the counter. The offset rows give the wall a repeated pattern without a strong color change. Blue lower cabinets and dark shelf supports introduce the clearer contrast around that lighter tiled surface.
Work out the top edge, corners and shelf positions before ordering, particularly when tiling extends over a larger wall area. Keep displayed dishes manageable because both shelves and exposed objects need cleaning. Blue kitchen cabinet ideas compare more ways to pair a stronger painted cabinet color with a quieter backsplash.
IDEA 05 / 20
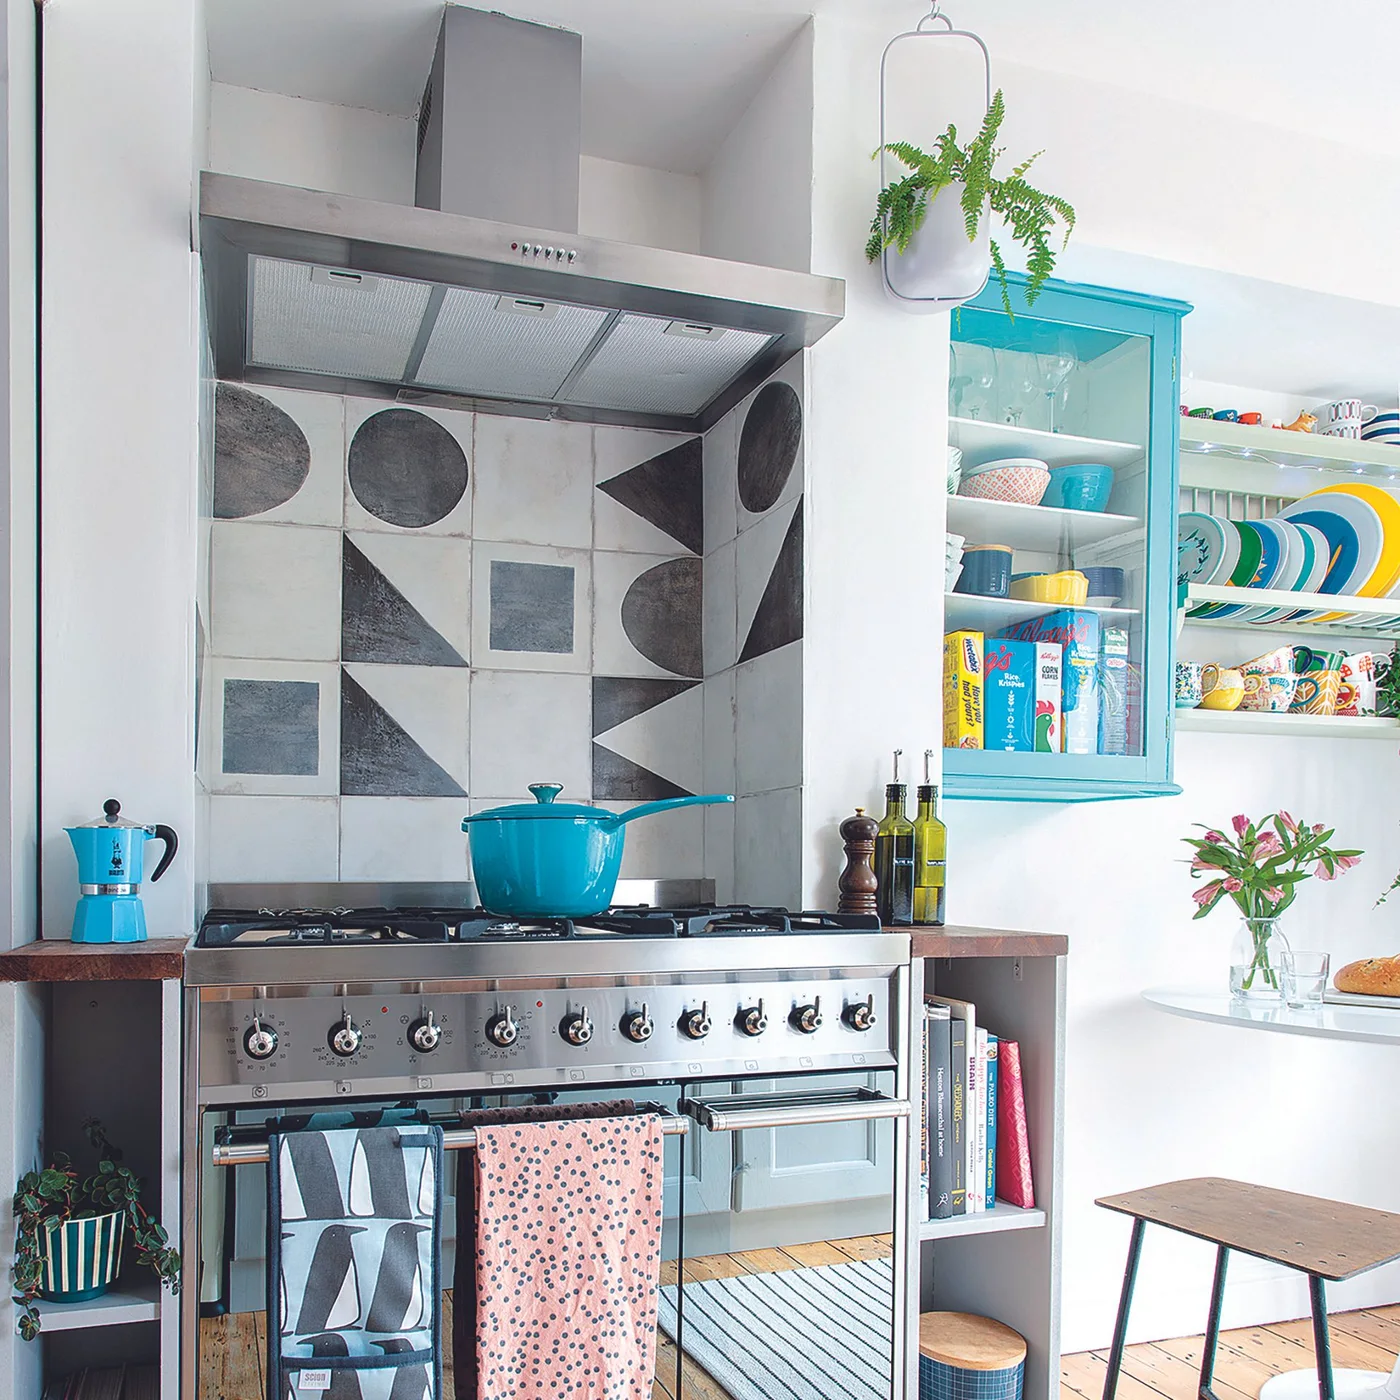
Keep a Bold Pattern Around the Cooking Position
 SaveSupport Non AI Creator
Image credit: Future PLC
Large circles, triangles and squares make this cooking backsplash the strongest pattern in the corner. The metal hood and pale surrounding wall leave its shapes easy to distinguish. Turquoise cookware and nearby shelving add a separate color accent without requiring the tile itself to carry several bright shades.
Arrange several tiles together before ordering so you can see the full pattern rather than a single isolated piece. Check heat suitability, cleaning instructions and appliance clearances with the supplier and installer. Keep cookware and hanging plants clear of cooking equipment, choosing the wall pattern independently of the photograph’s smaller staged objects.
PART 02
Use smaller features and useful patterns
IDEA 06 / 20
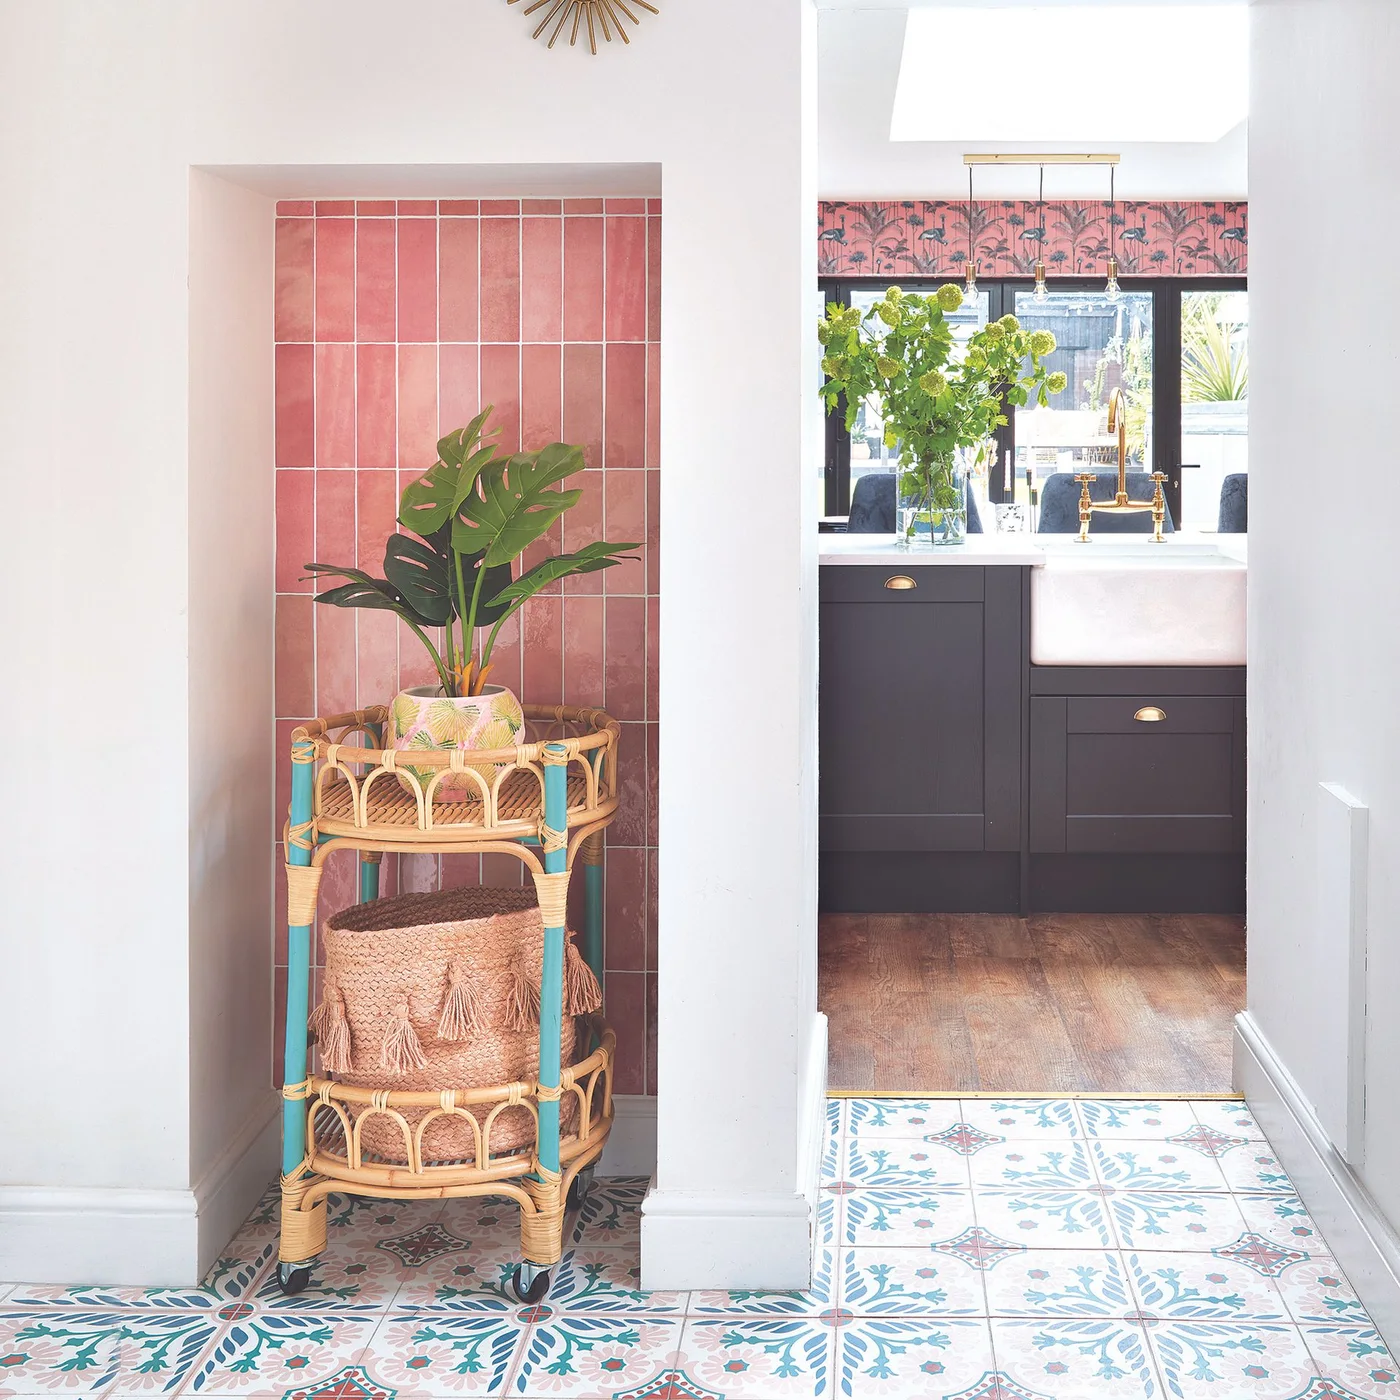
Put a Small Tile Feature in an Alcove
 SaveSupport Non AI Creator
Image credit: Future PLC
The pink tiled alcove gives this corner a separate color feature beside the kitchen opening. Upright rectangular tiles produce a clear grid behind the woven plant stand. The patterned floor adds a second detail lower down, while the surrounding pale wall keeps the narrow recess easy to identify.
Check the alcove’s corners and edge finish before ordering tiles, including where the feature meets the surrounding wall. Keep any plant watering contained to protect nearby furniture and flooring. Use a small tiled area when you enjoy a stronger color but do not want it behind every cabinet or across the whole kitchen.
IDEA 07 / 20
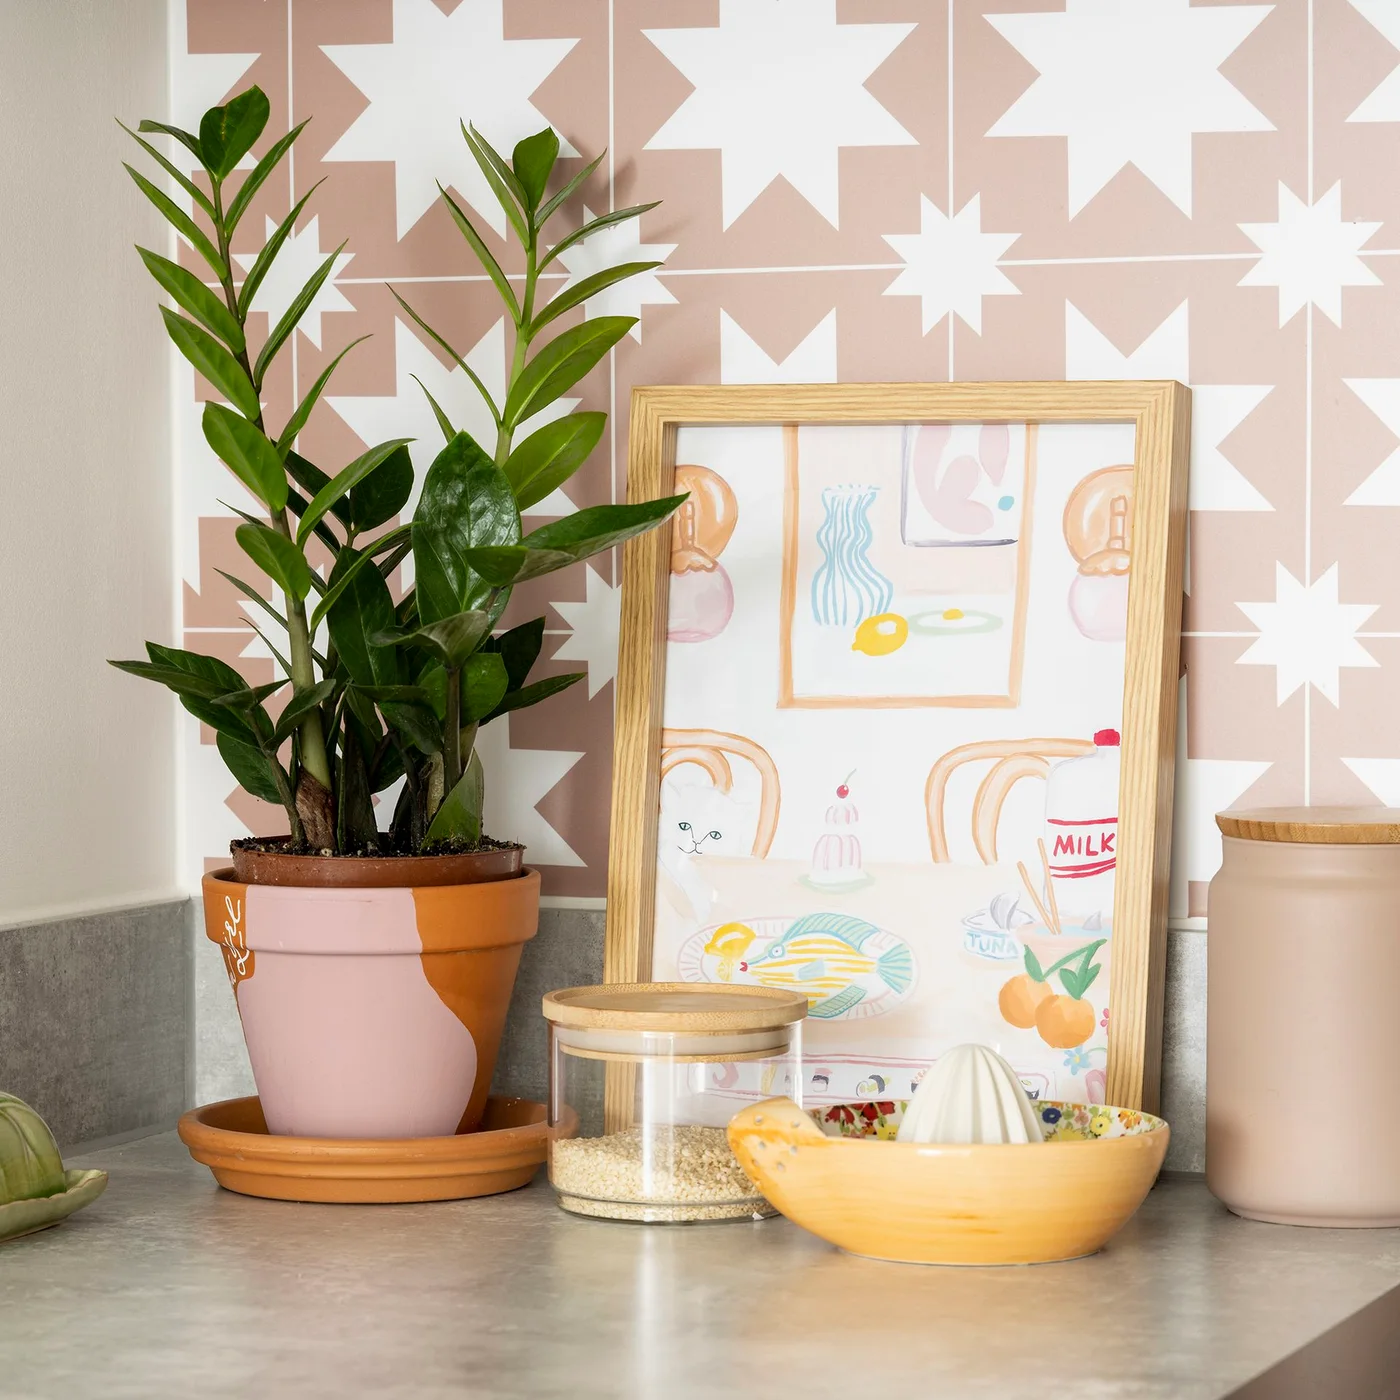
Choose a Pattern for One Useful Counter Area
 SaveSupport Non AI Creator
Image credit: Future PLC
The pink-and-white geometric pattern gives this counter a defined backdrop. Its repeated angular shapes contrast with the rounded plant pot and canisters below. A framed print adds a smaller picture within the arrangement, while the pale counter keeps the larger working surface relatively quiet.
Compare the pattern with the objects you normally keep here before committing to the entire wall. Leave a useful clear area for the task this counter serves. Protect plants against overflow and keep loose framed art convenient to move, so wiping the tiled surface does not become a complicated rearrangement every time.
IDEA 08 / 20
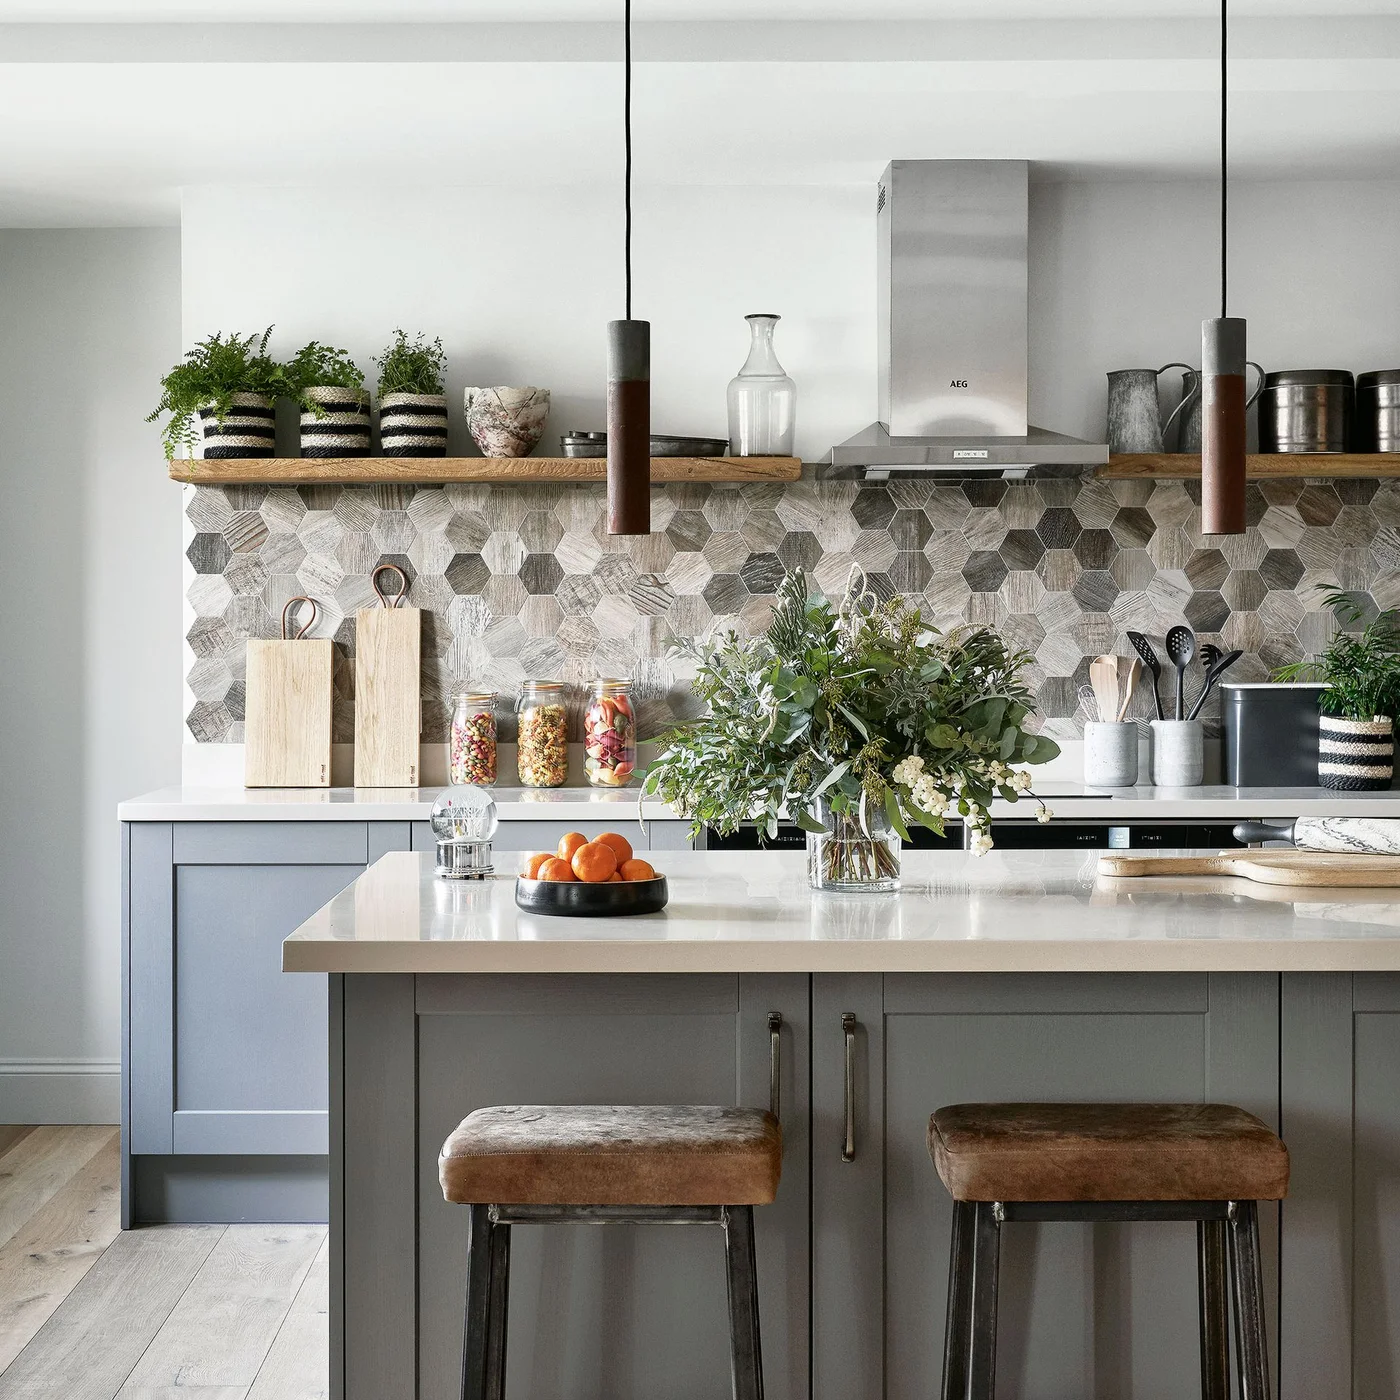
Add Variation with a Muted Hexagon Pattern
 SaveSupport Non AI Creator
Image credit: Future PLC/Davide Lovatti
The hexagonal backsplash combines lighter and darker gray sections with smaller textured-looking patterns. Its colors remain close to the surrounding cabinets, so the shape changes supply most of the movement. A wooden shelf introduces warmth above, with the pale island providing a quieter surface in front.
Ask to see several tiles together and confirm how the pattern repeats before ordering. Plan the cut edges around cupboards and sockets, since a hexagon layout can create smaller perimeter pieces. Grey kitchen cabinet ideas compare quieter cabinet finishes when you want the backsplash geometry to remain the main detail.
IDEA 09 / 20
Use a Pale Herringbone Behind the Sink
 SaveSupport Non AI Creator
Image credit: Future PLC
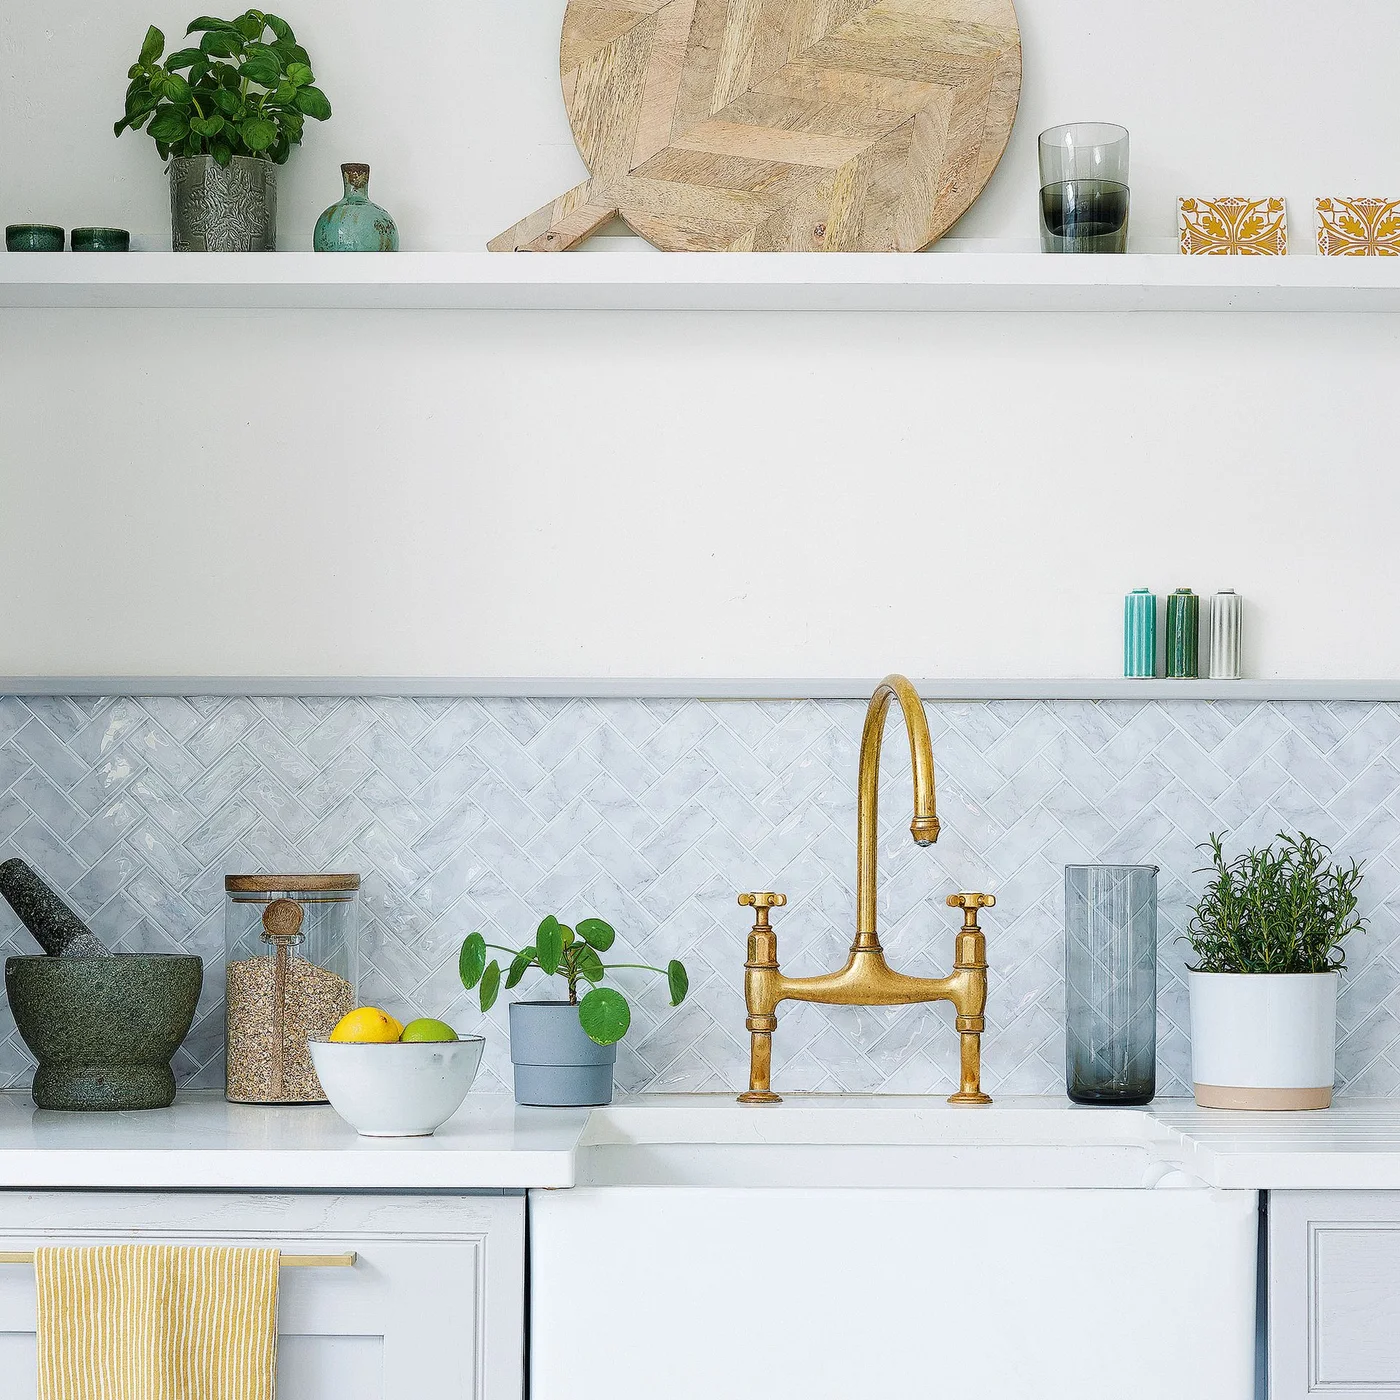
The pale herringbone gives this sink wall a pattern without a large contrast in color. Its angled rows sit between the straight shelf and counter, breaking up those long horizontal lines. The gold-toned tap adds a warmer shape against the white sink and surrounding lighter surfaces.
Discuss the layout center and perimeter cuts before installation rather than beginning from whichever corner is easiest. Choose grout with the tile sample in hand and check the care requirements of the actual material. Keep shelf objects limited if you want the diagonal pattern to stay visible behind the everyday sink arrangement.
IDEA 10 / 20
Build a Color Feature from Horizontal Bands
 SaveSupport Non AI Creator
Image credit: Future PLC/Mark Scott
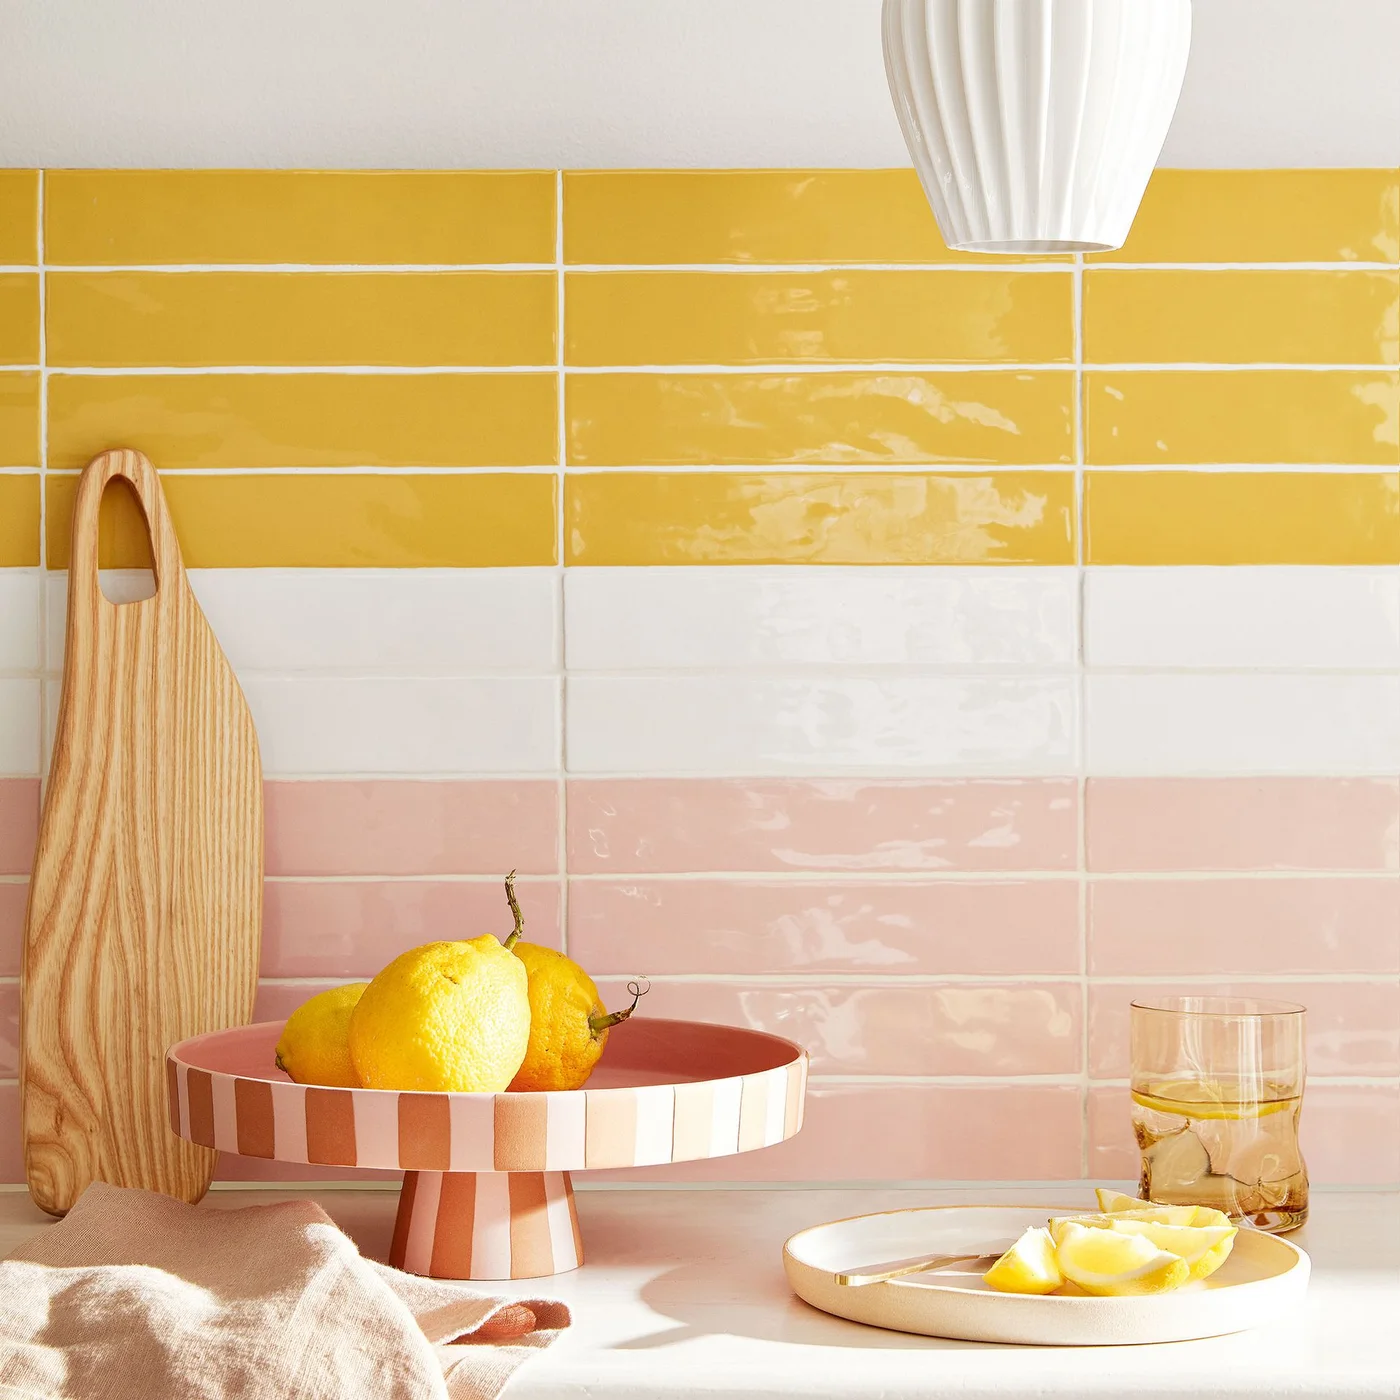
Horizontal bands separate the yellow, white and pale pink tiles into clear color groups. Their glossy surfaces add reflected light, with the warmer wooden boards connecting the wall to the countertop arrangement. The pattern relies on color placement rather than several differently shaped tile pieces.
Map the row heights against the finished counter and any shelves before ordering, checking how the bands continue around corners. Compare all colors together in your actual lighting. Keep the surrounding cabinet finish simpler if you want the bands to stand out, and retain extra matching tiles for possible future repairs.
PART 03
Connect tile color with cupboards and shelves
IDEA 11 / 20
Tile the Back of a Glass-Front Cabinet
 SaveSupport Non AI Creator
Image credit: Blakes Kitchens
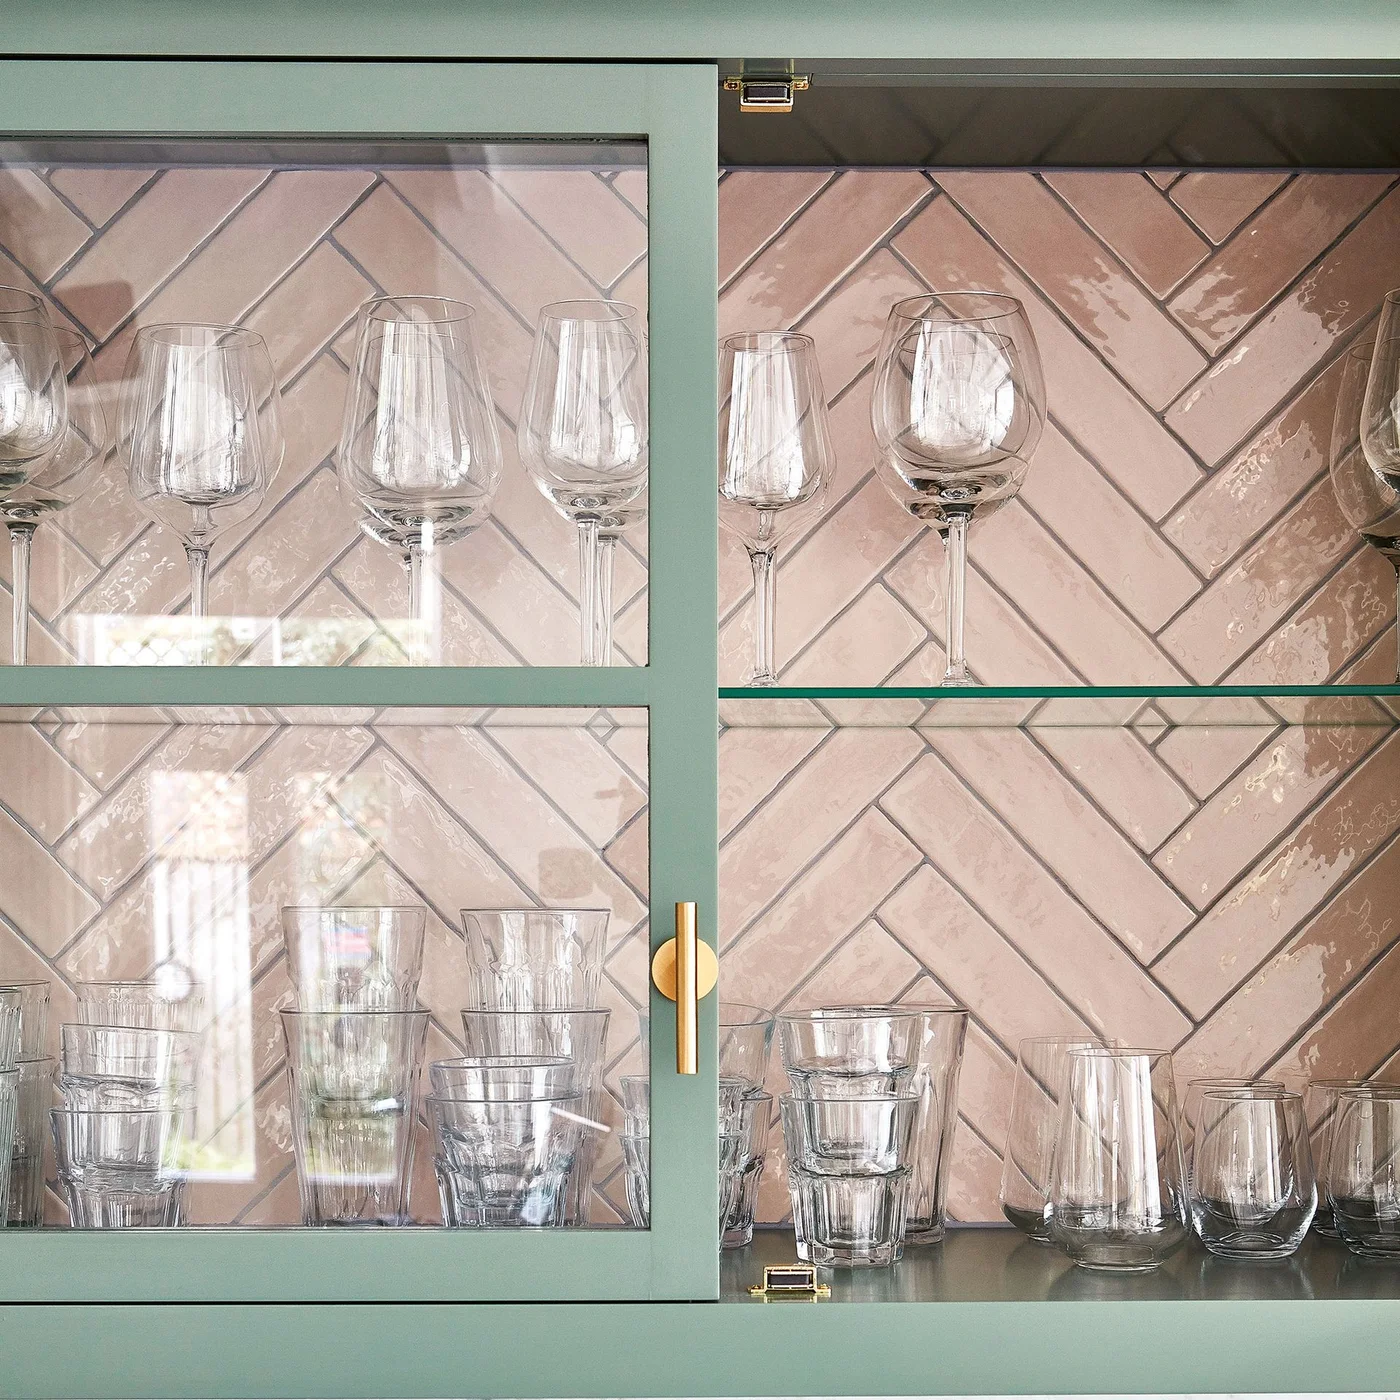
Pink tiles give the cabinet interior a warmer background behind its drinking glasses. The herringbone is visible through the glass door and between the clear shelf contents. Green framing provides a contrasting border, making the cabinet backing a small tile feature instead of a full backsplash.
Confirm the backing and fixing method with the cabinet supplier before adding tile weight to furniture. Check shelf access and the finished depth so glasses remain easy to remove. Limit the number of competing objects on display if you want the pattern visible, and account for cleaning both the cabinet glass and the tiled backing.
IDEA 12 / 20
Compare Two Related Tile Colors
 SaveSupport Non AI Creator
Image credit: CTD Tiles
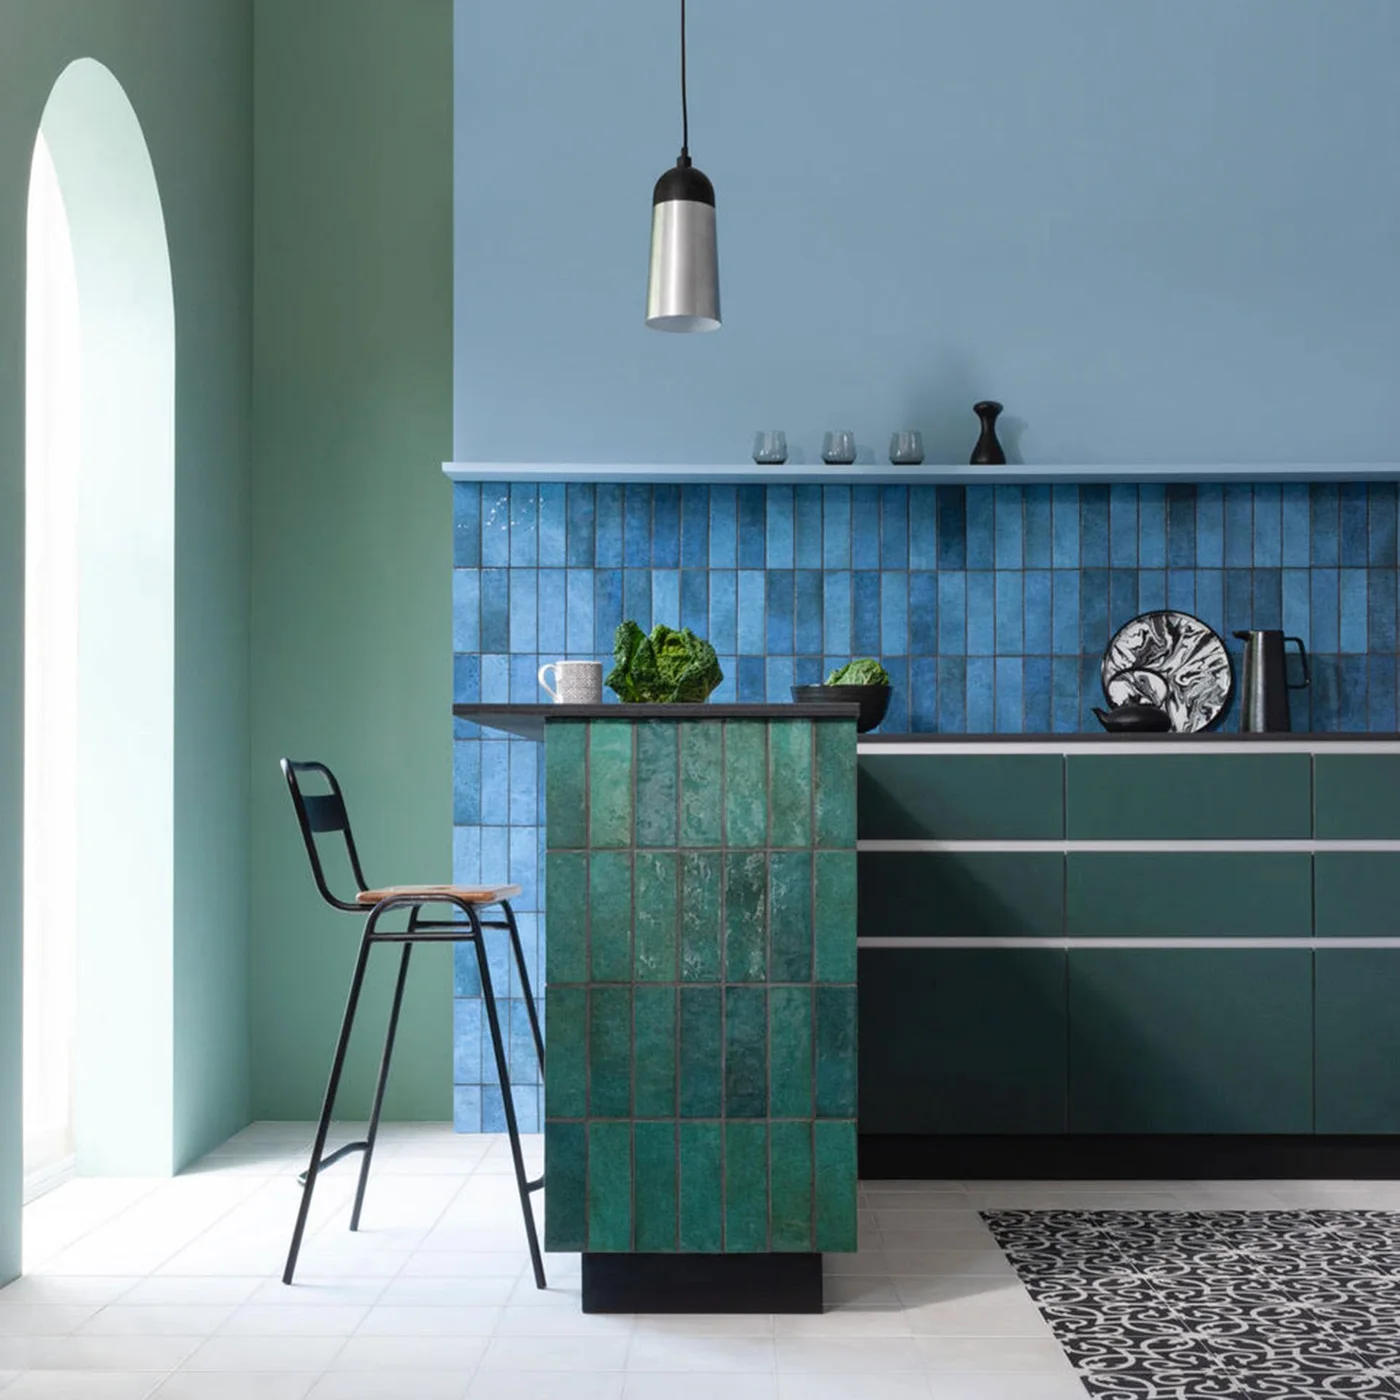
Blue tiles define the working wall, while green tiles wrap the narrower peninsula face. Their similar upright shapes connect the two areas despite the color change. Plain painted wall surfaces above keep the arrangement from becoming tiled everywhere, leaving space to distinguish the stronger blue and green groups.
Compare both tile samples beside the cabinet finish before choosing their proportions. Plan corner trims, counter junctions and any exposed edges together. Green kitchen tiles offer more color arrangements when you want to decide whether green belongs mainly on the backsplash or on a smaller feature beside the seating area.
IDEA 13 / 20
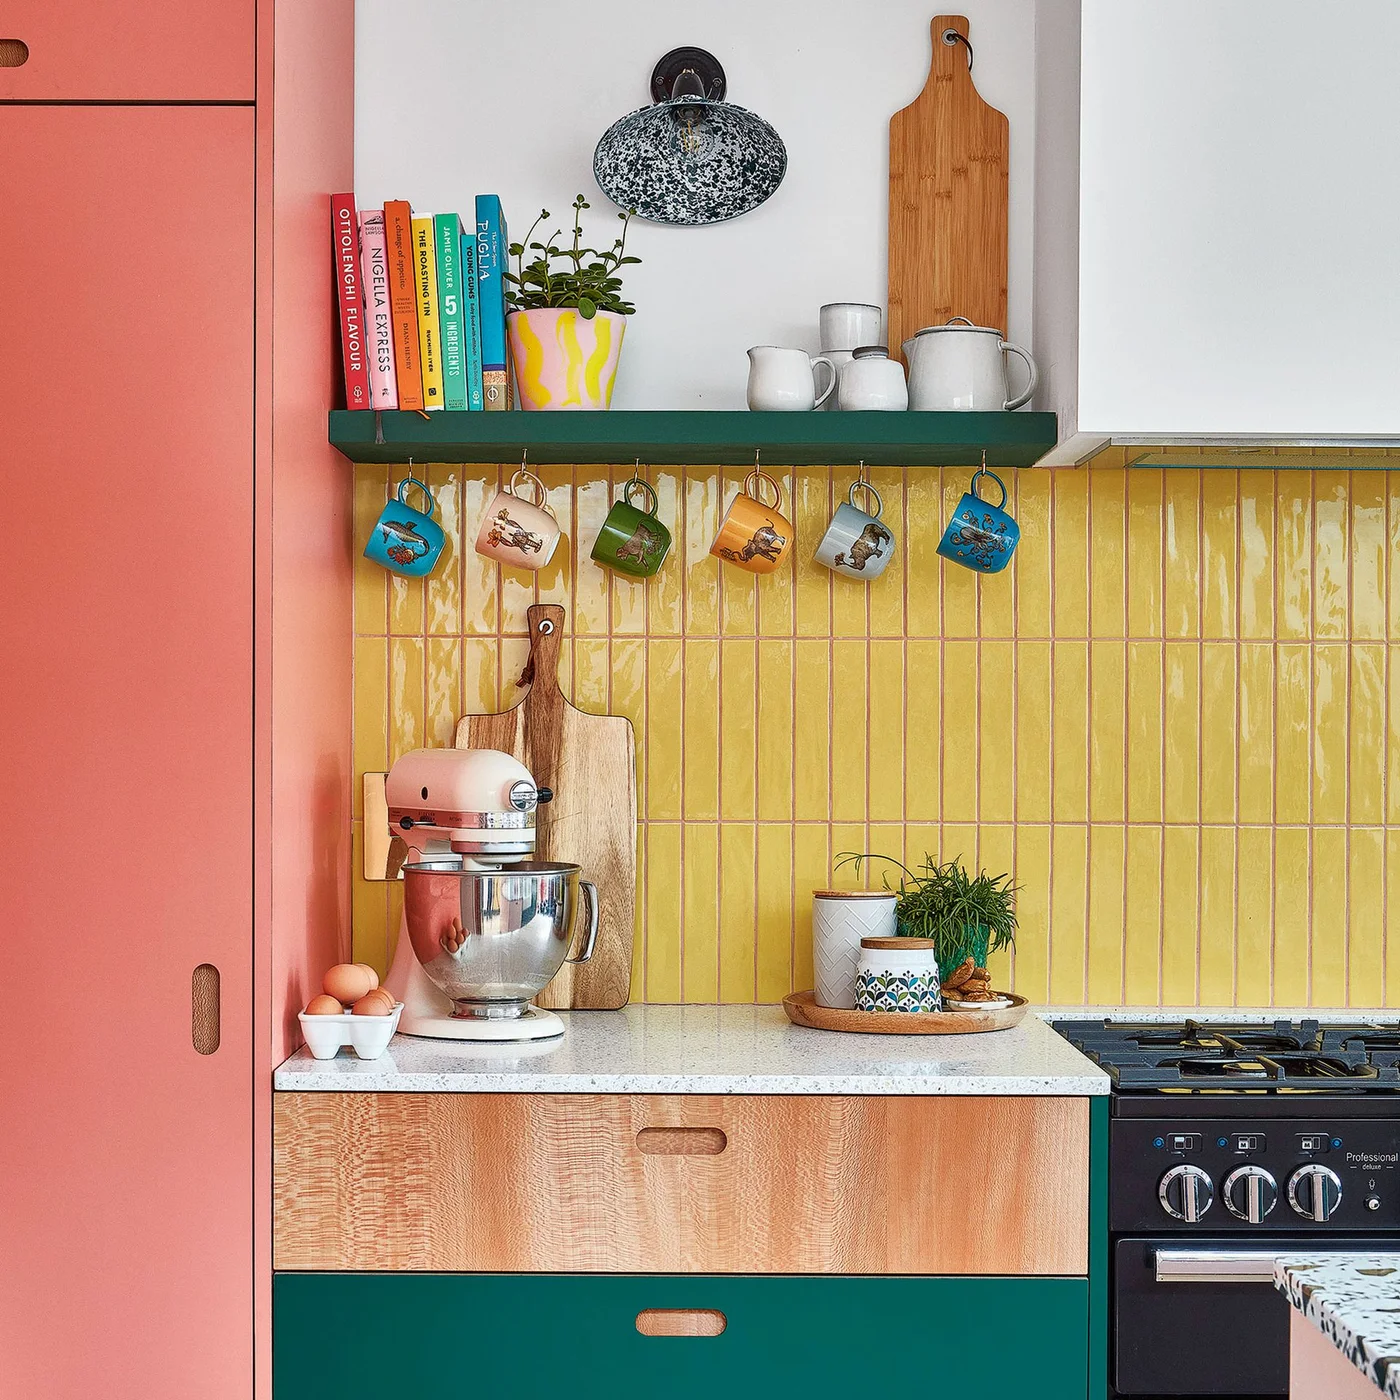
Warm a Working Corner with Yellow Tiles
 SaveSupport Non AI Creator
Image credit: Future PLC/Pluck Kitchens
Yellow tiles make the working corner brighter beside the coral-colored cabinet. A dark green shelf defines their upper edge, with hanging mugs introducing smaller separate colors. The tile pattern remains a straightforward upright grid, giving the more varied cookware and storage a consistent background.
Check the yellow sample against nearby cabinet colors rather than judging it in isolation. Keep hanging mugs and boards outside the cooking equipment’s required clearances. Choose shelf and rail fixings for their actual load, and leave enough open counter space that the tiled corner remains useful for preparation as well as displaying favorite pieces.
IDEA 14 / 20
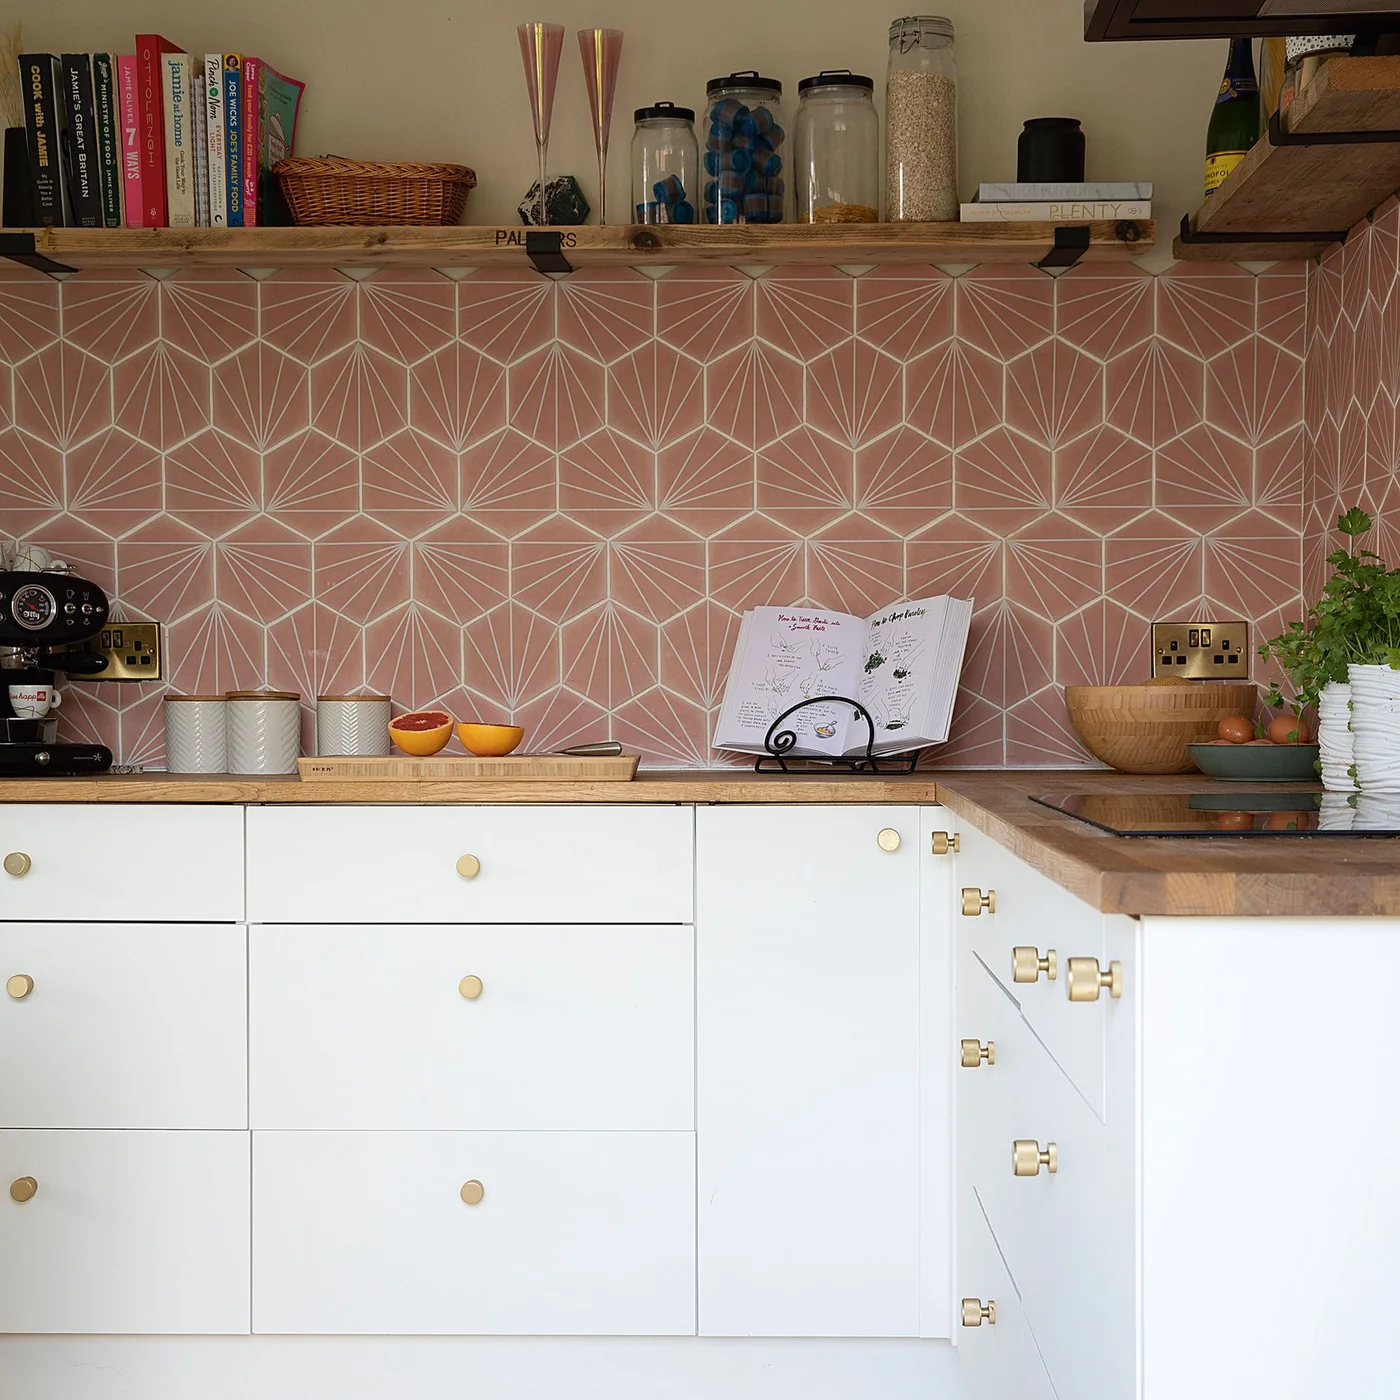
Let a Geometric Tile Cover the Corner
 SaveSupport Non AI Creator
Image credit: Future PLC/Katie Lee
The pink geometric tile continues around the corner, connecting two working surfaces with the same pattern. White cabinet fronts keep the lower area relatively simple. Wooden shelves and counters add warmer horizontal lines, with the tile’s pale outlines giving the larger pink surface more movement.
Plan the pattern at the internal corner and visible outer edges before installation, checking whether cuts will interrupt a repeated shape. Keep shelves convenient to clean and avoid crowding the counter below. A larger sample arrangement is particularly useful here because the pattern looks different across two adjoining walls than on one loose tile.
IDEA 15 / 20
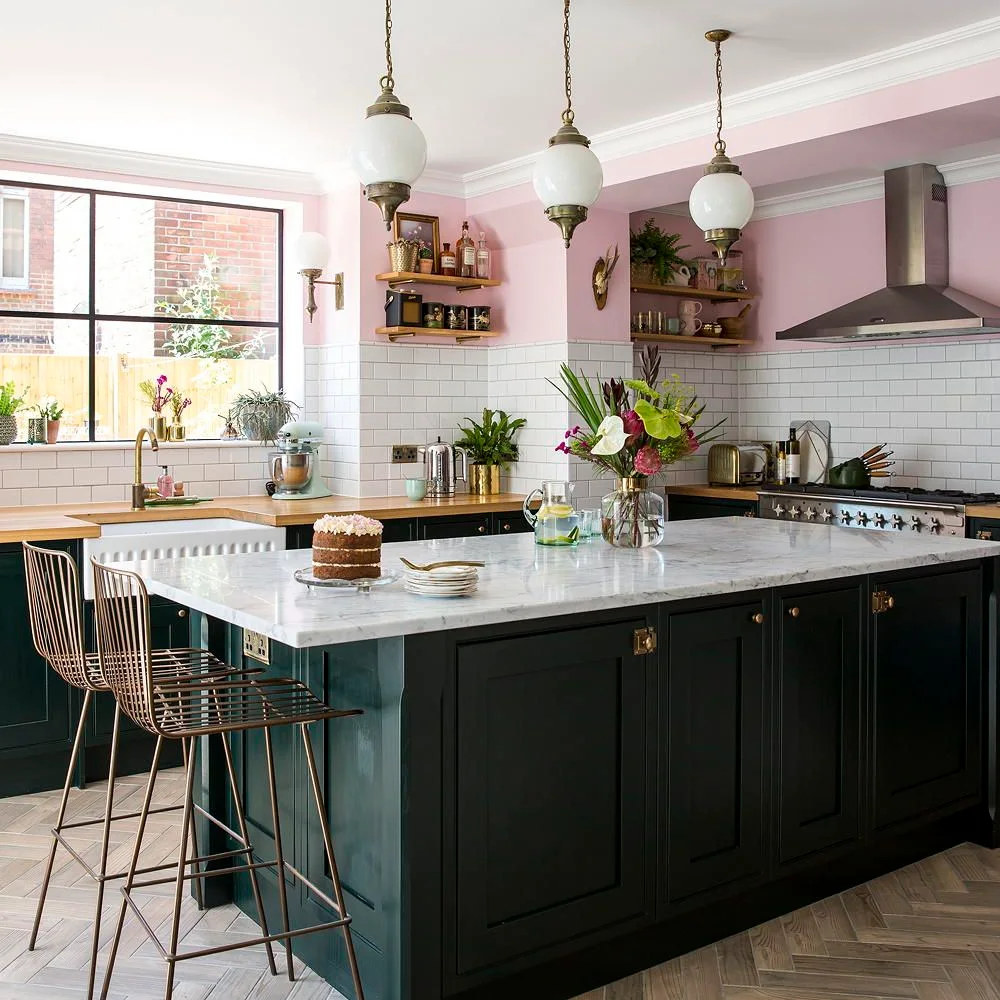
Balance Pink Walls with a White Tiled Run
 SaveSupport Non AI Creator
Image credit: Future PLC/ Lizzie Orme
White offset tiles give this kitchen a consistent light strip below the pink wall. Wooden shelves introduce warmer surfaces above, while the dark green island creates a separate stronger color group. The backsplash’s quieter pattern leaves the painted wall, island and pendant shapes easier to distinguish.
Choose the tile height with the cabinets, hood and shelves in place on the plan, avoiding awkward changes where the run meets a corner. Compare grout beside the white tile and pale counter. Painted kitchen cabinet ideas show more color combinations if you want the cabinet fronts to carry the stronger accent instead.
PART 04
Balance floor patterns and daily maintenance
IDEA 16 / 20
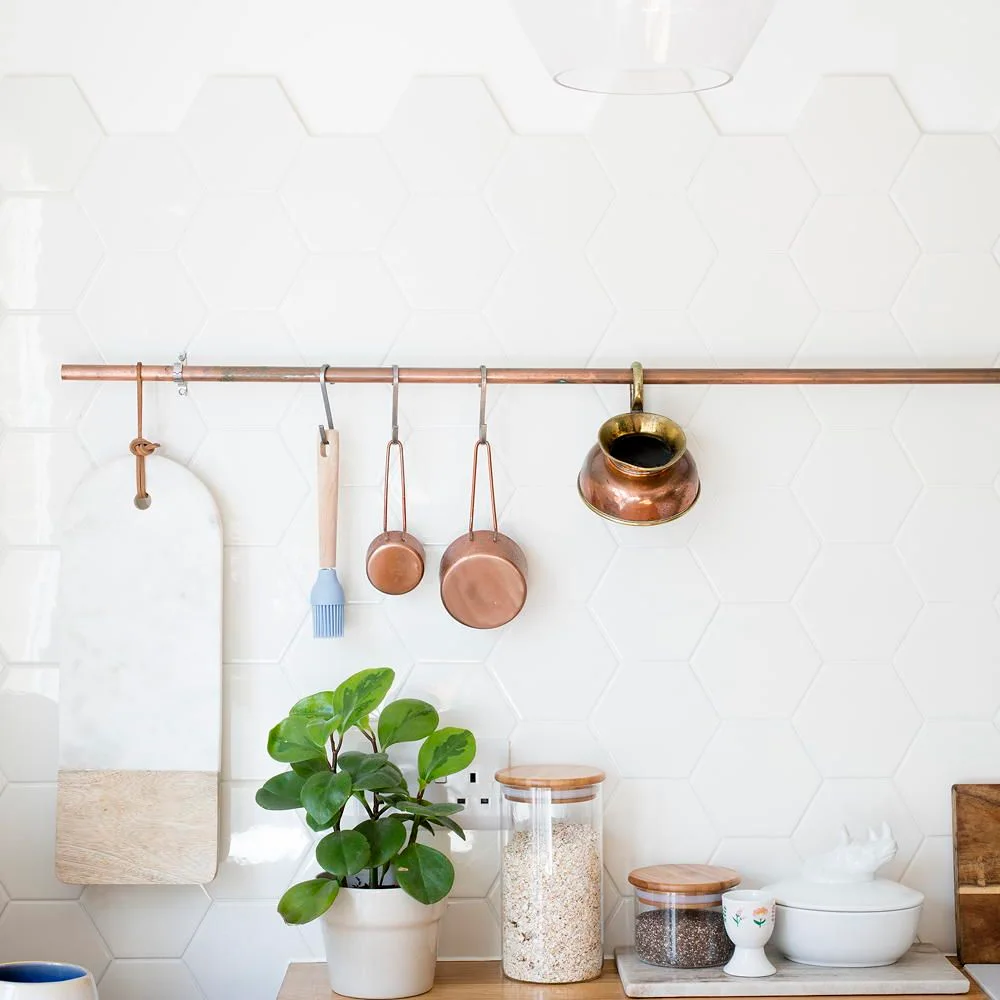
Use a Subtle Hexagon Around Everyday Tools
 SaveSupport Non AI Creator
Image credit: Future PLC/ David Giles
The white hexagons give this wall a repeated shape without a darker grout outline dominating the surface. A copper-toned rail adds a warmer horizontal line across the pattern. Pale canisters and hanging utensils make the counter useful while leaving sections of the tile visible between them.
Plan rail fixings with the installer before drilling into the finished tiled wall. Check the load and keep hanging tools positioned where they can be removed conveniently. A low-contrast grout can make the overall pattern quieter, but compare an actual sample and choose the joint product from its suitability and maintenance instructions.
IDEA 17 / 20
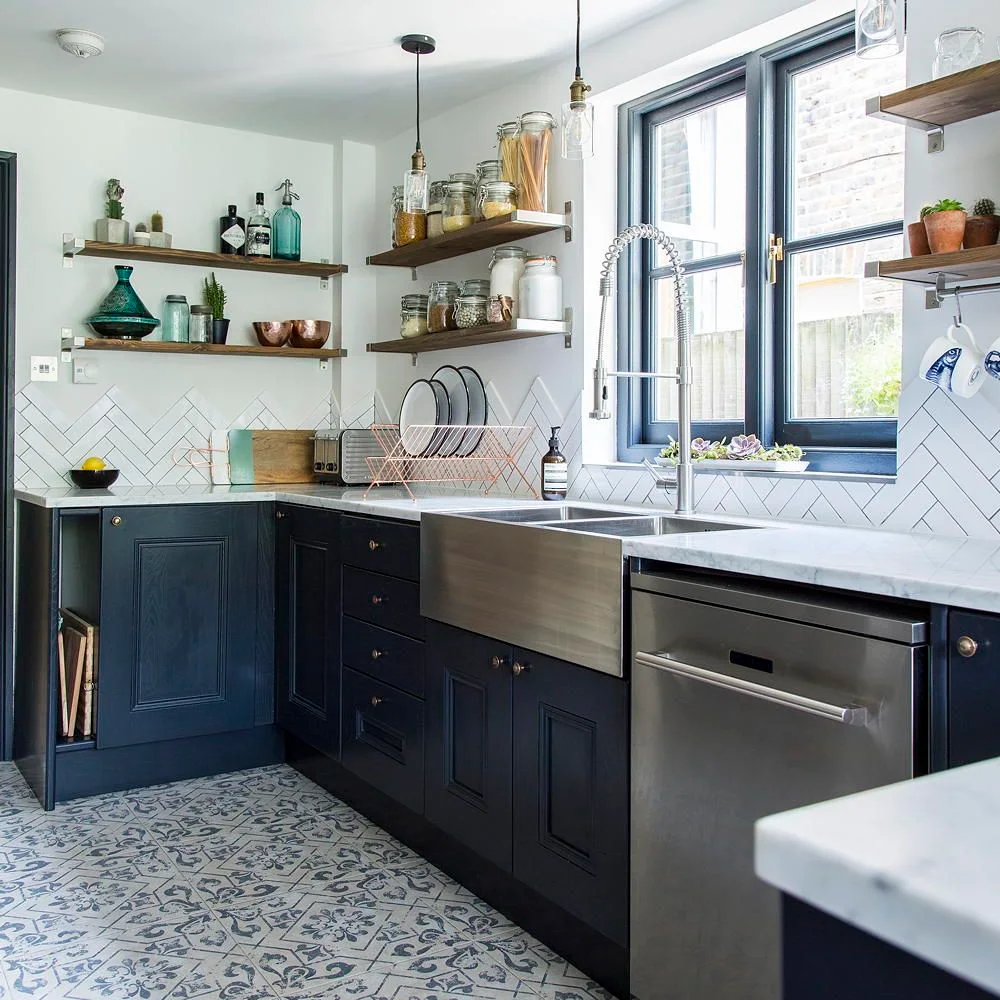
Keep the Wall Quieter Beside a Patterned Floor
 SaveSupport Non AI Creator
Image credit: Future PLC/ Lizzie Orme
The white herringbone adds a quieter diagonal pattern above these dark cabinets. The floor supplies the stronger decorative repeat, so the wall does not need another bold print. Wooden shelves give the sink corner warmth, with jars and dishes arranged in separate reachable groups.
Compare floor and wall samples together before choosing both patterns, checking their scale from the room’s normal viewing distance. Confirm that the floor product is rated for that use and ask about cleaning and slip performance. Keep exposed shelf contents manageable so the corner remains straightforward to wipe and organize.
IDEA 18 / 20
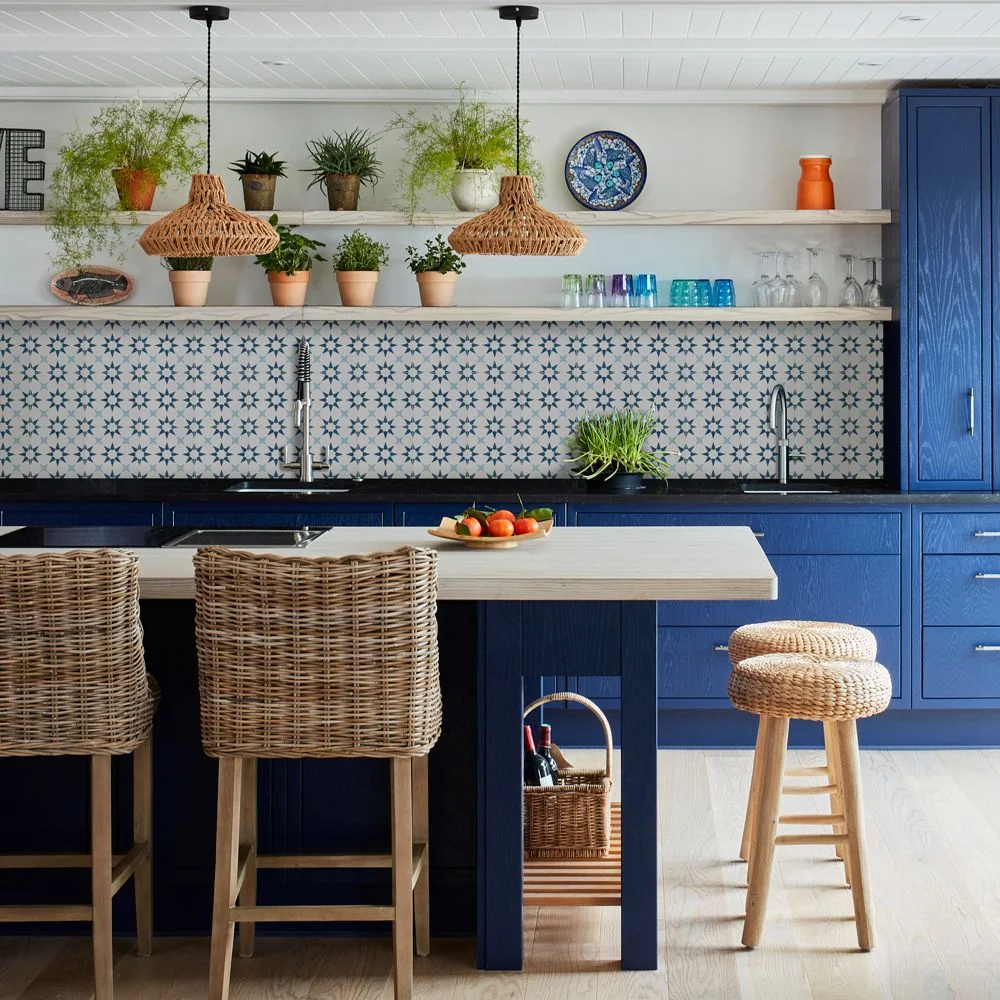
Repeat a Small Motif Across a Long Backsplash
 SaveSupport Non AI Creator
Image credit: Ca' Pietra, Atlas tiles
The small blue-and-white motif creates a continuous patterned strip beneath the long shelves. Blue cabinets repeat one of the tile colors below, while woven seats and pendant shades introduce warmer texture. The pale surrounding surfaces leave the backsplash as a clear detail rather than covering every wall with the same repeat.
Check several tiles together to understand the full motif and plan how it ends at tall cabinets or wall corners. Limit other patterned finishes if you want this repeat to remain easy to read. Keep plants and open dishes convenient to remove so cleaning the longer backsplash does not require dismantling the entire shelf arrangement.
IDEA 19 / 20
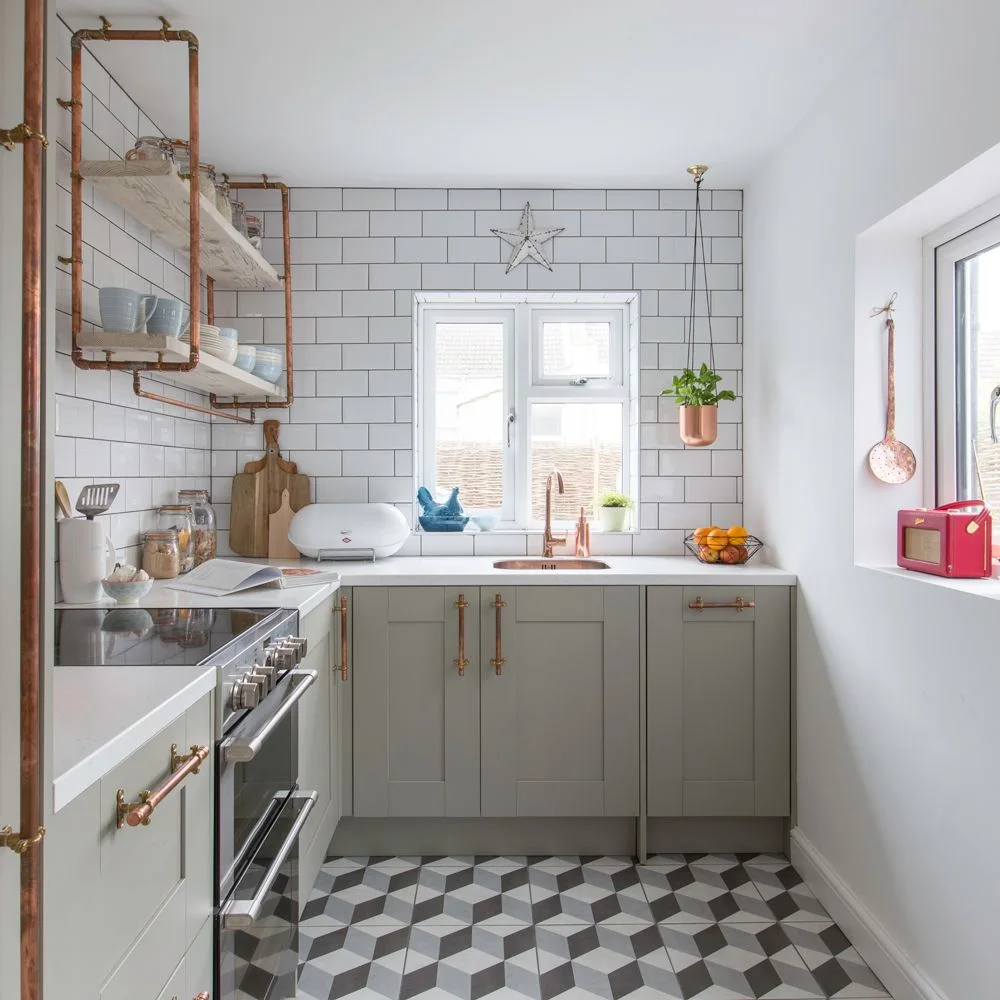
Let a Strong Floor Sit Beneath Simple Wall Tiles
 SaveSupport Non AI Creator
Image credit: Future PLC/ Jonathan Jones
White rectangular wall tiles provide a straightforward grid around the window. The stronger black-and-gray floor pattern supplies the room’s more noticeable geometry. Pale cabinets soften that contrast, with copper-toned shelving supports and fittings adding smaller warm outlines against the otherwise lighter working area.
Confirm floor suitability, slip performance and cleaning guidance before choosing the geometric product. Check the pattern’s orientation against the kitchen entrance and cabinet run. Keep the wall tile layout planned around the window edges, giving both surfaces a deliberate finish instead of allowing small cuts to determine the room’s strongest lines.
IDEA 20 / 20
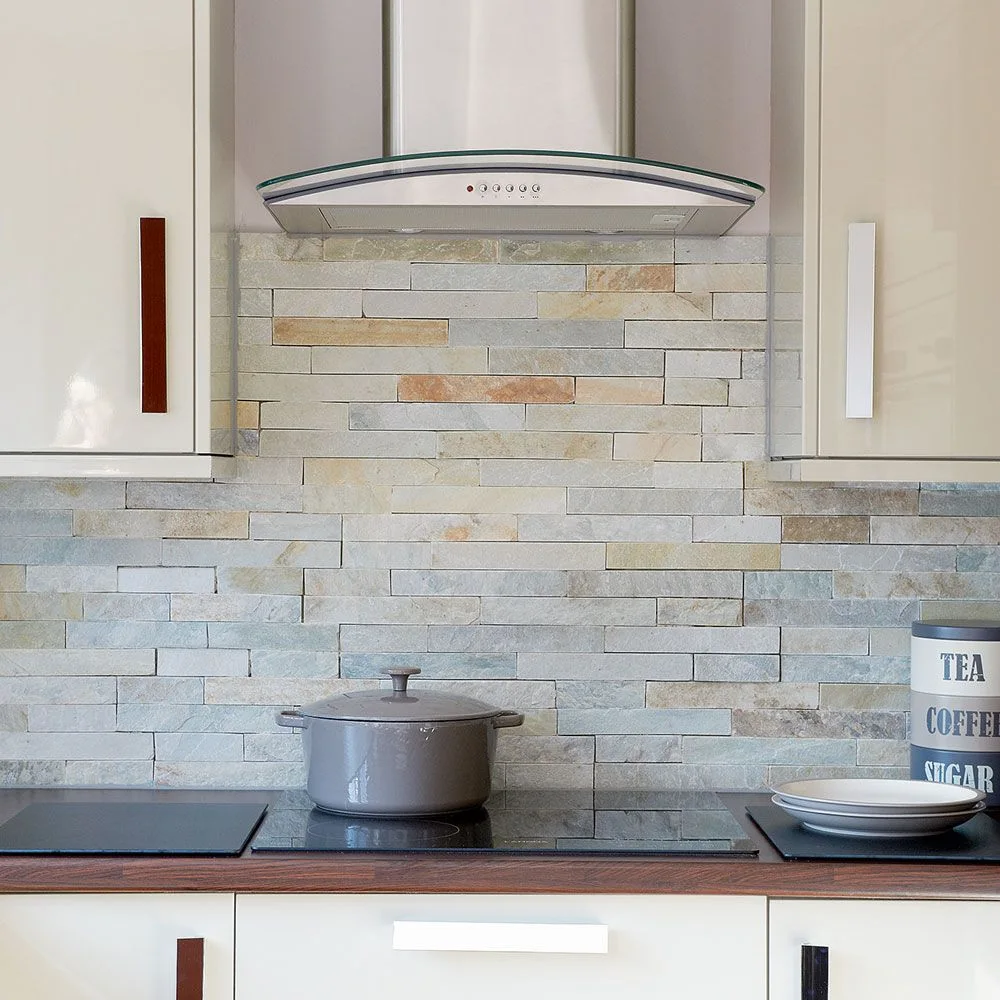
Consider the Cleaning Tradeoff of Textured Strips
 SaveSupport Non AI Creator
Image credit: Future PLC/Oliver Gordon
Narrow textured strips give this cooking wall a layered surface beneath the metal hood. Pale gray and warmer sections introduce color variation without a printed motif. Light cabinet doors frame the feature on both sides, keeping the textured area concentrated around the cooking position.
Ask the supplier to confirm the product’s suitability behind your particular cooking appliance, including heat and maintenance requirements. Raised texture can need more detailed cleaning than a smooth face, especially where cooking residue collects. Test a sample and discuss edge finishing and sealing requirements before choosing the appearance for a frequently used working wall.
BRING IT ALL TOGETHER
Choose the sample and the cleaning routine together
Compare several tiles with the grout, counter and cabinet finish before ordering. Check how the layout meets sockets, shelves, windows and corners, and ask the installer to plan the visible cuts. A repeat that looks attractive on one sample may feel considerably stronger across a whole working wall.
Confirm the actual product’s intended use and maintenance requirements, particularly for floors or behind cooking equipment. Smooth, glossy and textured faces each need different consideration during everyday cleaning. Keep some spare matching tiles where practical and record the product details so a later repair does not depend on guessing the original finish.