A kitchen backsplash should work with the cabinets and make the busiest parts of the room easier to live with. Its color and pattern matter, but so do the joints, edges and cleaning requirements around the sink and cooking area.
These kitchens show several ways to combine familiar cabinet shapes with tiles, patterned surfaces and taller panels. Use the photographs to compare arrangements, then check the actual product specifications and installation requirements before choosing a finish for your own kitchen.
PART 01
Give larger panels a thoughtful setting
IDEA 01 / 20
Balance sweeping veins with quieter cabinet outlines
 SaveSupport Non AI Creator
Image credit: Kaj Design
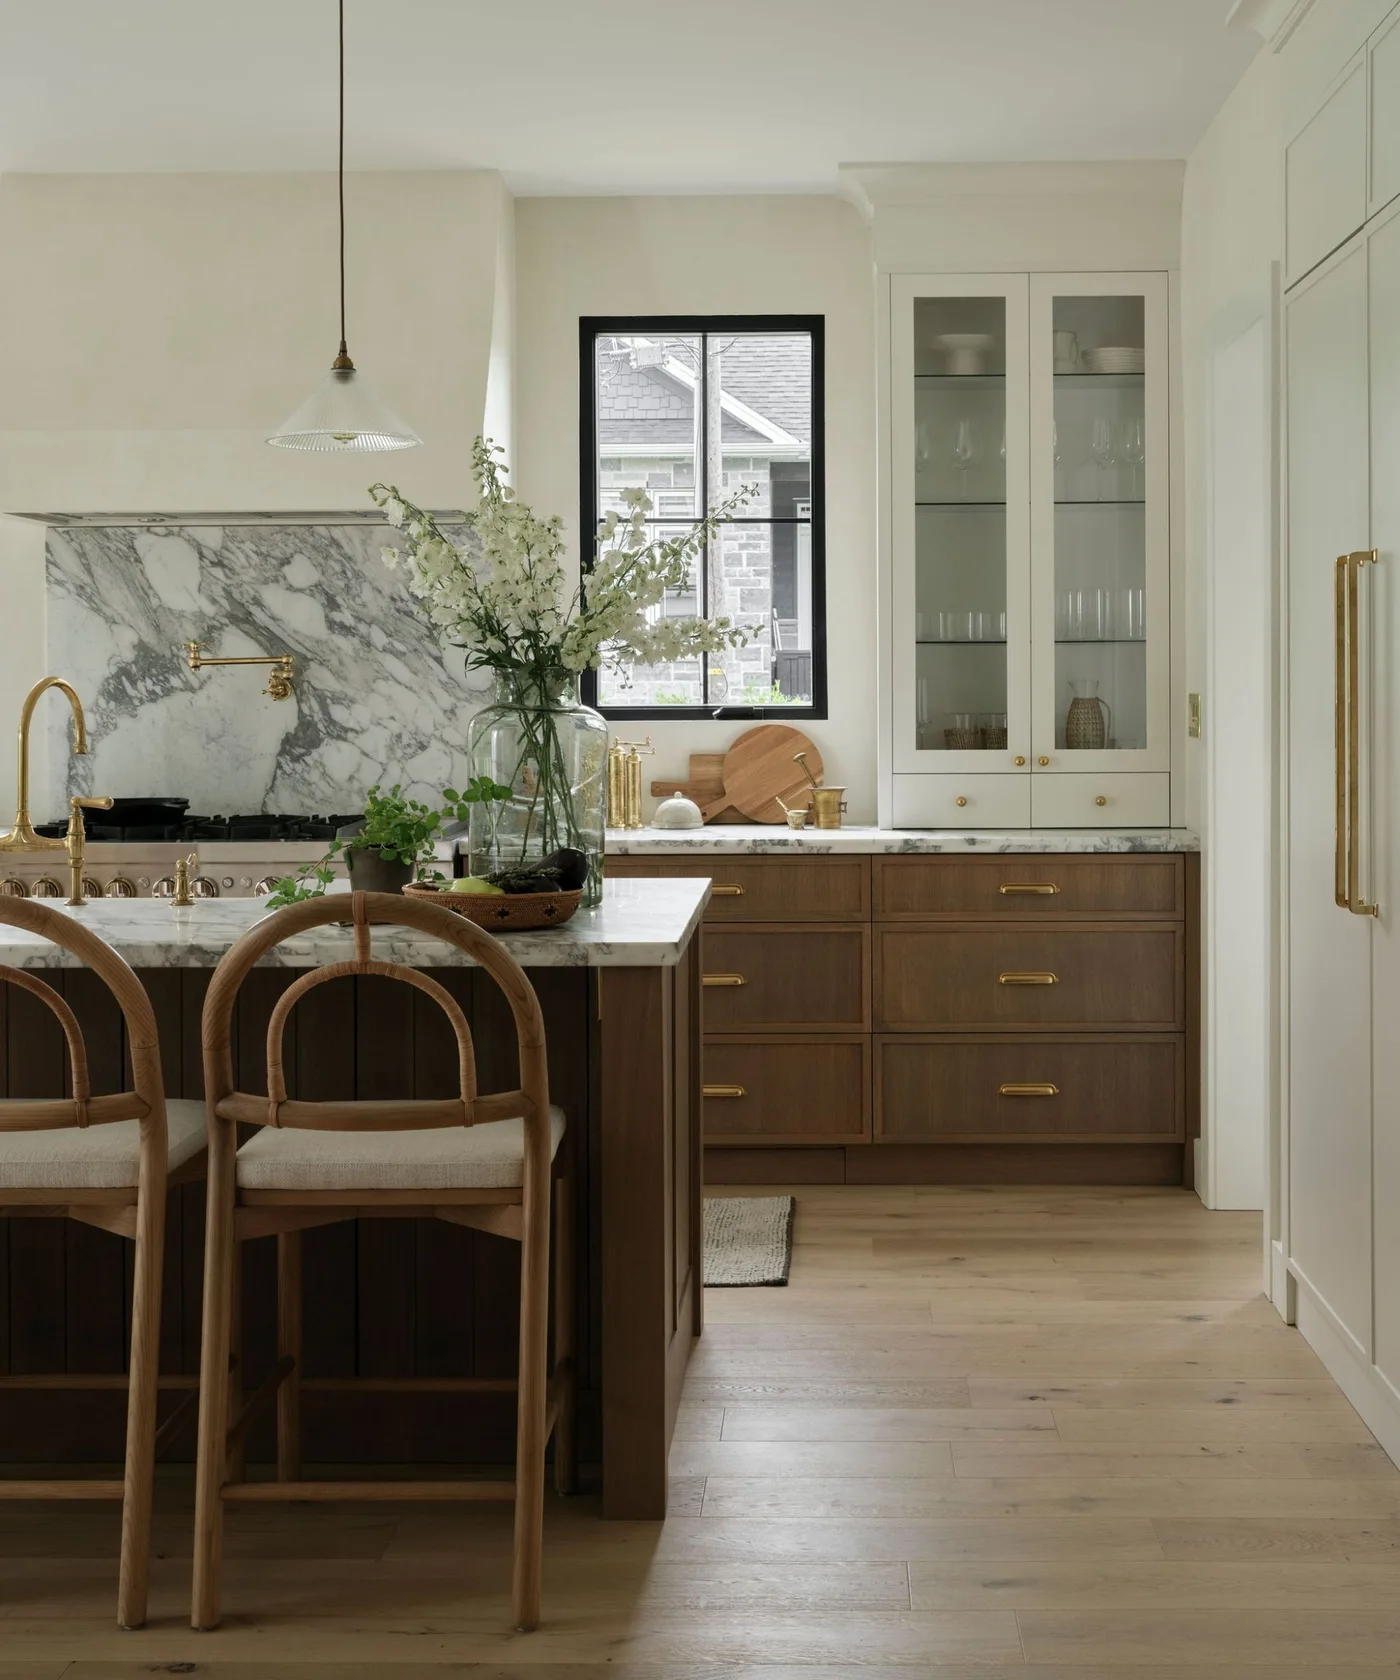
Sweeping gray veins give the wall behind this cooktop much of its movement. Glass-front upper cabinets and wooden lower drawers provide a familiar framework around the larger panel, while the rectangular window introduces a darker outline at the side. The cabinet shapes stay relatively quiet beside the strongly marked surface.
Look at the full panel or a representative section before choosing a finish with large markings. A small sample may miss the strongest veins and their direction. Ask about cleaning, sealing where applicable, and installation requirements for the actual material, rather than assuming every pale veined surface needs the same care.
IDEA 02 / 20
Continue a cabinet color across the sink surround
 SaveSupport Non AI Creator
Image credit: deVOL Kitchens
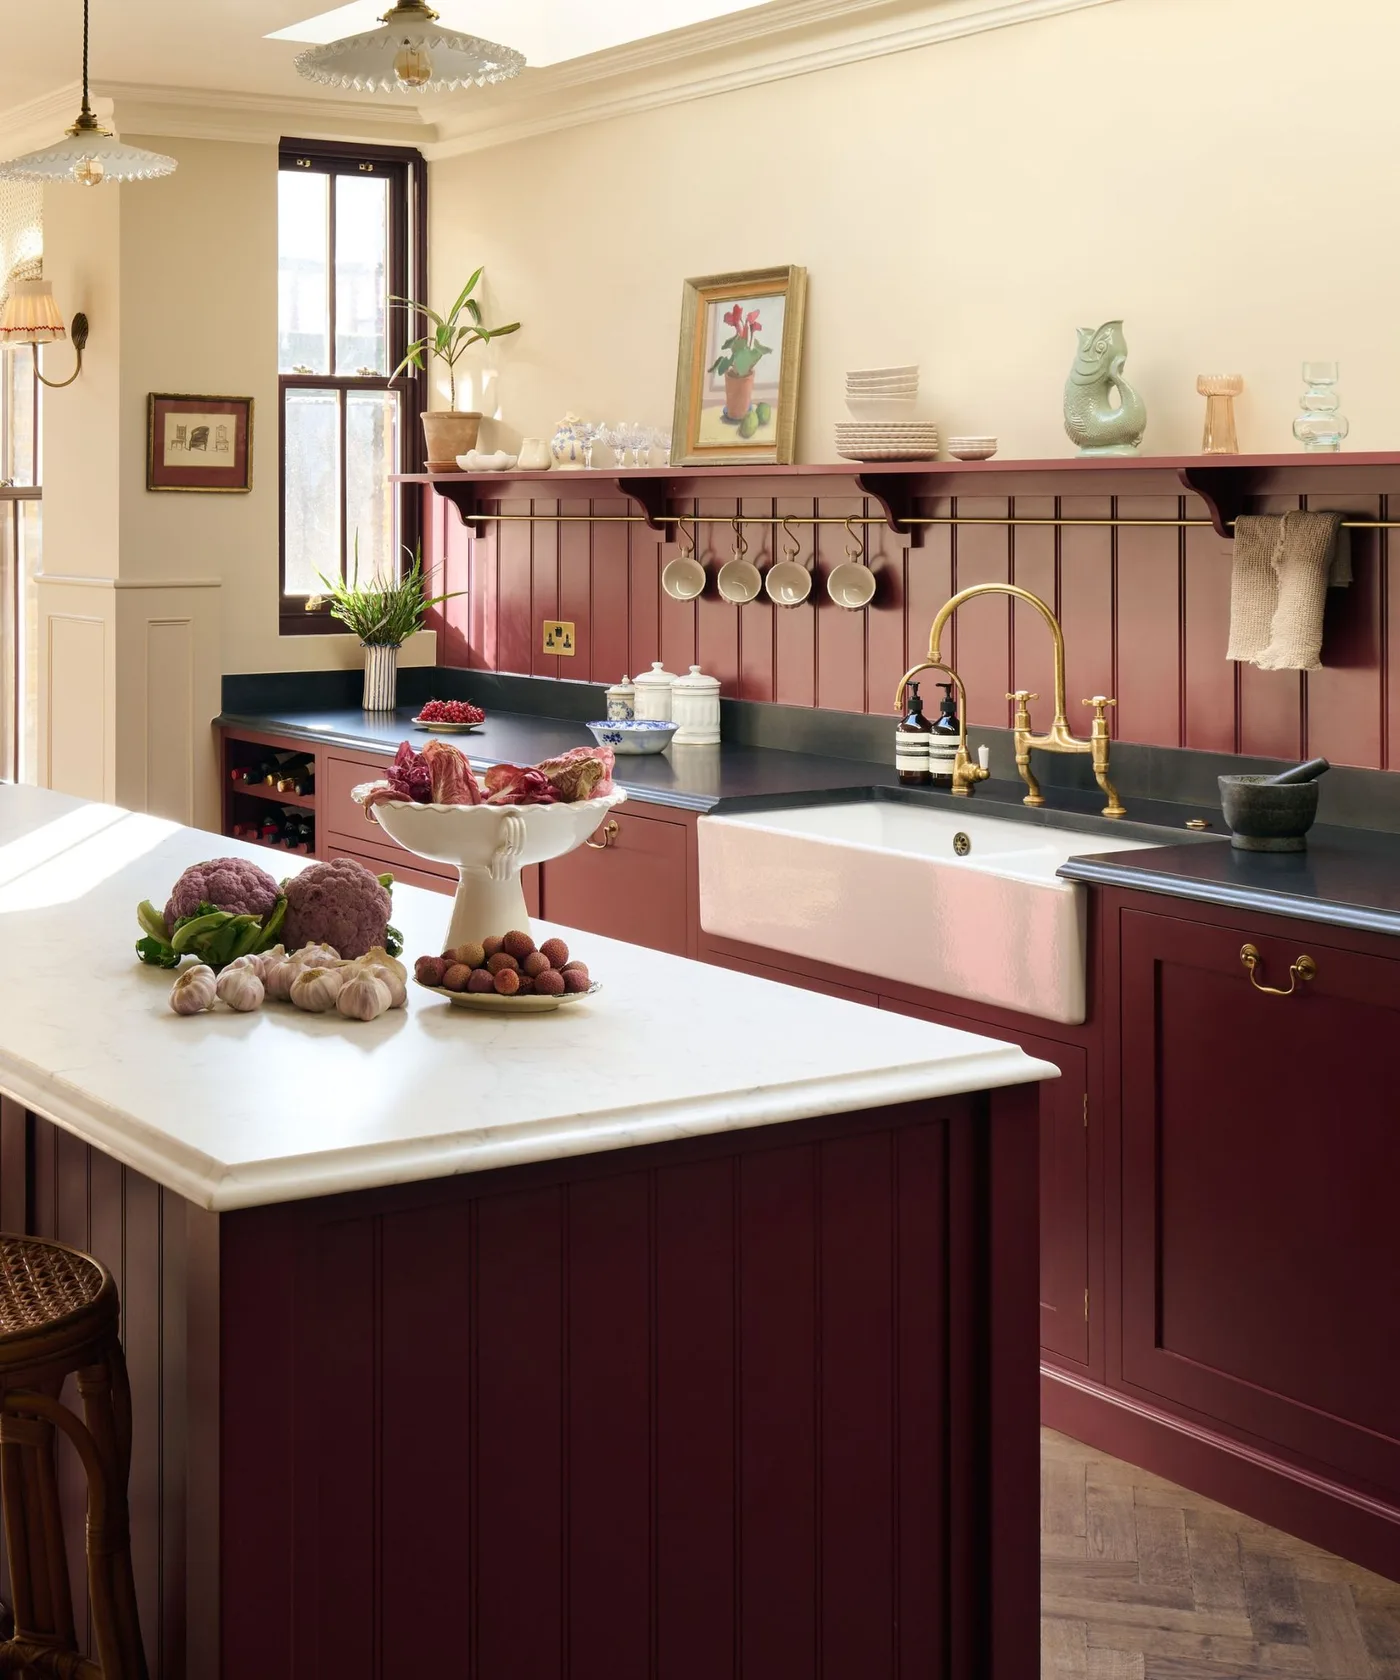
Burgundy vertical paneling continues the color of the lower cabinets behind the white double sink. A long shelf and hanging mugs add useful detail without changing that main color relationship. The dark counter separates the pale basin from the red surround, making the sink a clear focal point within the arrangement.
For a similar sink wall, check the proposed panel product and installation for moisture exposure before choosing it. Pay attention to the junction beside the counter and around the taps. This photograph shows a sink setting; it is not a reason to use the same finish behind a heat producing appliance.
IDEA 03 / 20
Use a softly reflective panel behind the basin
 SaveSupport Non AI Creator
Image credit: Future / © James Merrell
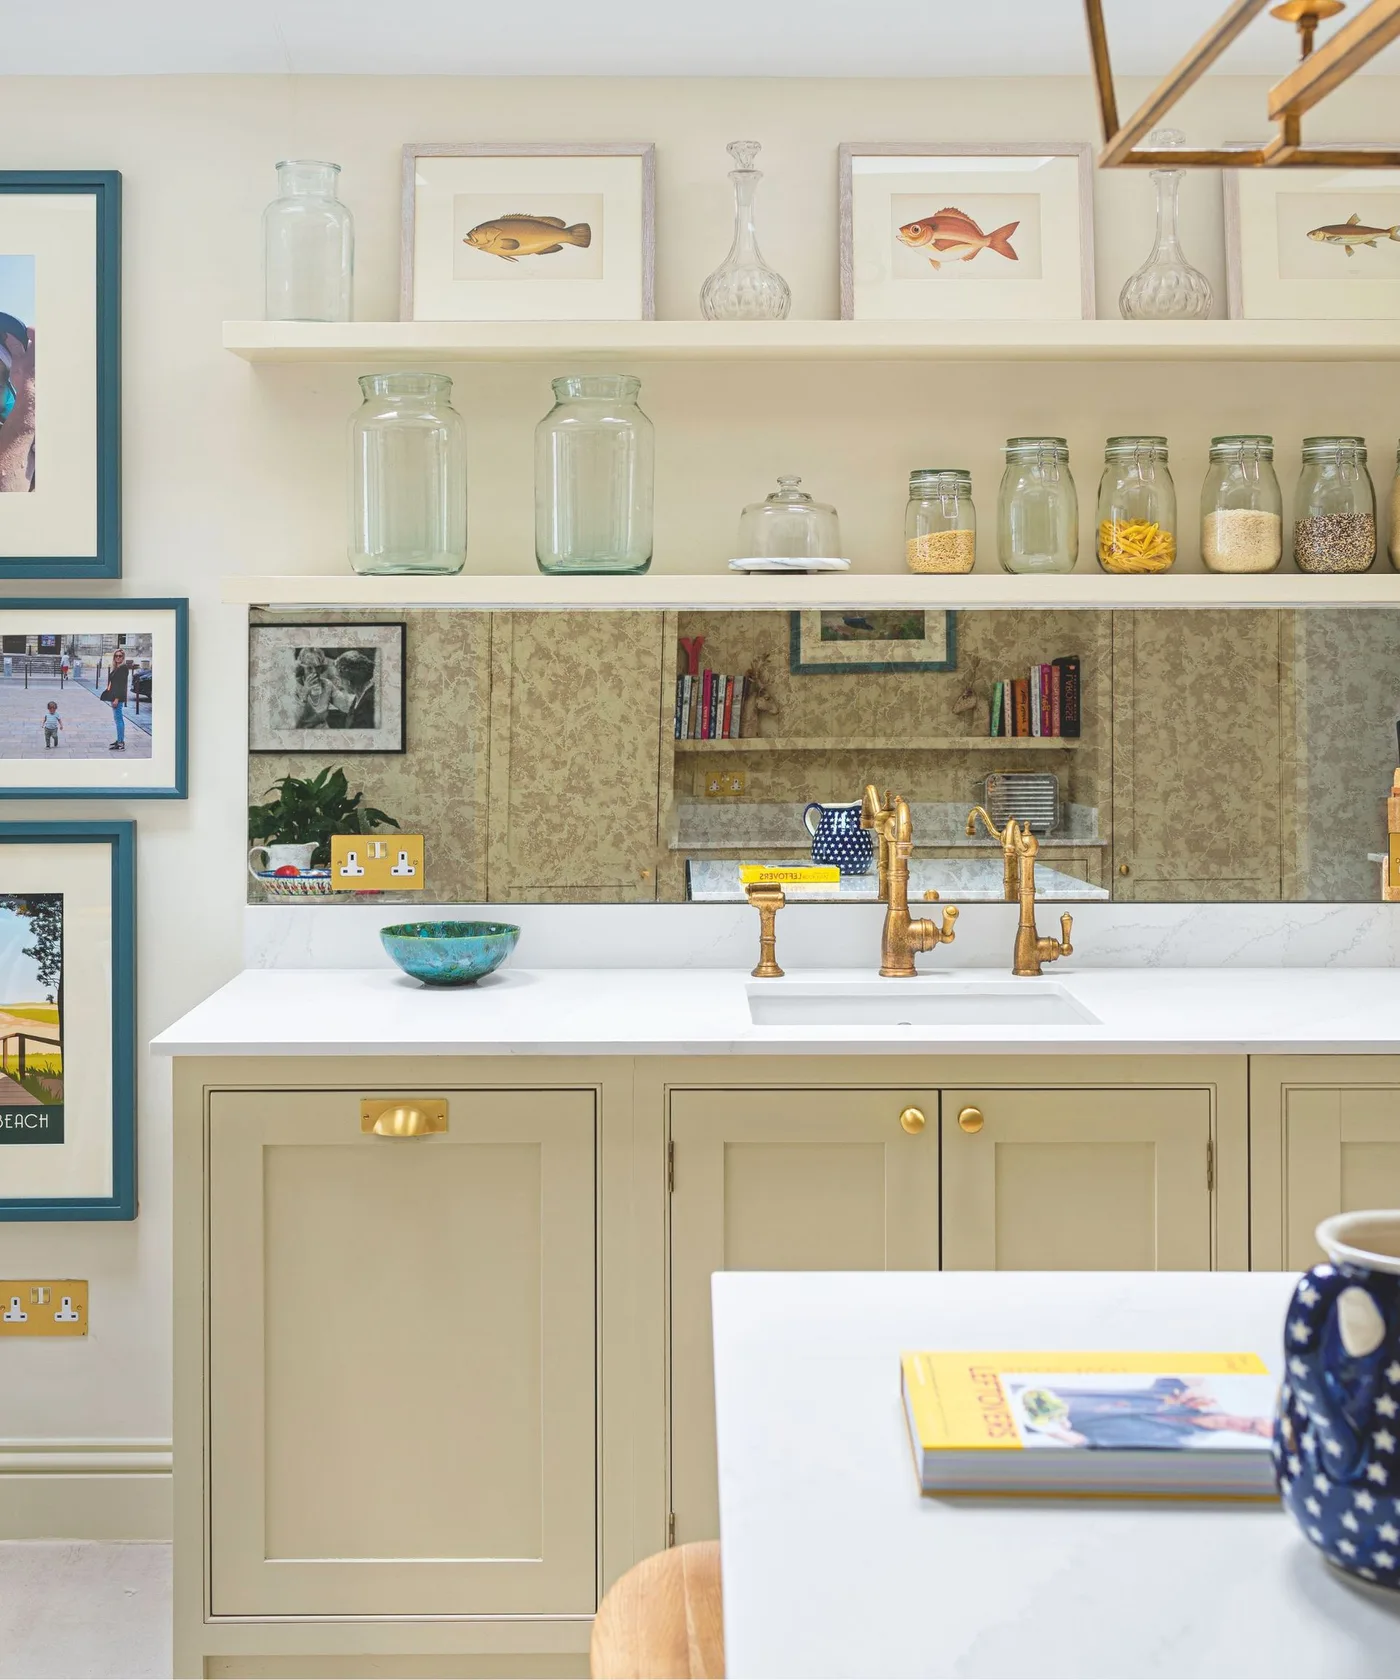
A softly mottled reflective panel sits behind the sink between cream cabinets and open shelves. Its uneven reflections add depth without introducing a strong geometric pattern. The pale basin, warm colored taps and small objects on the shelves keep the arrangement detailed, while the cabinet fronts provide a simpler surround.
A reflective backsplash needs to suit its location and the way it will be cleaned. Compare a larger sample in your own lighting, where reflections may look quite different from the photograph. Ask the supplier about moisture, edge treatment and suitable cleaners, and confirm separate heat requirements if considering a cooking position.
IDEA 04 / 20
Cap a veined panel with a useful wooden shelf
 SaveSupport Non AI Creator
Image credit: Lauren Gilberthorpe Interiors
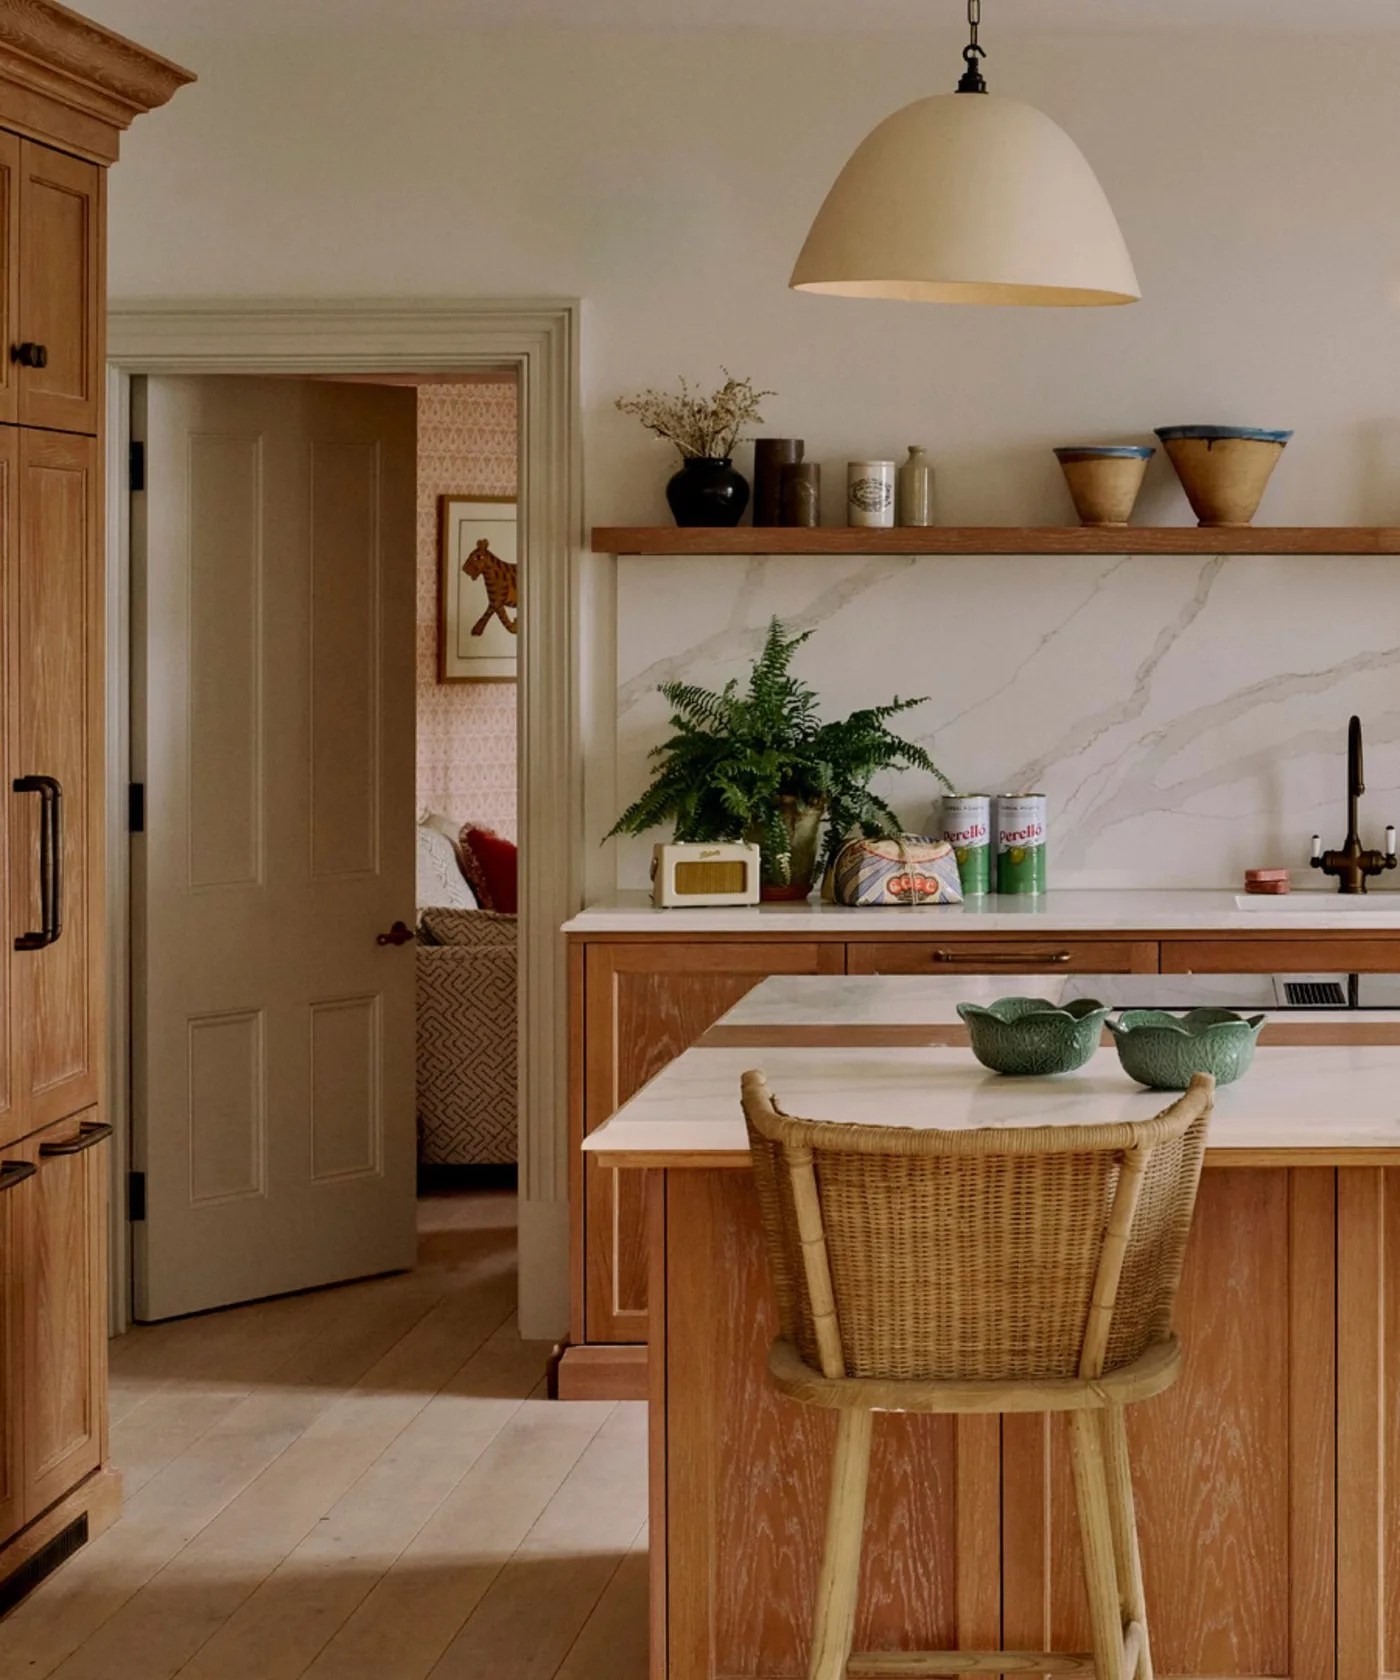
A pale veined panel runs above the counter, with a long wooden shelf defining its upper edge. The shelf echoes the lower cabinet doors and tall framed cupboard at the side. A black faucet provides a small darker accent, leaving the combination of wood tones and pale markings as the main visual relationship.
Decide what the shelf will hold before setting its height and depth. Frequently used bowls need comfortable reach, while objects beside the sink should tolerate nearby splashes. Have the backsplash edge, shelf fixings and plumbing considered together so the useful storage does not create awkward joints or compromise the chosen surface.
IDEA 05 / 20
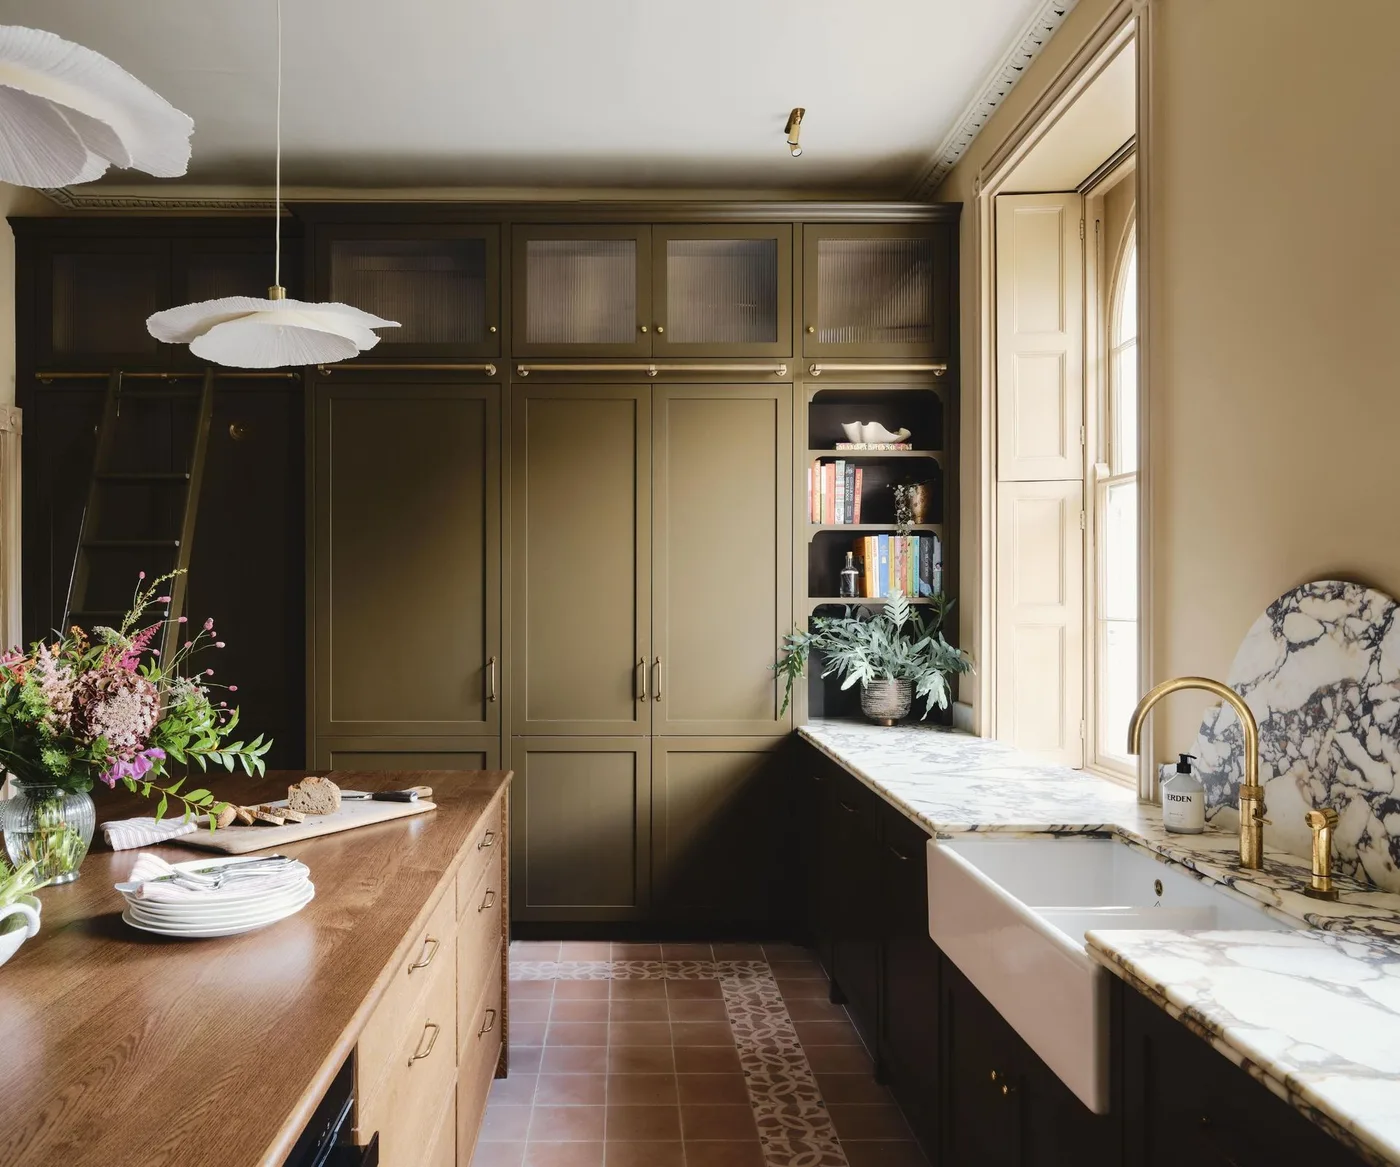
Give a sink backsplash a curved upper edge
 SaveSupport Non AI Creator
Image credit: 202 Design/Studio Duggan
The pale backsplash rises in a curve behind the white sink before stepping down along either side. Dark olive cabinets make its outline easy to see, and the warm colored taps sit against the central raised area. The window above keeps the sink wall from becoming a continuous expanse of cabinetry.
A shaped panel needs careful planning around the basin, taps and window trim. Discuss templating and edge finishing with the installer rather than relying on a sketch alone. Check how much protection the lower sections provide where you actually splash water, and follow the cleaning guidance for the material you select.
PART 02
Make a familiar pattern feel individual
IDEA 06 / 20
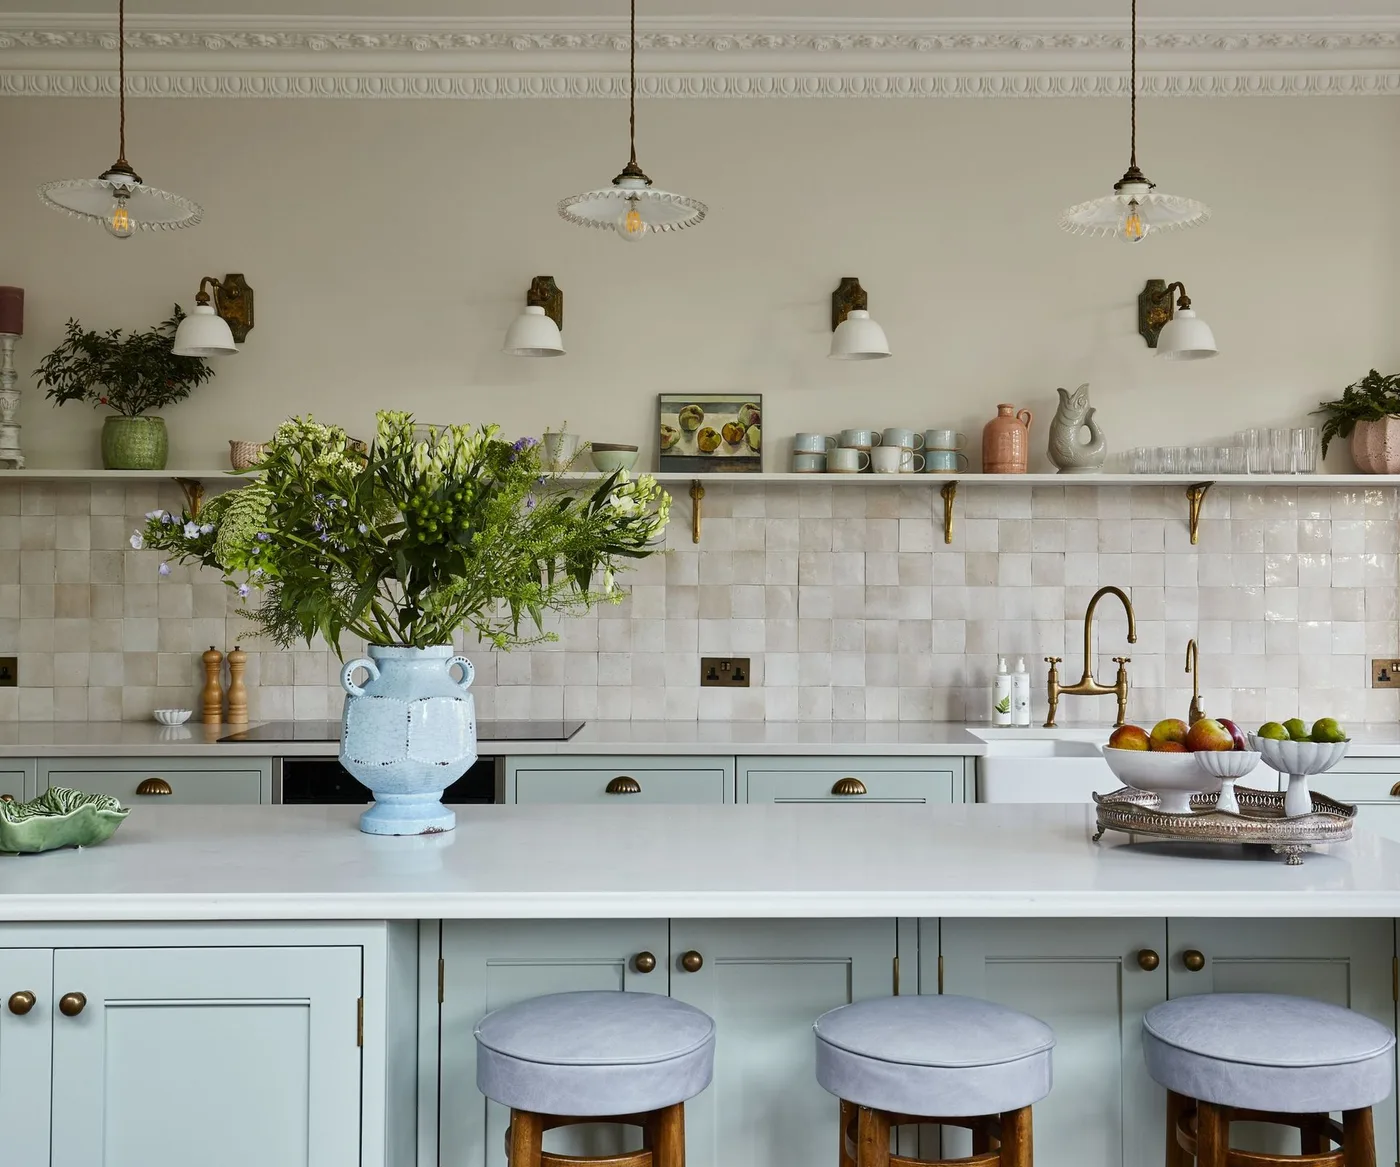
Pair creamy square tiles with pale blue cabinets
 SaveSupport Non AI Creator
Image credit: Laura Stephens
Creamy square tiles form an offset pattern above the pale blue cabinets. Their slightly varied tones and glossy reflections give the wall interest without a bold printed motif. A long shelf and small wall lights create another horizontal layer, leaving the tile arrangement visible across much of the working surface.
Compare the tile color with the cabinet paint under the task lighting you plan to use. A cream that looks gentle in daylight can appear yellower under a different lamp. Include a grout sample in the comparison, since the many short joints will help determine how pronounced the square pattern becomes.
IDEA 07 / 20
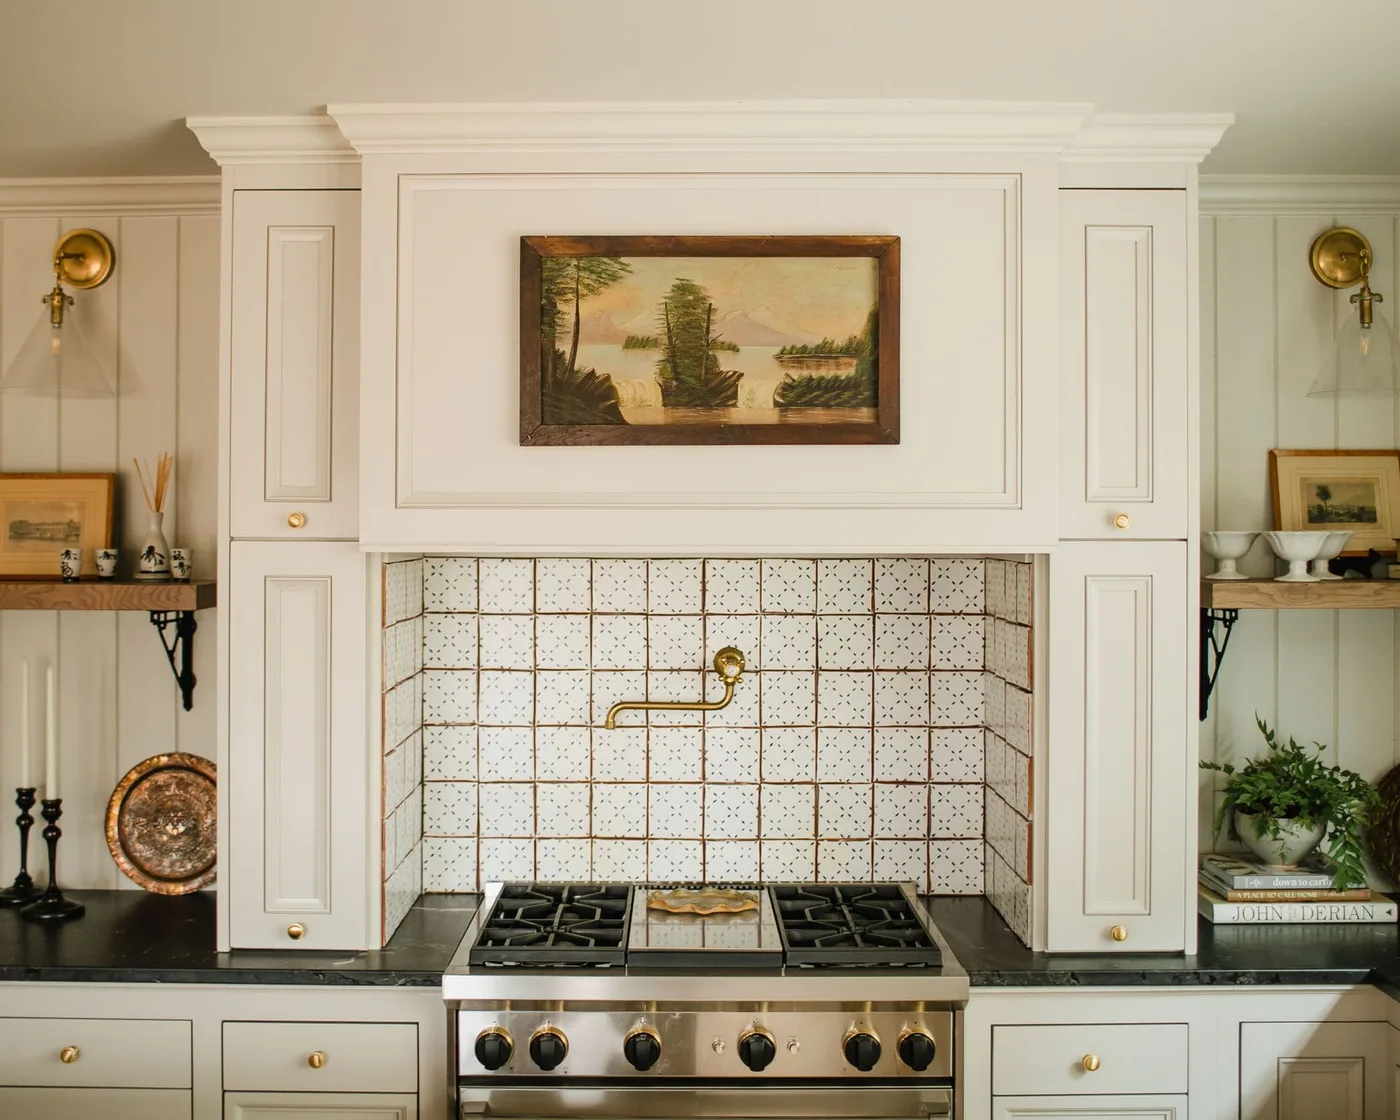
Frame a small pattern inside the cooking alcove
 SaveSupport Non AI Creator
Image credit: The Misfit House/Kristin Benton Photography
Pale square tiles with small dark motifs fill the cooking alcove beneath a decorative cream hood. Their repeated marks give the central wall more detail than the surrounding cabinet fronts. Darker joint lines make the squares readable, while the pale tones connect the patterned area with the cabinetry on either side.
When choosing a similar small pattern, view several tiles together at the distance you normally stand from the cooker. Check the chosen tile, adhesive and installation against the appliance requirements. Keep accessories and any artwork outside the necessary heat clearances, and choose a surface whose cleaning routine suits regular cooking splashes.
IDEA 08 / 20
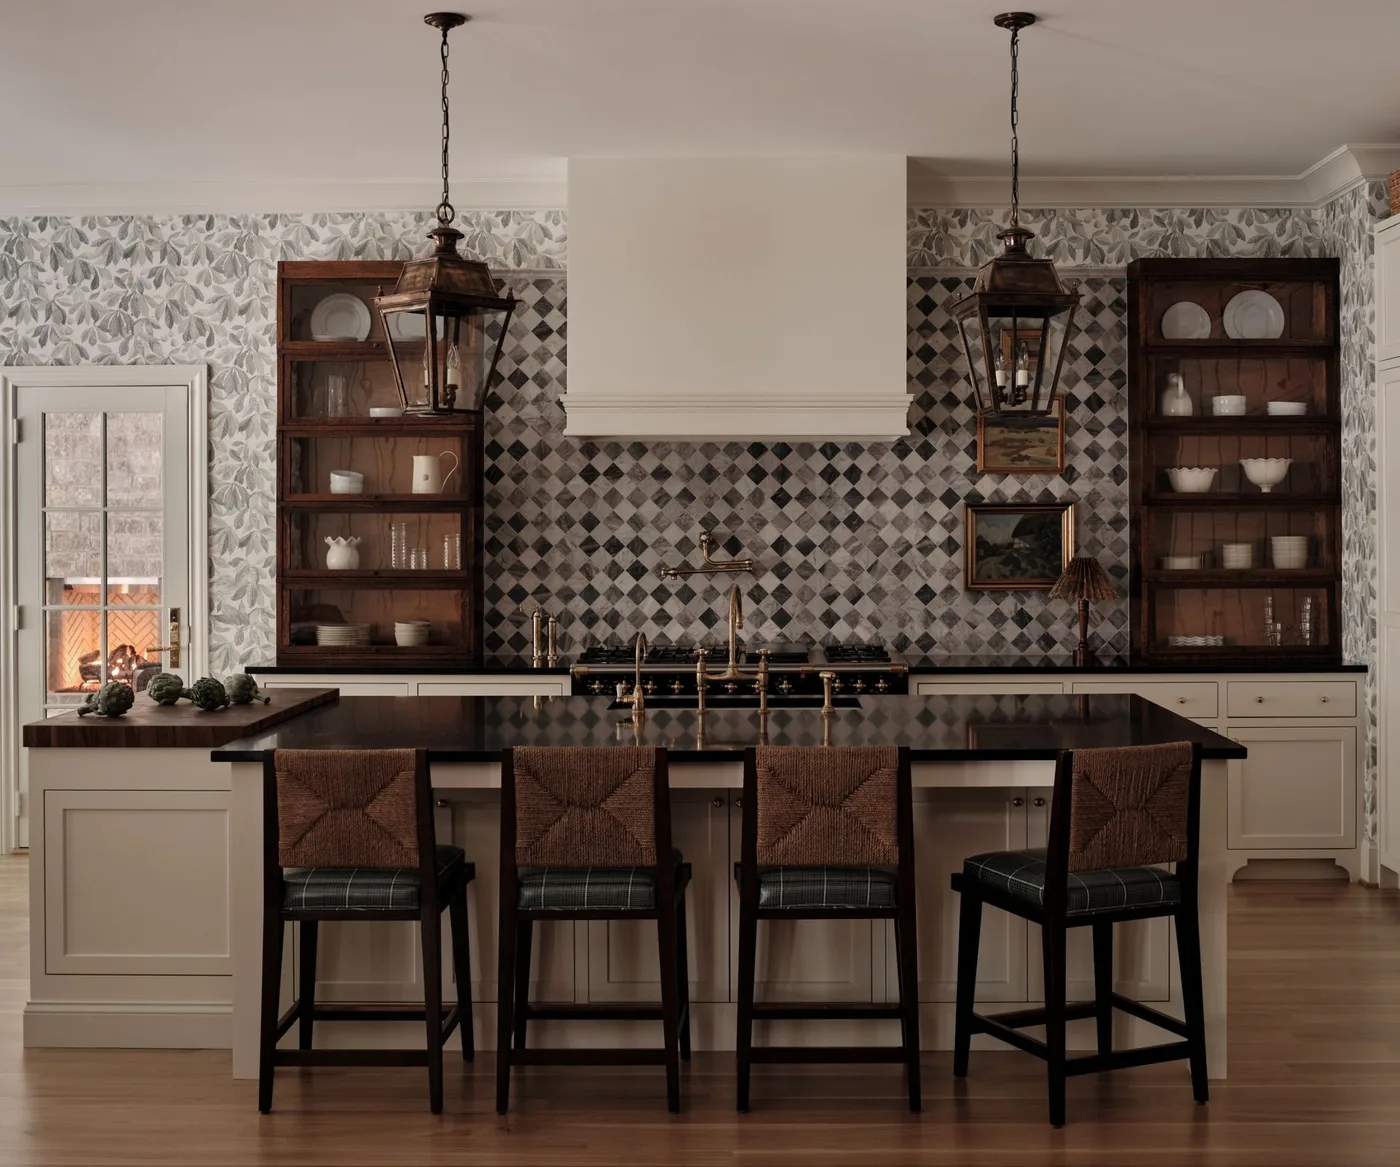
Make the cooker wall a geometric focal point
 SaveSupport Non AI Creator
Image credit: Sabbe Interior Design
A diamond pattern makes the cooker wall the strongest decorative area in this kitchen. Dark wooden glass-front cupboards flank the pale central hood, repeating some of the darker tones in the backsplash. The surrounding framed cabinet doors and botanical decoration add detail, but the geometric wall remains easy to identify.
Lay out a larger sample of a geometric pattern before committing to it. Check how the motif will center behind the cooker and meet each cupboard edge. If your kitchen already contains several busy surfaces, consider quieter neighboring finishes so the backsplash can be enjoyed without competing patterns across every wall.
IDEA 09 / 20
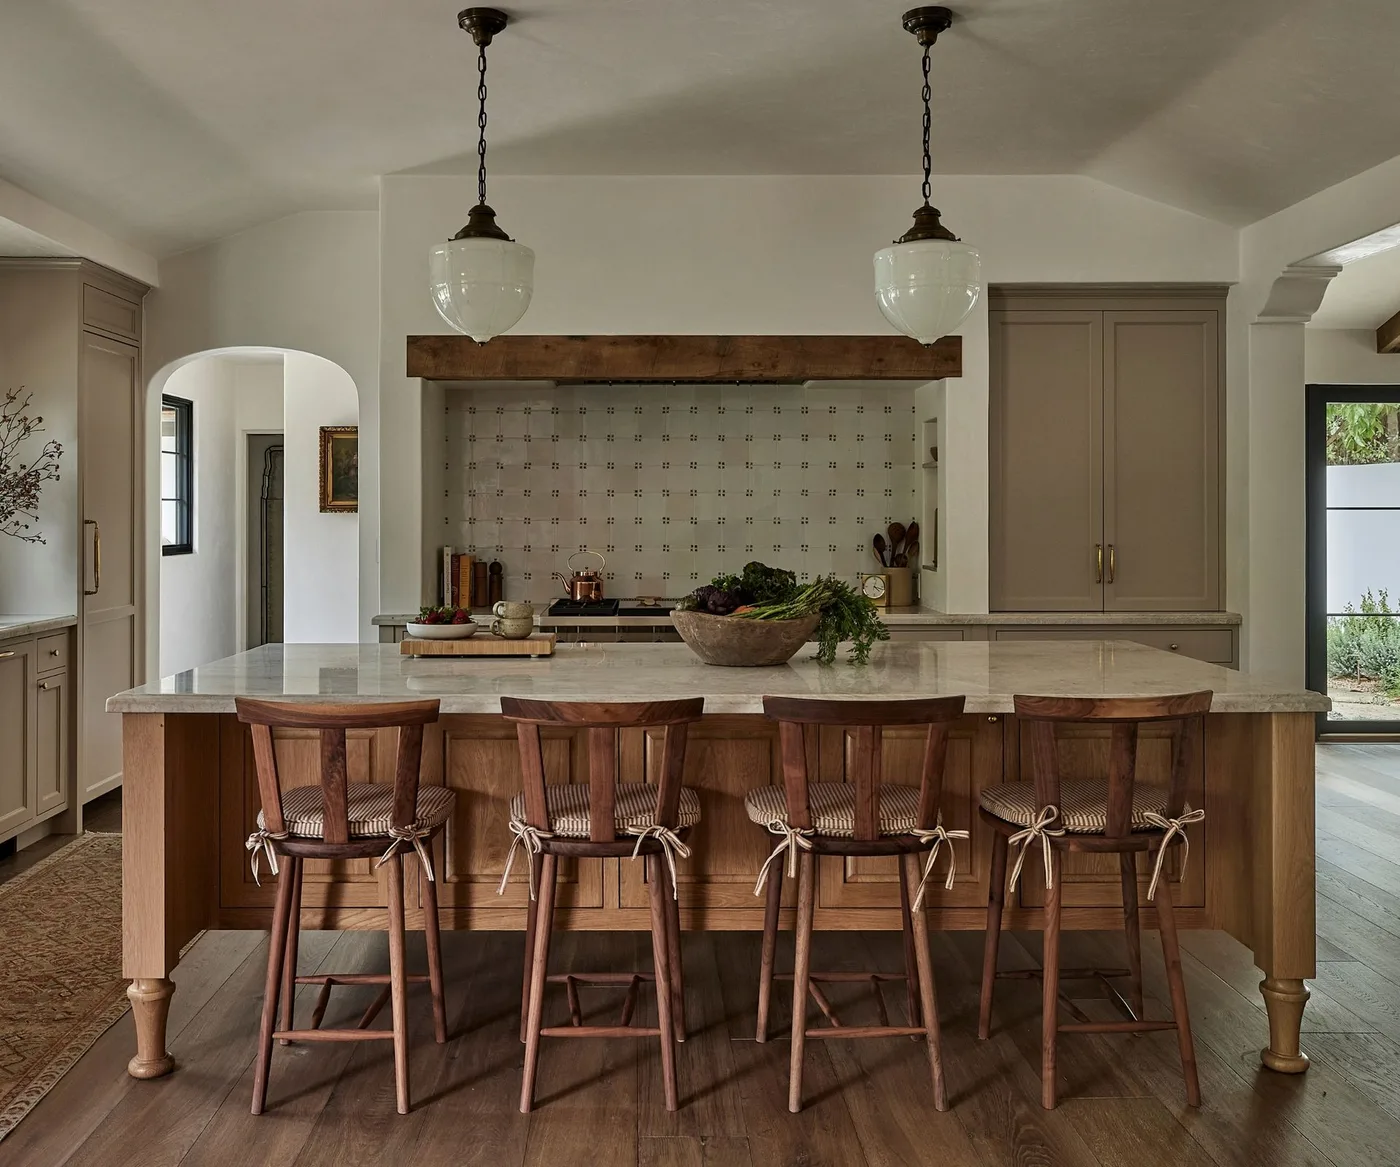
Keep blue motifs small inside a pale niche
 SaveSupport Non AI Creator
Image credit: Platner Studio/Jenna Peffley Photography
Small blue motifs repeat across the pale tiles inside the cooker niche. The surrounding framed cabinets keep the area calm, while a wooden edge above the niche relates to the wooden island in front. Utensils and mugs make the scene feel used, without hiding the main tile pattern behind the cooking area.
Choose a motif size that remains pleasant when repeated over the whole niche. A decorative sample can become much busier across a complete wall. Ask the installer to consider the layout at the hood, counter and side edges together, and confirm that the actual tiles and joints suit the appliance and cleaning requirements.
IDEA 10 / 20
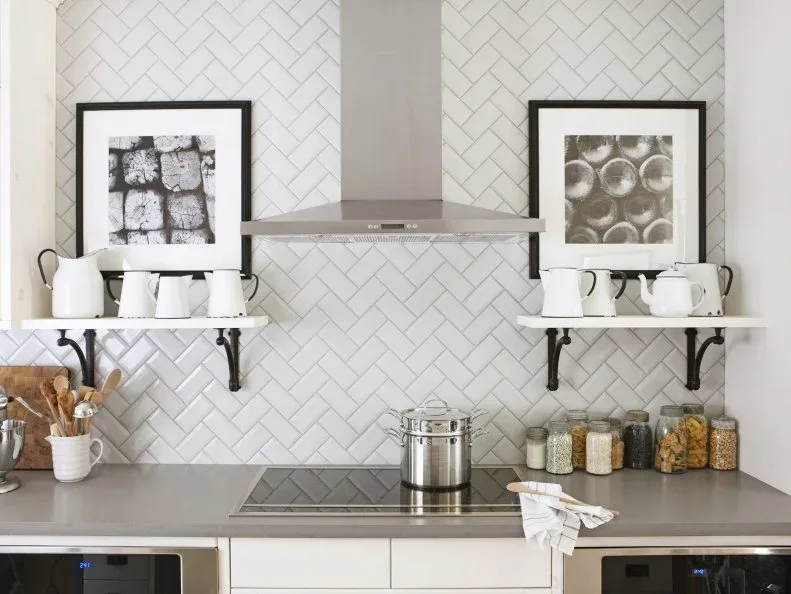
Let pale herringbone provide the movement
 SaveSupport Non AI Creator
Image credit: Photo: Stacey Brandford. From: HGTV Magazine
White herringbone tiles cover the wall behind the metal hood and open shelves. Pale gray joints reveal their changing direction without introducing another strong color. Dark shelf brackets and the hood outline give the wall a few clear anchors, while the repeated pale jugs leave much of the tile pattern visible.
Plan a herringbone layout around the main focal point before installation begins. The position of the hood and shelves affects where cut tiles will show. Discuss corners, exposed edges and outlet positions with the installer, and compare a grouted sample so the final pattern is neither stronger nor fainter than you expect.
PART 03
Connect backsplash color with the cabinets
IDEA 11 / 20
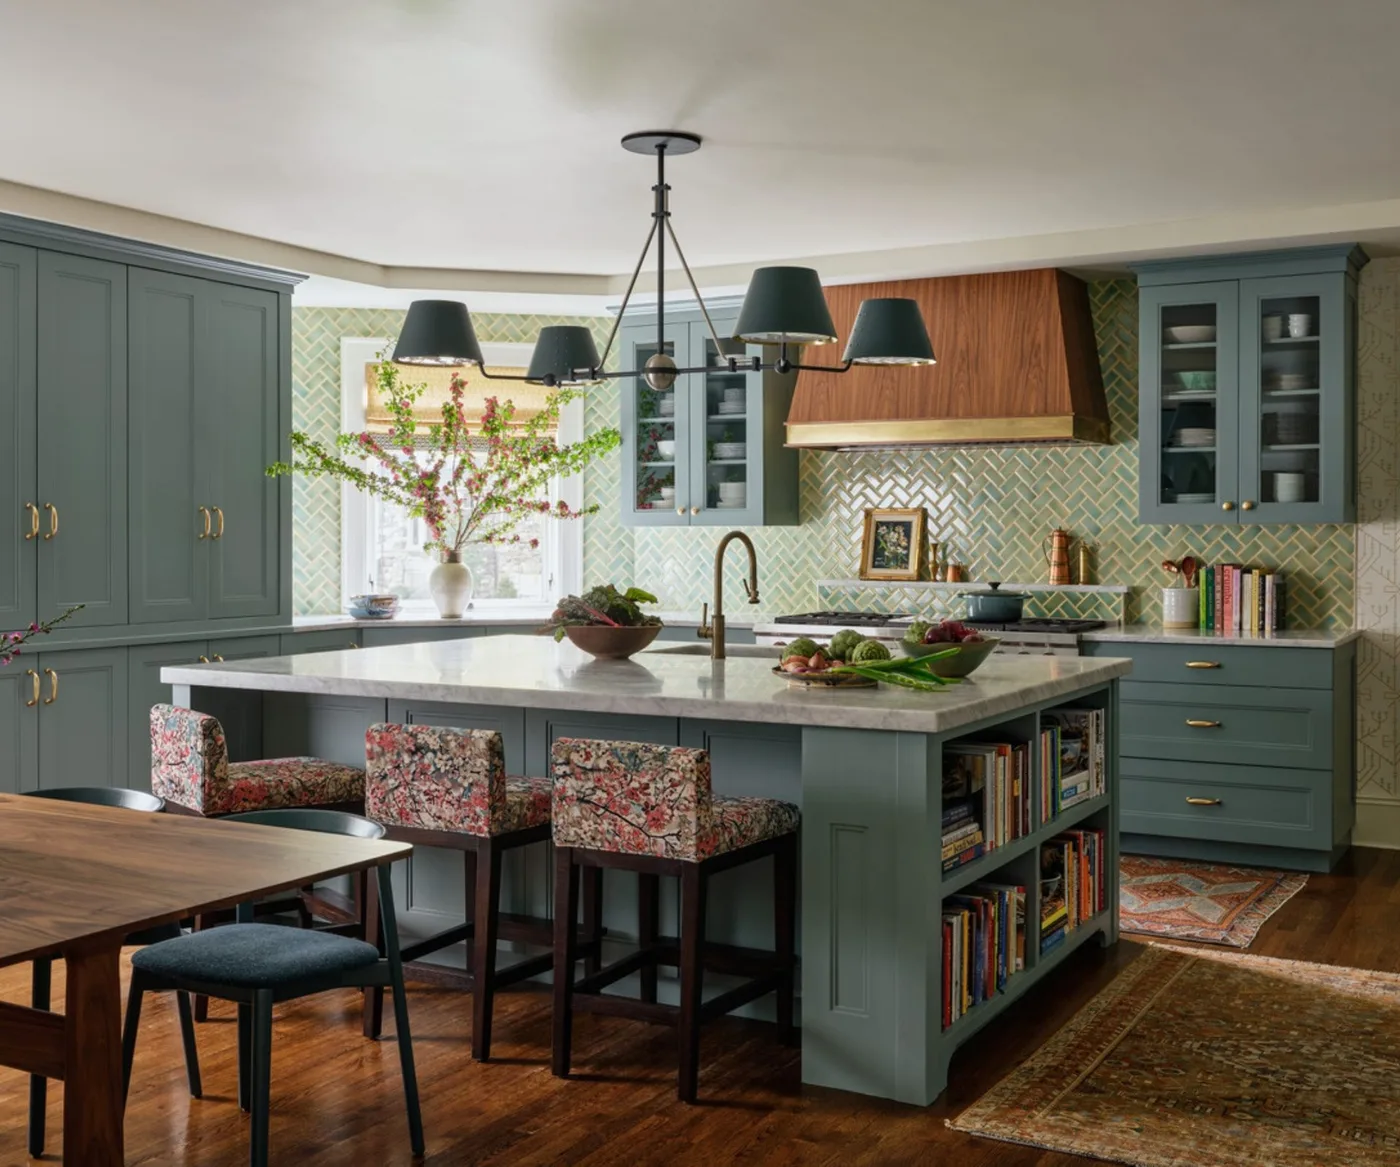
Connect green herringbone with blue-green cabinets
 SaveSupport Non AI Creator
Image credit: Casagrande Studio / Read McKendree Photography
Pale green herringbone tiles connect the backsplash with the blue-green cabinets in this kitchen. A vertically clad hood introduces warmer tones above the cooker, while patterned stools add a separate decorative layer at the island. The backsplash pattern is visible without needing to become the room's most colorful element.
Try the tile beside the actual cabinet paint and any nearby wood finish. Similar greens can look harmonious in one light and noticeably different in another. Decide how clearly you want the herringbone joints to show, then compare grout options on a larger sample before settling on the strength of the pattern.
IDEA 12 / 20
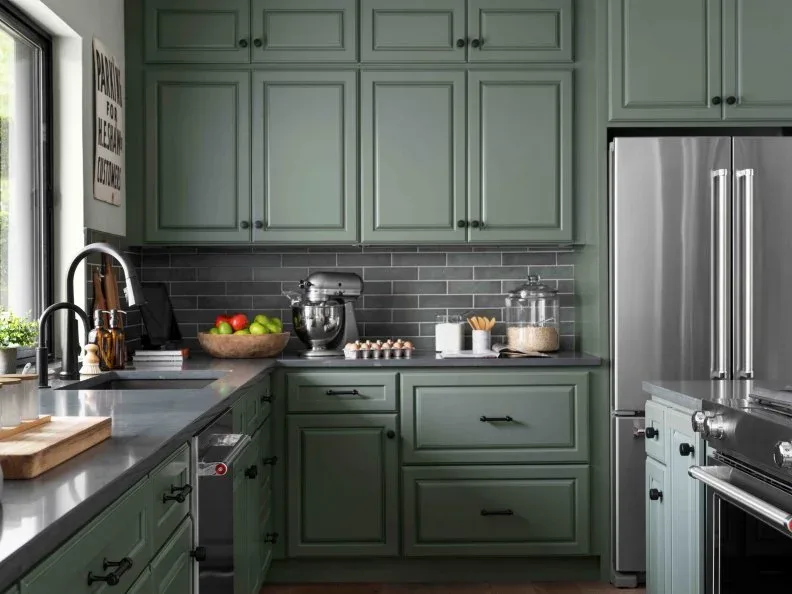
Set charcoal rectangles against muted green cabinets
 SaveSupport Non AI Creator
Image credit: Photo: Robert Peterson, Rustic White
Charcoal rectangular tiles create a dark band between the muted green cabinets in this kitchen. Light joints make the offset rows clear, while the gray countertop forms a quieter boundary below. The dark bridge faucet repeats the backsplash tone near the sink, keeping the contrast connected with a useful fitting.
Compare a light and a closer colored grout with your selected dark tile. The lighter option will emphasize every joint, while a closer match can produce a quieter wall. Check the actual tile finish under task lighting, and choose the cleaning method recommended for that tile and grout rather than judging solely by color.
IDEA 13 / 20
Carry glossy tiles upward between wall cabinets
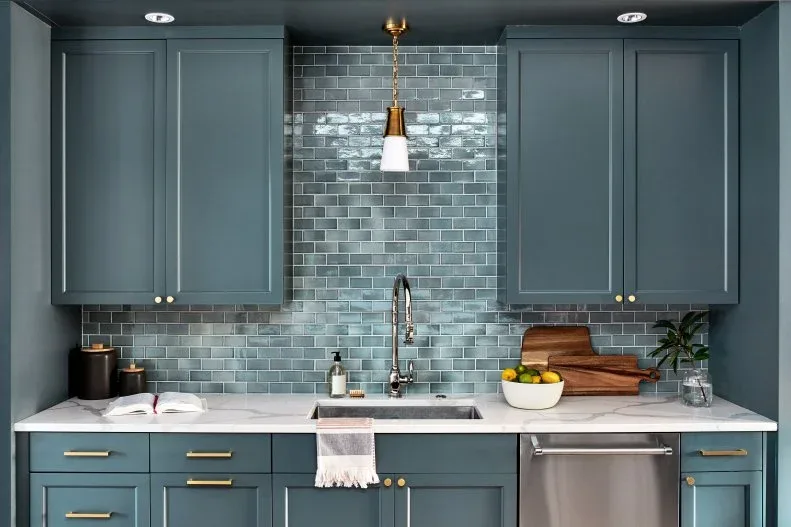 SaveSupport Non AI Creator
Image credit: Photo: Stacy Zarin Goldberg. From: Zoe Feldman Design
Glossy blue-gray tiles rise between the upper cupboards as well as covering the lower backsplash area. Their color sits close to the cabinet fronts, creating a connected background above the white sink and counter. Warm colored cabinet knobs and the central light add small contrasts against the cooler surfaces.
A taller tiled section makes the finish more noticeable, particularly where it catches a lamp or window reflection. View several tiles vertically under your intended lighting. Plan the top and side edges with the cabinetry, and consider whether reflections and water marks on the chosen finish suit the amount of cleaning you prefer.
IDEA 14 / 20
Link blue cabinets with a lighter tiled band
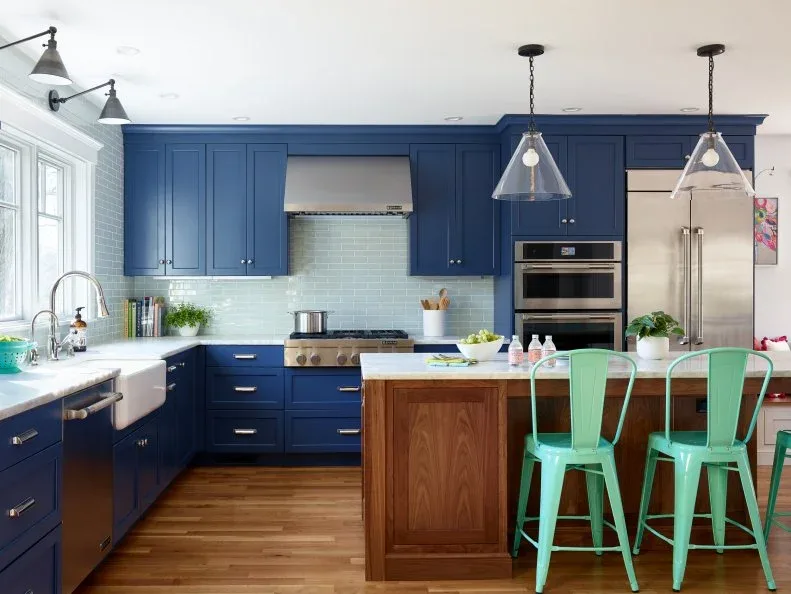 SaveSupport Non AI Creator
Image credit: Photo: Jared Kuzia Photography. From: Kristina Crestin
A lighter blue-green tiled band connects the blue cabinets around the perimeter of this kitchen. White counters give the tiles a clean lower boundary, while the wooden island introduces warmth in the center. Pale green chairs repeat a related color away from the wall, making the backsplash part of a broader palette.
Choose the backsplash color alongside both the cabinets and the objects that stay in view. A slightly lighter shade can provide separation without a sharp contrast. Have the installer plan the long run of joints, outlet openings and corner transitions together, particularly where the tile band continues through several different working areas.
IDEA 15 / 20
Use green tiles to soften warm wooden cabinetry
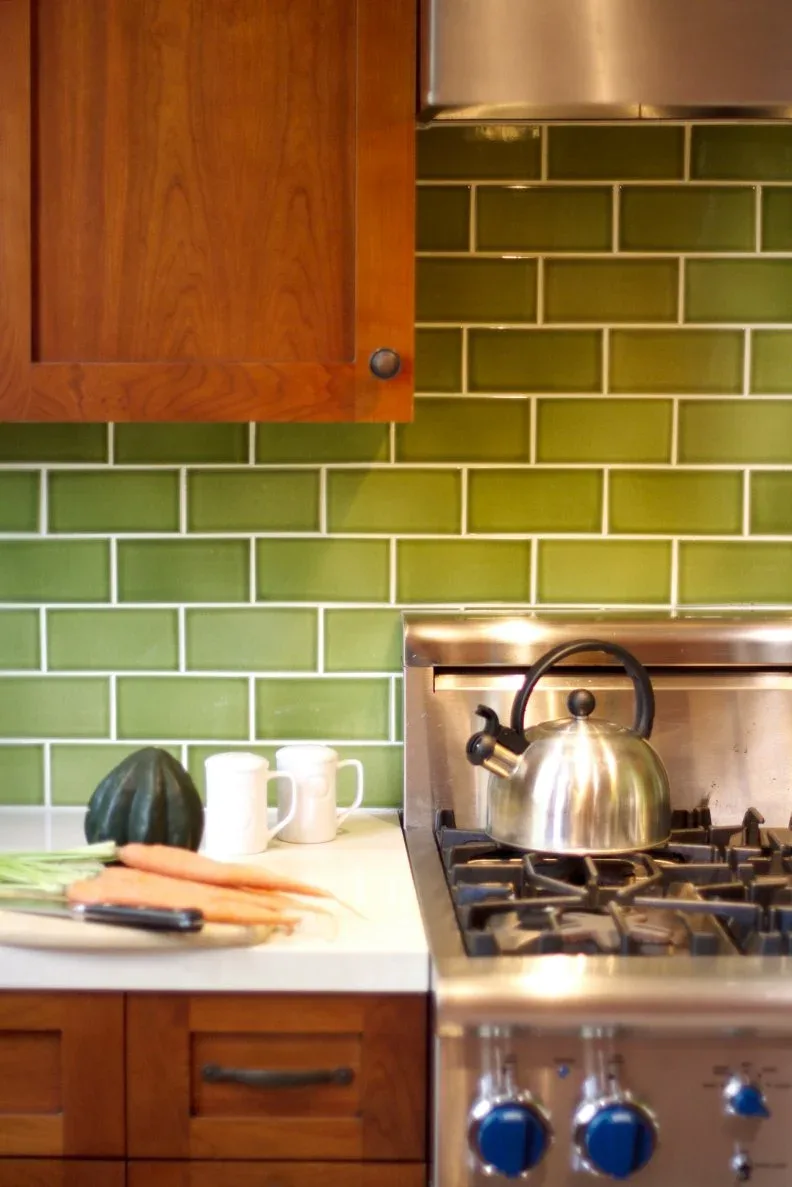 SaveSupport Non AI Creator
Image credit: Photo: Kari McIntosh Dawdy. From: Kari McIntosh Dawdy
Glossy green rectangles bring a cooler color beside the warm wooden cabinetry in this cooking area. Their shades vary across the wall, and light grout outlines the offset rows clearly. The nearby metal appliance and kettle add different reflections, leaving the green tiles as the most noticeable colored surface around the cooker.
Compare several tiles rather than one when the finish varies in shade. Arrange them beside a sample of your cabinet wood so the overall mix feels intentional. Confirm that the selected product and grout suit the cooking position, and follow their care instructions instead of assuming all glossy green finishes clean in the same way.
PART 04
Finish corners, shelves and sink areas carefully
IDEA 16 / 20
Keep a pale tiled wall behind a darker hood
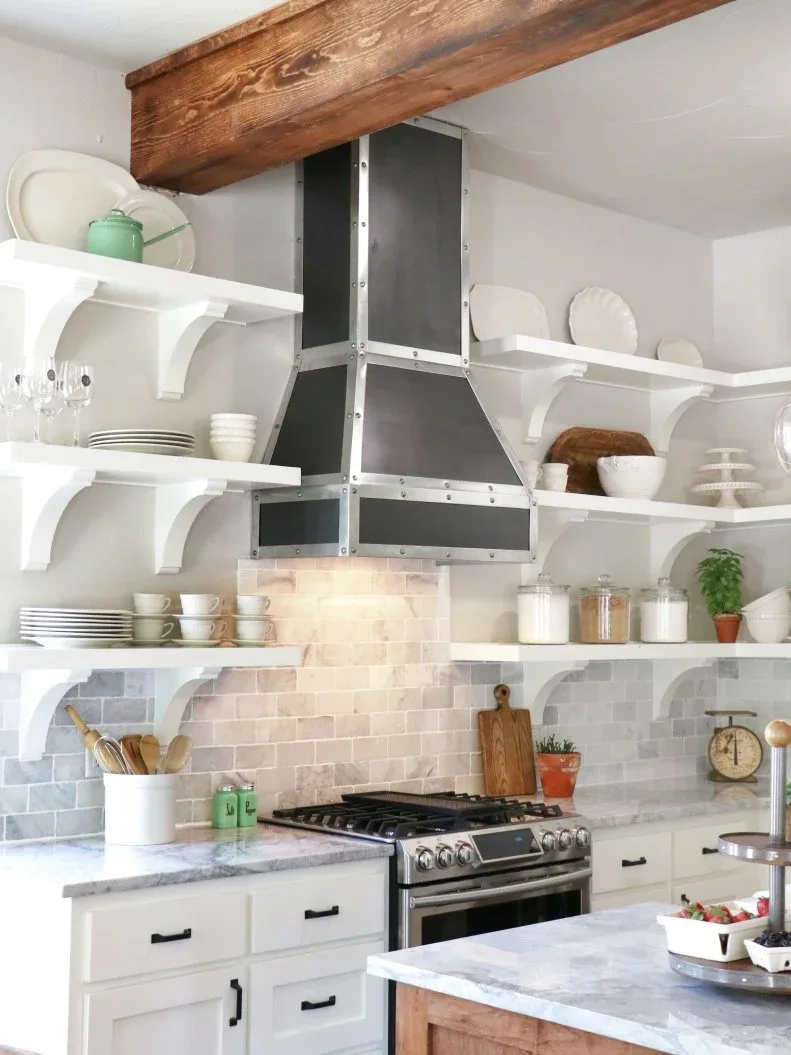 SaveSupport Non AI Creator
Image credit: From: Fixer to Fabulous
Pale rectangular tiles with soft veining form a quieter background behind the dark hood. White bracketed shelves and framed cabinets repeat the lighter tones around the cooking area. The larger wooden beam above adds another horizontal line, while the offset tile layout keeps the backsplash organized beneath these different outlines.
When shelves sit near cooking equipment, check all required appliance clearances and the suitability of the fittings. Decide what can be stored there safely before copying the arrangement. Compare the tile markings over a wider area, and choose a finish that you can clean using the supplier's recommended method after cooking.
IDEA 17 / 20
Continue quiet tiles around a small opening
 SaveSupport Non AI Creator
Image credit: From: Home Town and History in the Making
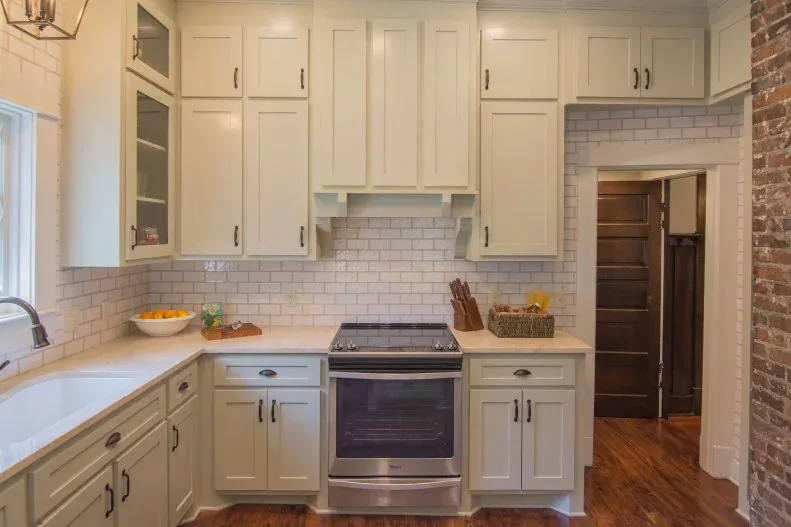
Pale rectangular tiles extend across the cooker and sink walls and meet the small opening at the side. White framed cabinets keep the wall treatment consistent, while exposed brick beyond the opening introduces a rougher texture. The quieter tile color allows those different surfaces to sit together without another strong pattern.
Include openings and side returns in the layout plan, rather than treating each cabinet run as a separate wall. The installer can help position cuts and finish visible edges near door trim. Check the junction with any neighboring brick or other surface so the transition is tidy and practical to clean.
IDEA 18 / 20
Mix pale blues within a familiar offset layout
 SaveSupport Non AI Creator
Image credit: Photo: Lee Manning. From: Jeff Troyer Associates
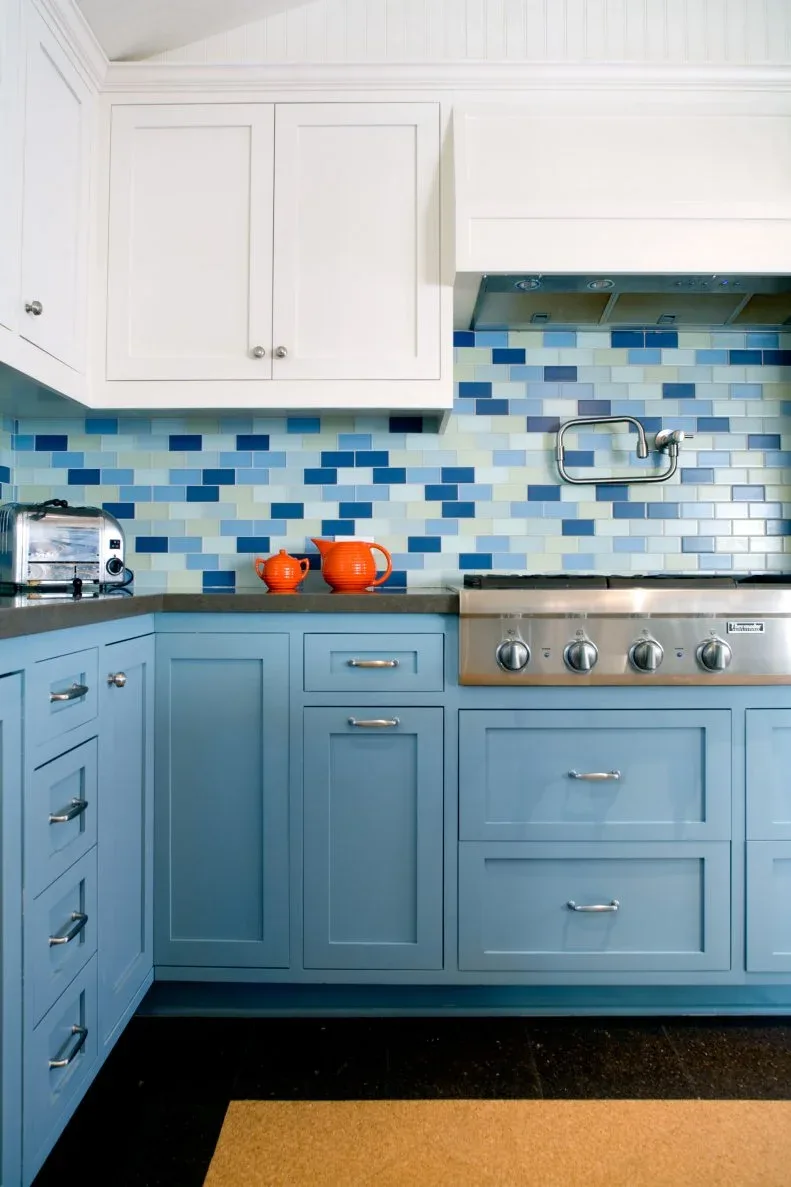
Blue, cream and white rectangles vary the color within a familiar offset tile arrangement. Pale blue lower cabinets and white upper cupboards repeat the two main light tones, while the dark counter provides a stronger dividing line. The pot filler sits against the mixed tiles, making the cooker wall both decorative and useful.
Test a group of tiles together before choosing a mixed color arrangement. Decide whether colors should be evenly distributed or more concentrated in particular areas, then discuss the intended layout with the installer. Include the joint color in your sample so the pattern stays coherent around taps, outlets and the cooker.
IDEA 19 / 20
Keep the wall gentle above a colored sink
 SaveSupport Non AI Creator
Image credit: Photo: Tomas Espinoza
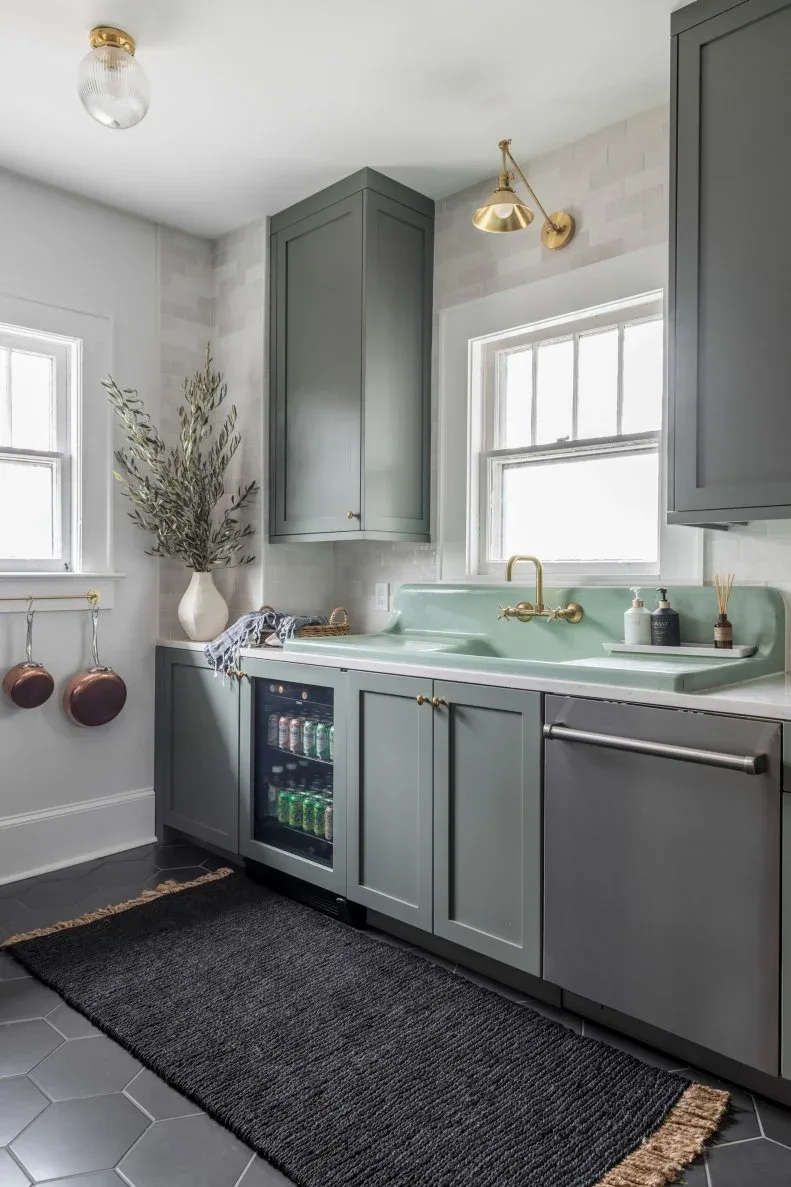
Pale glossy tiles cover the wall above a mint-colored sink with its own raised back. Gray-green framed cabinets continue the muted palette, while warm colored taps and a small wall light introduce brighter details. The window divides the tiled area, leaving the gently varied surface visible around the sink and cupboards.
Plan the relationship between the sink's raised back and the separate wall finish before installation. Check the junction, window edge and tap positions together so splashes do not collect at awkward seams. Compare tile variation under daylight and evening lighting, then follow the chosen product's recommended care rather than relying on its appearance.
IDEA 20 / 20
Repeat soft yellow between tile and window fabric
 SaveSupport Non AI Creator
Image credit: From: Tobi Fairley
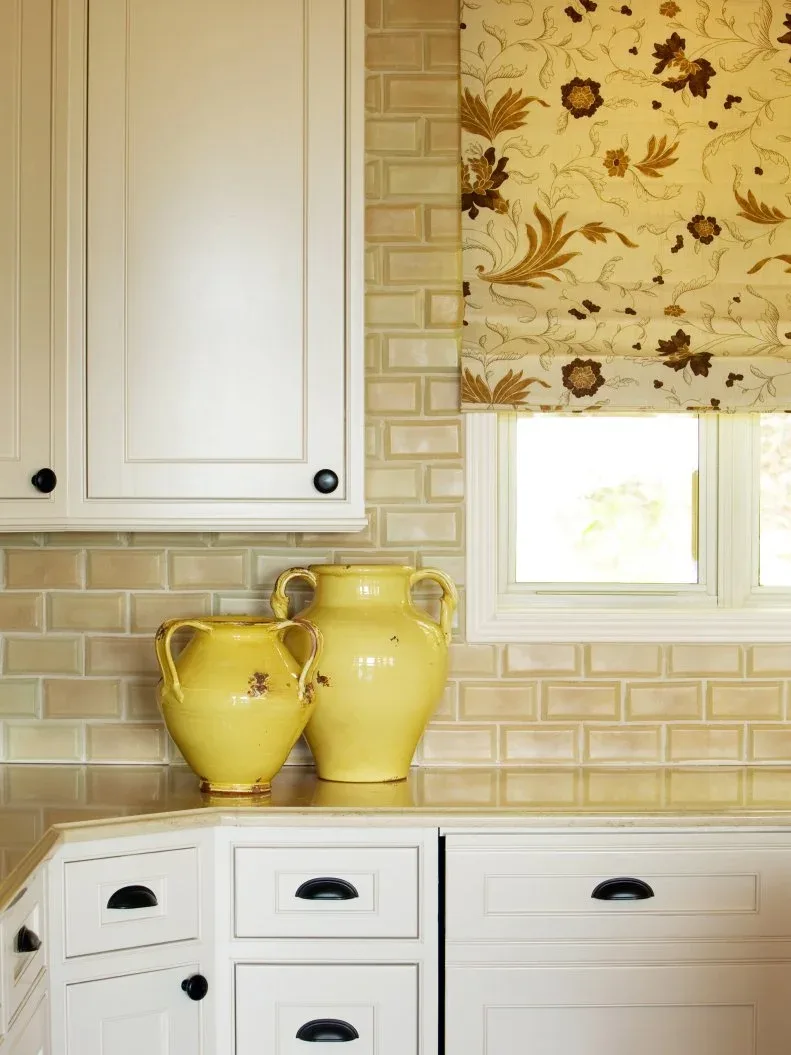
Pale yellow rectangular tiles warm the corner between white cabinets and the window. Beveled edges make the offset layout more pronounced, even though the color remains gentle. Yellow pitchers and the floral blind repeat the wall tone in smaller areas, while black cabinet hardware adds a few sharper outlines.
Check a beveled tile sample under both daylight and the lamps you use in the evening. Its edges create shadows and reflections that a flat sample may not show. Consider the cleaning routine around those edges, and compare the yellow beside your window fabric so the repeated color feels connected rather than mismatched.
BRING IT ALL TOGETHER
Choose the backsplash as part of the whole kitchen
Compare the finish beside a cabinet sample, countertop sample and your intended grout. Look at them under the lighting you actually use, allowing for the pattern to repeat across a longer wall rather than judging only a tiny piece.
Check suitability for the particular sink or cooking position, and plan edges, outlets and joints with the installer. A backsplash that fits these everyday details will be more useful than a striking surface chosen without considering how the kitchen works.