Built-ins work best when they answer a specific need in the dining room. You might want somewhere for serving dishes, a bookcase that fits a narrow recess, or a bench with drawers beneath the seats. Before choosing door styles or paint, list what you need to store and check how the table and chairs use the surrounding space.
The examples below show fitted cabinetry, recessed shelving, integrated benches, and storage combined with other uses. Each has a different balance of display and concealment. Look closely at door openings, shelf spacing, the route around the table, and nearby windows. These details help turn a handsome wall of storage into something useful during ordinary meals and gatherings.
PART 01
Combine Display with Closed Cabinets
IDEA 01 / 20
Mix Open Shelves with a Closed Lower Base
 SaveSupport Non AI Creator
Image credit: Photo: Rebecca McAlpin. From: Michelle Gage Interiors
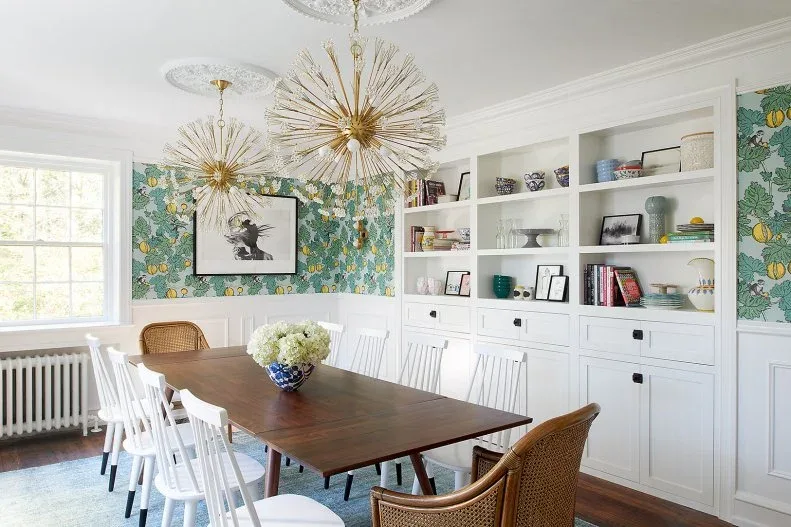
White shelves rise above closed cabinets along the dining-room wall, holding books, dishes, and framed pictures. Their regular divisions provide structure beside the green floral wallpaper. A wooden table and white chairs repeat the display’s quieter colors, with woven end chairs adding another texture. The lower doors keep part of the storage concealed while the upper shelves remain visible from the table.
Decide which belongings deserve display before allocating the open sections. Measure larger serving pieces and books so the shelf spacing suits them instead of creating unusable shallow gaps. Put less attractive everyday supplies behind doors. Check that the dining chairs can move without striking the cabinet fronts, and allow room to stand comfortably when opening the lower storage.
IDEA 02 / 20
Use Glazed Cabinets Beside a Fireplace Wall
 SaveSupport Non AI Creator
Image credit: Photo: Ryan Garvin. From: Blackband Design
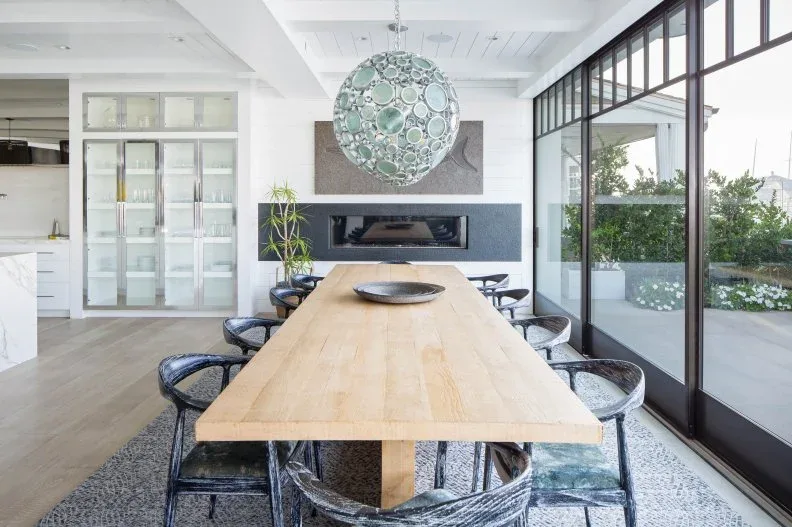
Tall glazed cabinets occupy the wall beside the horizontal fireplace. Their pale frames connect with the surrounding ceiling and wall surfaces, while the dark fireplace gives the room a contrasting horizontal feature. A long wooden table extends toward the glazing, surrounded by dark rounded chairs. The cabinet doors create a contained display without requiring exposed shelves throughout the whole wall.
If cabinetry is near a fireplace, have the layout checked against the appliance’s installation and clearance requirements. Do not assume a photographed arrangement applies to another model. Plan door travel around the table and use shelves rated for their contents. Glazing reduces direct dust exposure, but both the glass and the items inside still need periodic cleaning and careful handling.
IDEA 03 / 20
Frame an Opening with Display Cabinets
 SaveSupport Non AI Creator
Image credit: Photo: Jeff Herr. From: Terracotta Design Build
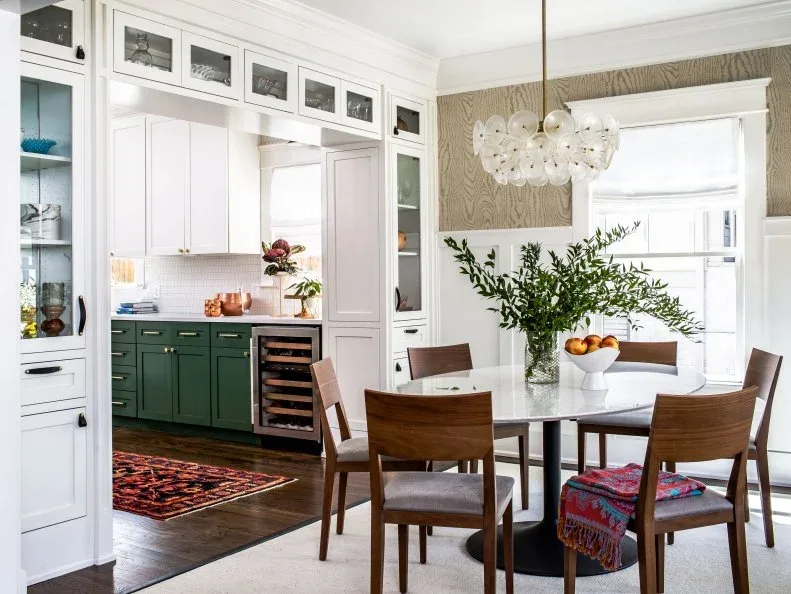
White glass-front cabinets frame the opening between the dining area and kitchen. Smaller upper compartments continue above the doorway, giving the storage a connected outline rather than separate towers. A round table and wooden chairs occupy the dining side, while green cabinetry adds color beyond. The opening remains useful and visible even though storage extends across much of the surrounding wall.
A doorway surround needs accurate measurements of the opening, trim, and door movement before cabinet design begins. Keep frequently used dishes at a comfortable reachable height and reserve upper compartments for occasional items. Consider the view from both rooms when choosing glazing and interior finishes. Check that cabinet doors can open without blocking the passage or hitting nearby dining chairs.
IDEA 04 / 20
Keep Low Cabinetry Along a Wooden Wall
 SaveSupport Non AI Creator
Image credit: Photo: Slifer Designs. From: Slifer Design
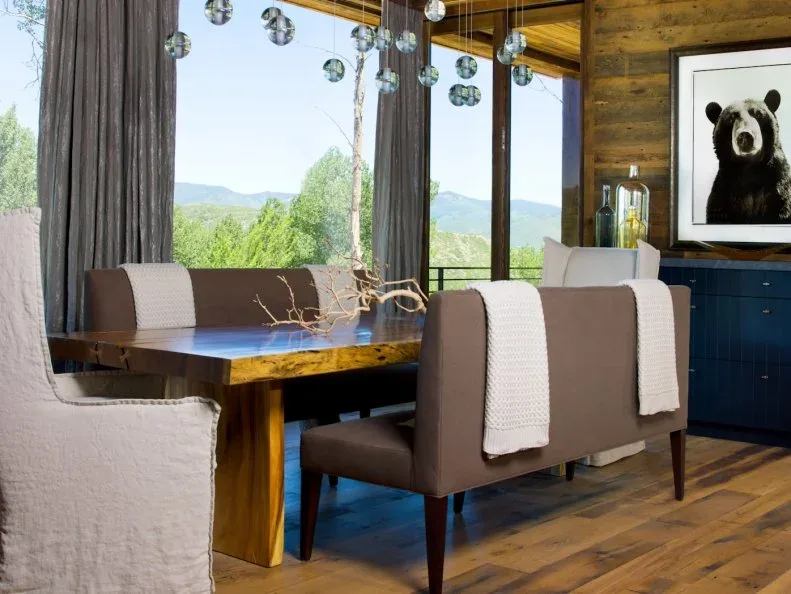
Dark blue lower cabinets follow the wooden wall beside the dining table, giving the room a storage surface beneath the framed bear picture. The broad wooden tabletop repeats the wall’s warmer colors, while upholstered chairs soften the foreground. Tall windows and pale curtains keep the other side of the room light. The cabinetry stays below the artwork rather than becoming a full-height display.
A low cabinet run can provide useful serving space, but keep enough of its top clear to use during a meal. Compare the proposed depth with chair movement and routes past the table. Plan door and drawer openings before deciding the final furniture position. Choose a cabinet finish with care requirements that suit regular handling, and protect it appropriately beneath vases.
IDEA 05 / 20
Keep a Serving Recess Within a Long Cabinet Run
 SaveSupport Non AI Creator
Image credit: Photo: Mark Lohman. From: Alison Kandler
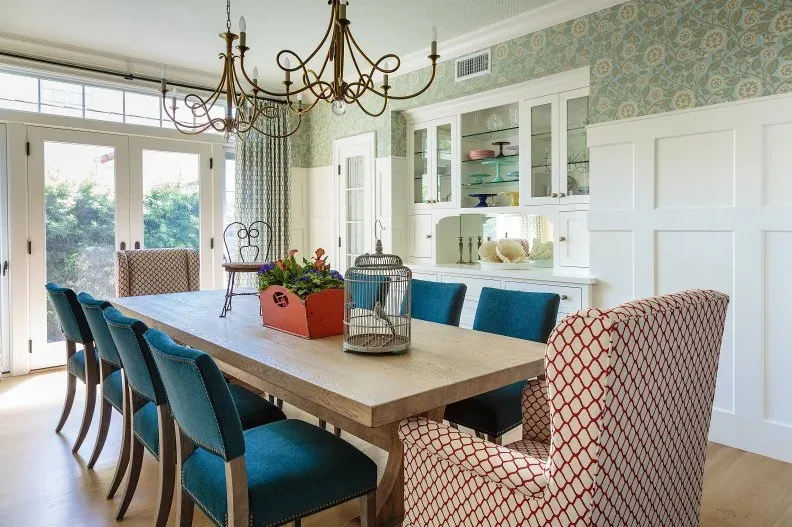
A long white cabinet run includes glazed upper doors and an open serving recess beneath them. That recess interrupts the wall of storage with a useful surface, while the lower cabinets continue the pale finish. Blue chairs and red-patterned end chairs bring color around the wooden table. Patterned wallpaper above the paneling keeps the cabinetry connected to the rest of the room.
Measure the serving pieces and appliances you intend to place in a recess before deciding its depth and height. Allow room to lift lids, pour drinks, and clear used dishes comfortably. If powered appliances are planned, follow their ventilation requirements and have outlets positioned appropriately. Keep decorative objects limited so the surface can still help during a meal or gathering.
PART 02
Use Recesses and Room Boundaries
IDEA 06 / 20
Give Arched Recesses a Patterned Back
 SaveSupport Non AI Creator
Image credit: Photo: Kelly Fondots. From: Design 4 Corners
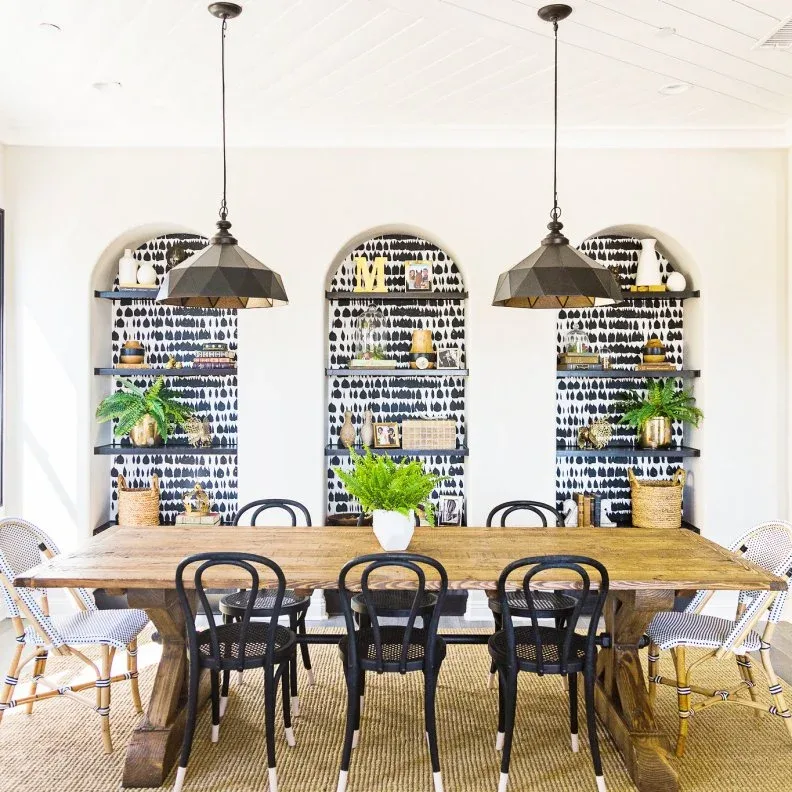
Three arched recesses hold dark shelves against black-and-white patterned backs. Books, plants, and decorative objects sit within the repeated openings, giving the display a clear rhythm. A long wooden table provides a simpler foreground, while black chairs connect to the shelf finish. The patterned recesses make storage part of the wall’s decoration without extending shelves across every surrounding surface.
Check the usable width and depth inside an arched opening, especially where the curve narrows the upper section. Choose objects that fit without leaning against the patterned back. Confirm shelf load limits and fixing requirements before adding books or heavier containers. Keep plants in suitable protective pots, and plan a watering routine that avoids spilling onto shelves or the decorative wall finish.
IDEA 07 / 20
Paint Recessed Shelves to Match the Room
 SaveSupport Non AI Creator
Image credit: Photo: Chris Vicino. From: Wilson Associates Real Estate
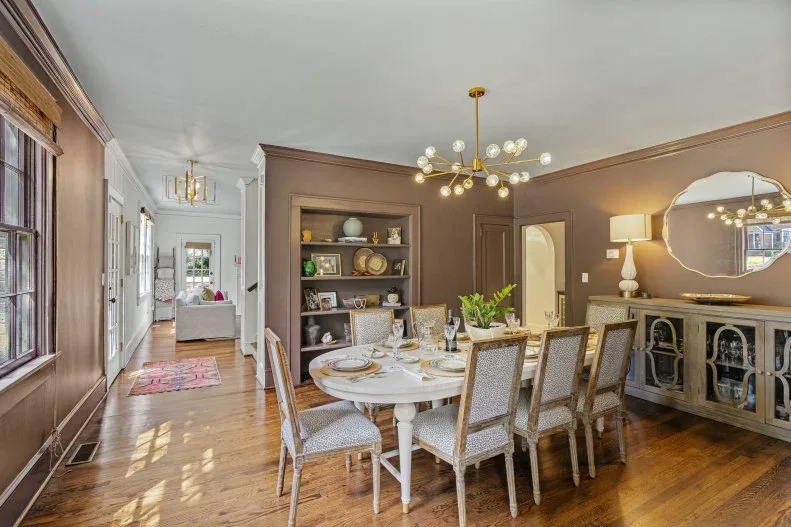
Recessed shelves share the brown color of the surrounding wall, making the display feel integrated rather than outlined in a separate finish. Pale dishes and framed pictures remain visible against that background. An oval table and upholstered chairs brighten the foreground, while a mirrored-front sideboard adds reflected light on another wall. The recess supplies display space without projecting far into the dining area.
Use the recess’s actual depth when deciding what to store; a shallow opening may suit plates or small frames better than large serving bowls. Compare the wall paint with the contents before painting every shelf. Keep heavier objects on appropriately supported lower levels, and avoid filling the opening so tightly that removing one piece disturbs several neighboring items.
IDEA 08 / 20
Fit a Narrow Bookcase Beside a Colored Wall
 SaveSupport Non AI Creator
Image credit: Future PLC/Simon Whitmore
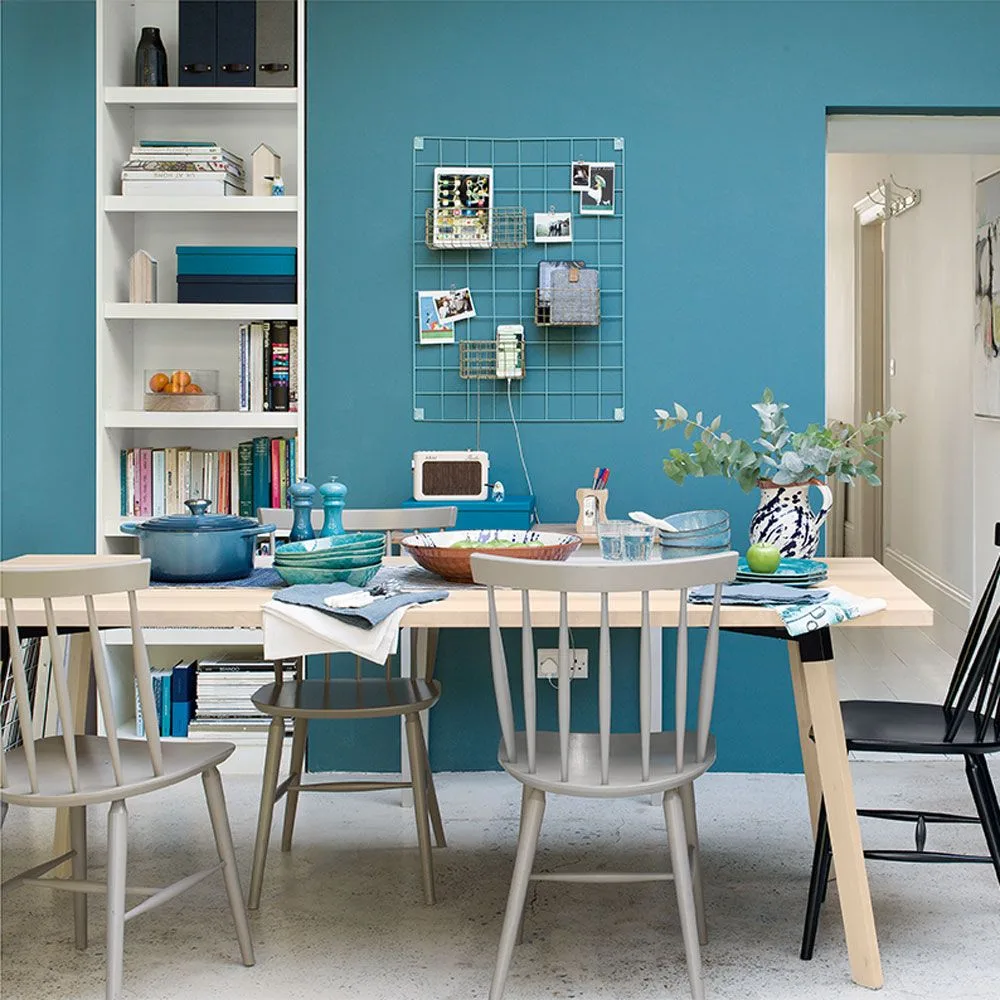
A narrow white bookcase occupies the space beside the teal wall. Books, boxes, and small objects share its shelves, while the pale finish gives the storage a clear edge against the stronger color. A wire organizer adds another useful feature above the wooden table. Mixed dining chairs keep the furniture informal, with the bookcase collecting supplies at one side of the arrangement.
A narrow fitted unit works better when shelf spacing is planned around specific belongings. Measure storage boxes before building so they slide out without catching on trim. Leave some shelves adjustable if the contents may change. Keep frequently needed items within easy reach, and check that nearby chairs can move without repeatedly bumping the bookcase or blocking access to its lower sections.
IDEA 09 / 20
Fill a Tall Recess with Books
 SaveSupport Non AI Creator
Image credit: Future PLC/Polly Eltes
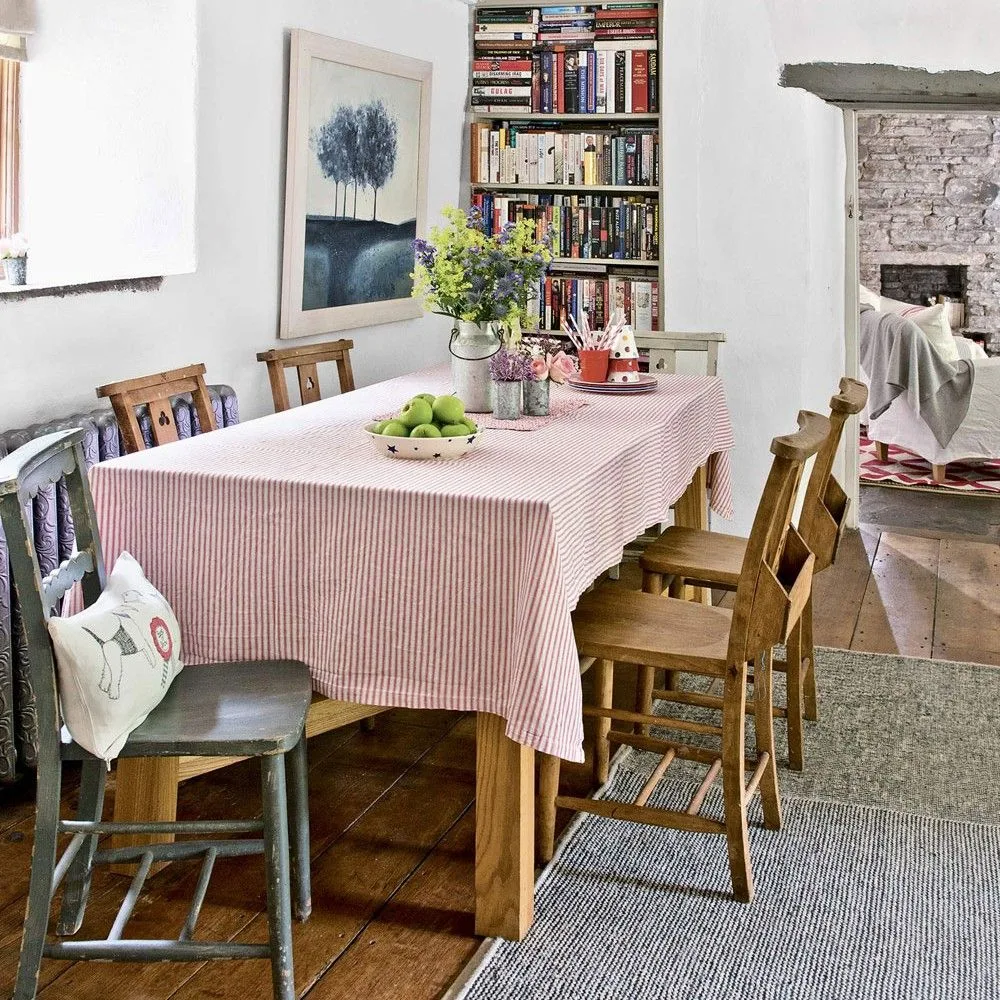
A tall bookcase uses the narrow recess beside the doorway, placing a substantial collection of books near the dining table. Pale surrounding walls keep the filled shelves distinct without adding another strong pattern. The pink-striped tablecloth introduces softer color, while mixed wooden chairs connect with the room’s informal setting. The storage rises upward rather than spreading across the floor beside the table.
Books are heavy, so shelf spans, supports, and wall fixings need to suit the intended load. Discuss those requirements with the installer before treating every opening as book storage. Keep a safe way to reach the upper shelves and avoid stretching over the table. Leave the doorway route clear, and plan enough space to remove larger books without scraping their covers.
IDEA 10 / 20
Use Low Shelving at a Room Boundary
 SaveSupport Non AI Creator
Image credit: Photo: Regan Wood Photography. From: Sara Touijer
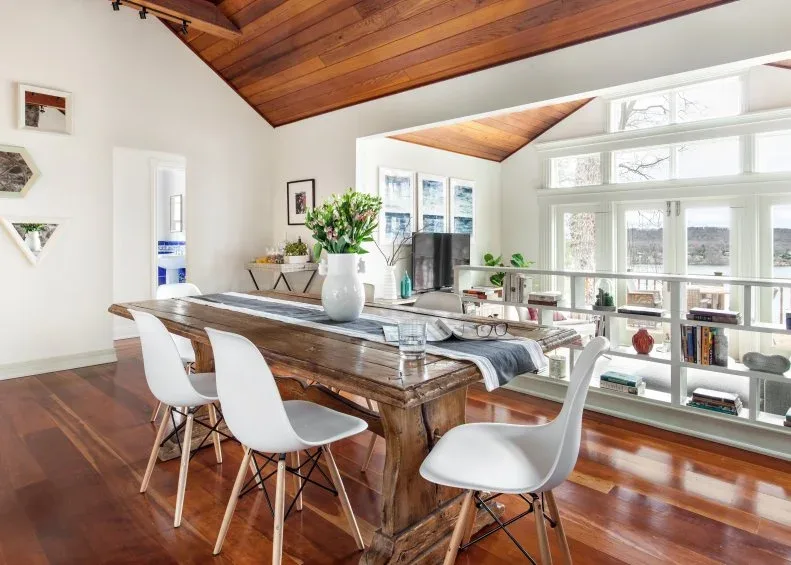
Low white shelving marks the edge of the dining area while leaving the adjoining windows visible. Books and decorative objects sit in its open compartments, and a metal rail runs above the unit. A wooden table and warm ceiling bring stronger brown tones to the room. The low storage defines a boundary without turning it into a full-height cabinet wall that would block the view.
A storage divider beside a change in floor level must be planned with the required guarding and structure in mind. Have a qualified professional confirm the arrangement; shelves alone are not a substitute for a suitable barrier. Keep compartments accessible from the intended side, and secure objects that could fall into the lower area when bumped or handled.
PART 03
Connect Storage with Fitted Seating
IDEA 11 / 20
Frame a Bench with Two Storage Towers
 SaveSupport Non AI Creator
Image credit: Photo: Skout. From: sKout
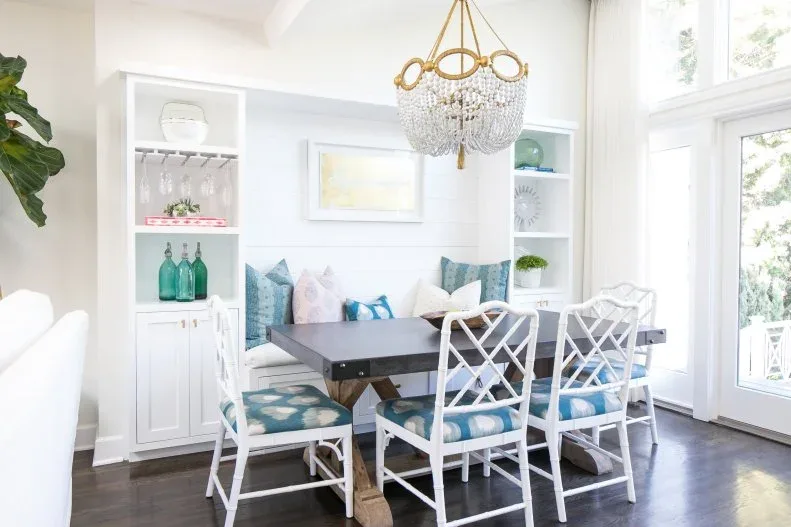
Two white shelving towers frame the bench, combining display above with closed cupboards below. Blue pillows and patterned chair seats give the pale fitted furniture a shared color accent. A dark tabletop contrasts with the white chairs, while the chandelier adds detail above. The arrangement treats the dining seat and storage as one wall feature rather than unrelated furniture placed close together.
Plan the bench width and back support before using the remaining wall space for cupboards. Check how cabinet doors open beside seated guests and the table. Keep fragile display pieces away from likely contact near shoulders or cushions. Use the higher shelves for less frequently handled objects, and choose a manageable number of pillows so the bench remains ready for meals.
IDEA 12 / 20
Combine Glazed Towers with a Wraparound Seat
 SaveSupport Non AI Creator
Image credit: Photo: Amber Thrane. From: Design 4 Corners
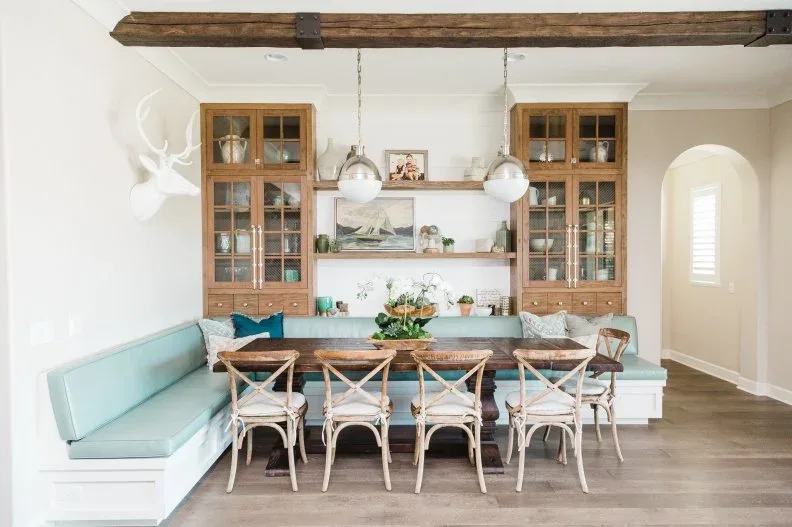
Wooden glazed towers stand behind the pale aqua seating, with open shelves connecting the storage between them. The cabinet finish repeats the table’s warmer color, while white walls and pale chairs leave the overall setting light. The bench extends along the side of the dining area beneath the exposed beam. Display, closed storage, and seating occupy a coordinated arrangement rather than separate walls.
Check reach and head clearance where shelves sit above a bench. Items used every day should not require leaning over someone’s seat to retrieve them. Plan the table supports and access at the bench ends before fixing the fitted base. Confirm that glazed doors open safely beside the dining furniture, and leave enough room to clean the shelves and upholstery without awkward stretching.
IDEA 13 / 20
Put Drawers Beneath a Window Bench
 SaveSupport Non AI Creator
Image credit: Photo: Amy Bartlam. From: Amy Elbaum
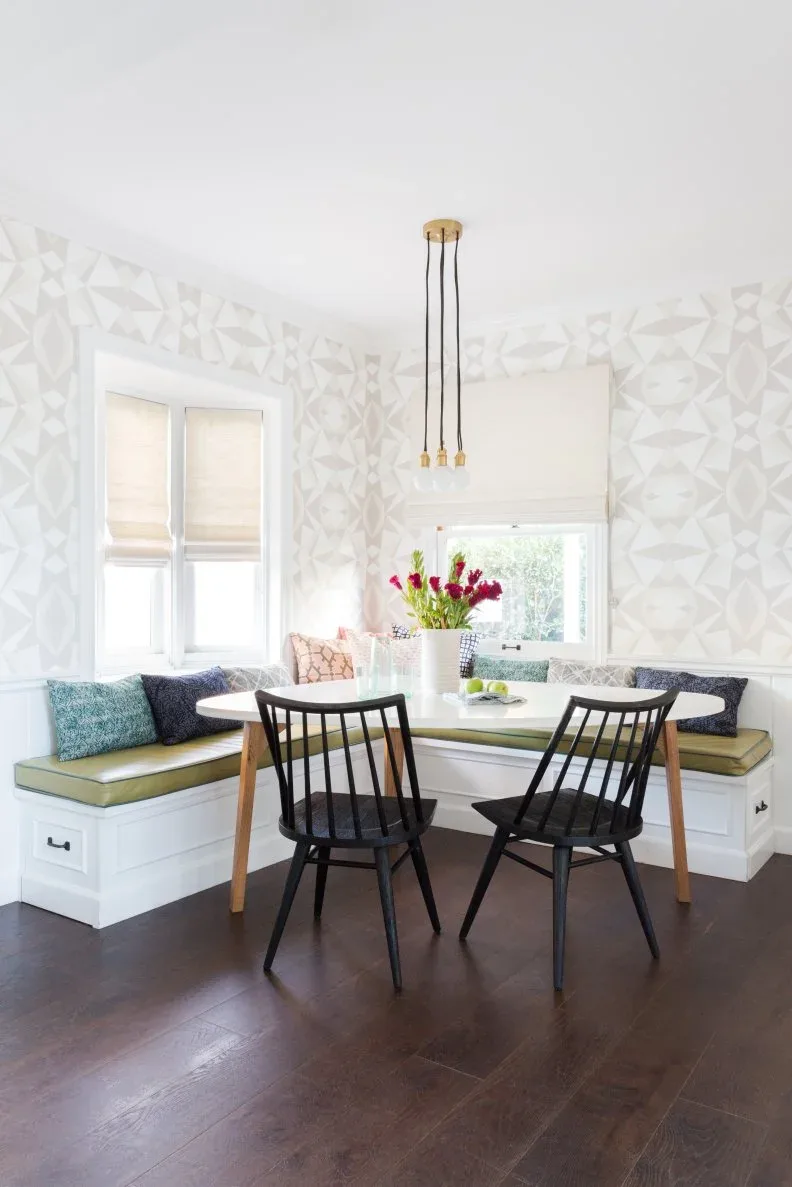
Drawer fronts appear beneath the white corner bench, turning the seat base into visible storage. Yellow-green cushions and mixed pillows soften the fitted outline against the pale geometric wall pattern. A rounded tabletop occupies the center, with black chairs providing separate seats on the open side. The drawers keep the storage low, allowing the windows and surrounding wall pattern to remain visible.
Check the complete drawer opening path against table legs and the nearby chairs. A generous compartment is inconvenient if the table must move whenever you need it. Choose belongings that suit the available height and keep handles clear of sliding knees. Test cushion thickness alongside the tabletop, since adding a thicker pad changes the dining position even when the base stays the same.
IDEA 14 / 20
Mix Bench Drawers with Open Basket Compartments
 SaveSupport Non AI Creator
Image credit: Future PLC/David Brittain
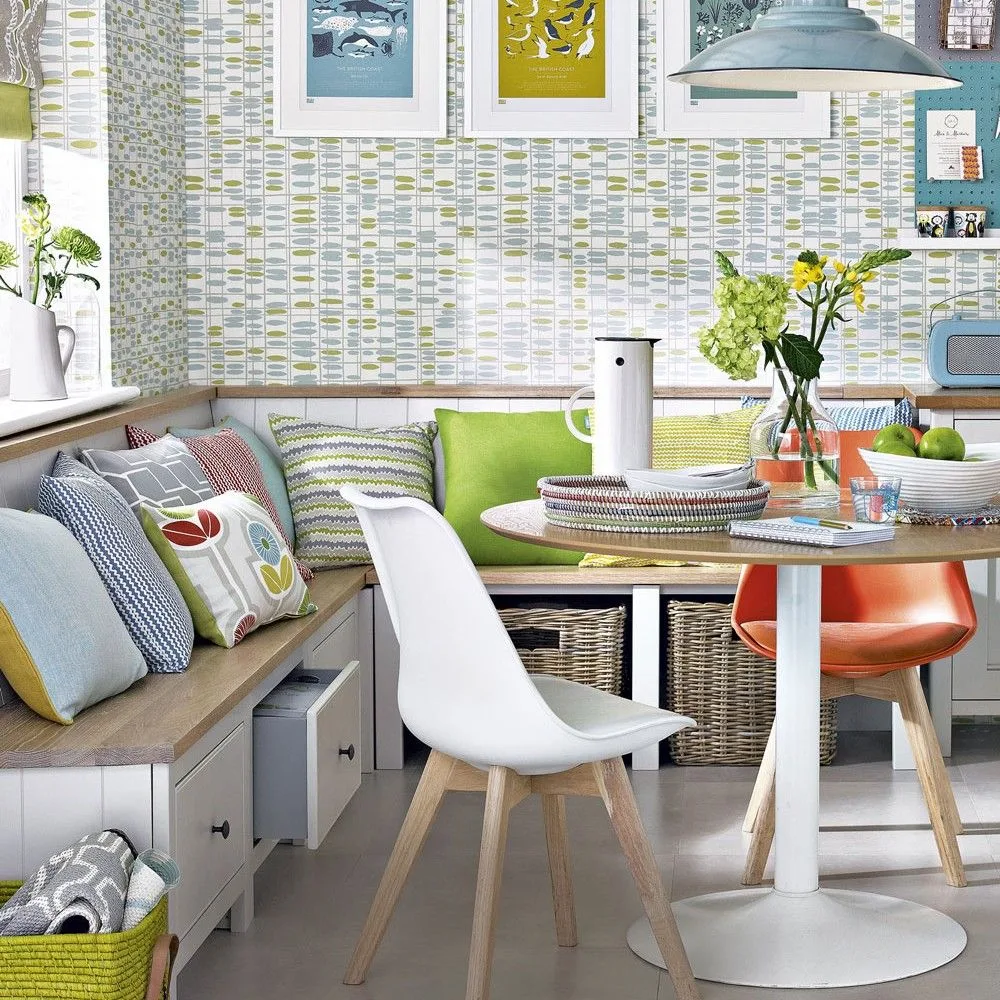
The fitted bench combines drawer fronts with open compartments holding baskets. Mixed cushions sit above the storage, bringing green, gray, and patterned details against the wallpaper. A white pedestal table and pale chair keep part of the foreground simple, while an orange chair adds another color. The different base openings show two ways of organizing belongings beneath the same seating arrangement.
Use drawers for items that benefit from being concealed and baskets for things you can lift out as a group. Measure basket handles as well as the main body before sizing compartments. Keep the table support clear of both opening methods. Remove cushions and baskets periodically to clean around the seat base, where crumbs and dust can collect during everyday meals.
IDEA 15 / 20
Use Full-Height Cabinets Along a Booth Wall
 SaveSupport Non AI Creator
Image credit: Photo: VHT Studios. From: @properties
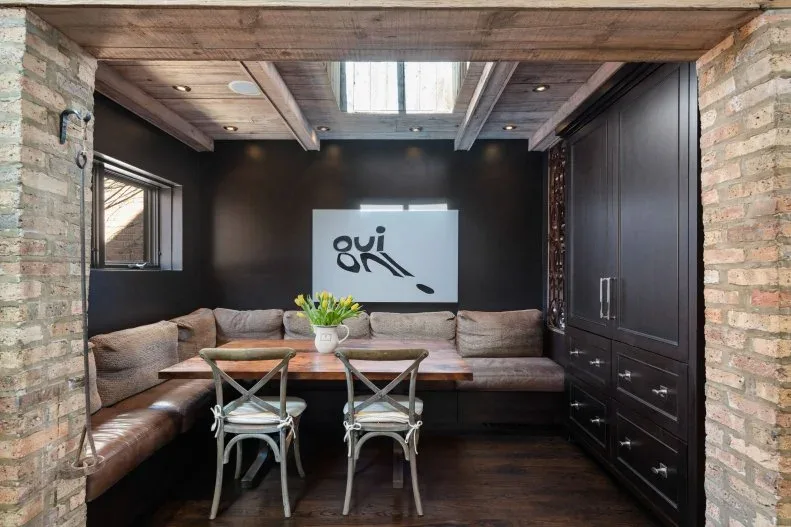
Dark cabinets rise along one side of the dining booth, with lower drawers beneath taller doors. The fitted storage gives the nook a substantial wall while the brick sides and skylight provide contrasting texture and light. A cushioned corner seat wraps around the wooden table, and pale cross-back chairs brighten the open side. The cabinetry occupies the wall’s height rather than several separate floor pieces.
Full-height storage beside a booth needs clear door and drawer access, including when people are seated. Reserve the lowest or most convenient compartments for belongings used during meals. Check handles against cushions and passing shoulders. If a similar nook has a skylight, compare the cabinet finish in direct and indirect light before choosing it, since the surface can look different across the day.
PART 04
Make Built-Ins Serve More Than One Purpose
IDEA 16 / 20
Include a Desk at the End of the Cabinet Run
 SaveSupport Non AI Creator
Image credit: Photo: Ty Cole. From: James Wagman Architect
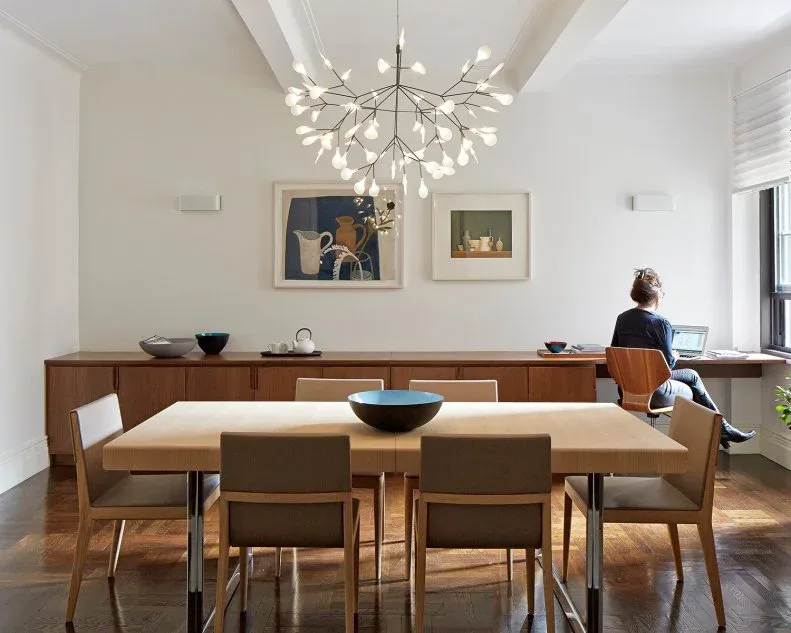
A long wooden cabinet run extends behind the dining table and provides a desk position at the window end. The work seat sits beside the daylight, while most of the storage keeps a continuous low outline. A wooden table connects the two parts of the room through color. Pale chairs and walls prevent the fitted furniture from becoming the only visible element in the shared space.
Decide where work supplies will go before designing a shared dining cabinet. A comfortable desk position needs its own knee space and suitable task lighting, not just a gap between cupboards. Plan cables and outlets so they do not cross dining routes. Give paperwork a closed compartment that can be cleared easily when the room is used for a meal.
IDEA 17 / 20
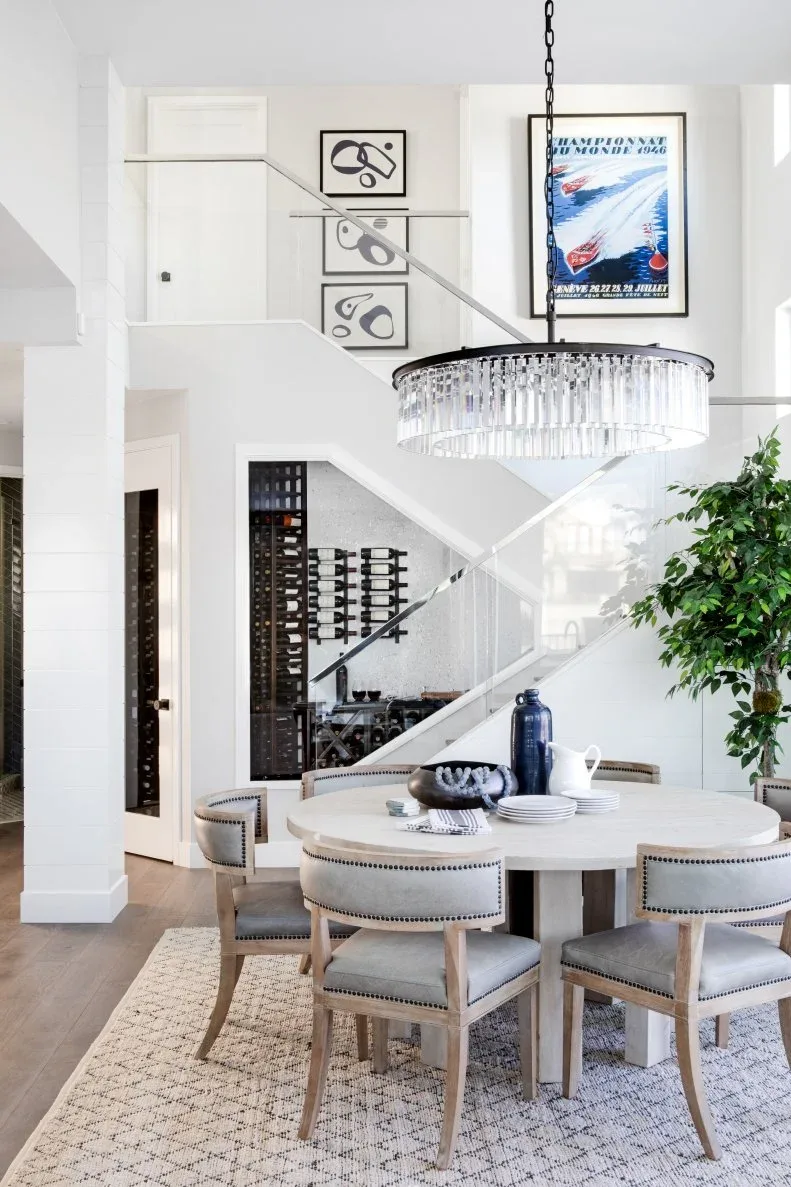
Use the Space Beneath the Stairs Thoughtfully
 SaveSupport Non AI Creator
Image credit: Photo: Chad Mellon. From: THREE SALT DESIGN Co.
Bottle storage occupies the recess beneath the white stairs, using a space beside the dining table that has an unusual sloping boundary. Dark racks make the arrangement visible without coloring the surrounding stair wall. A round white table and pale chairs keep the dining area light, while framed pictures add detail above. The storage follows an existing architectural space instead of creating a new tall wall.
Have the stair structure and any fire-safety requirements checked before altering the space beneath it. Plan secure racks suited to the bottles and keep the route past the table clear. Display storage is different from controlled wine storage, so consider the actual light and temperature conditions for what you intend to keep there rather than assuming the recess preserves it.
IDEA 18 / 20
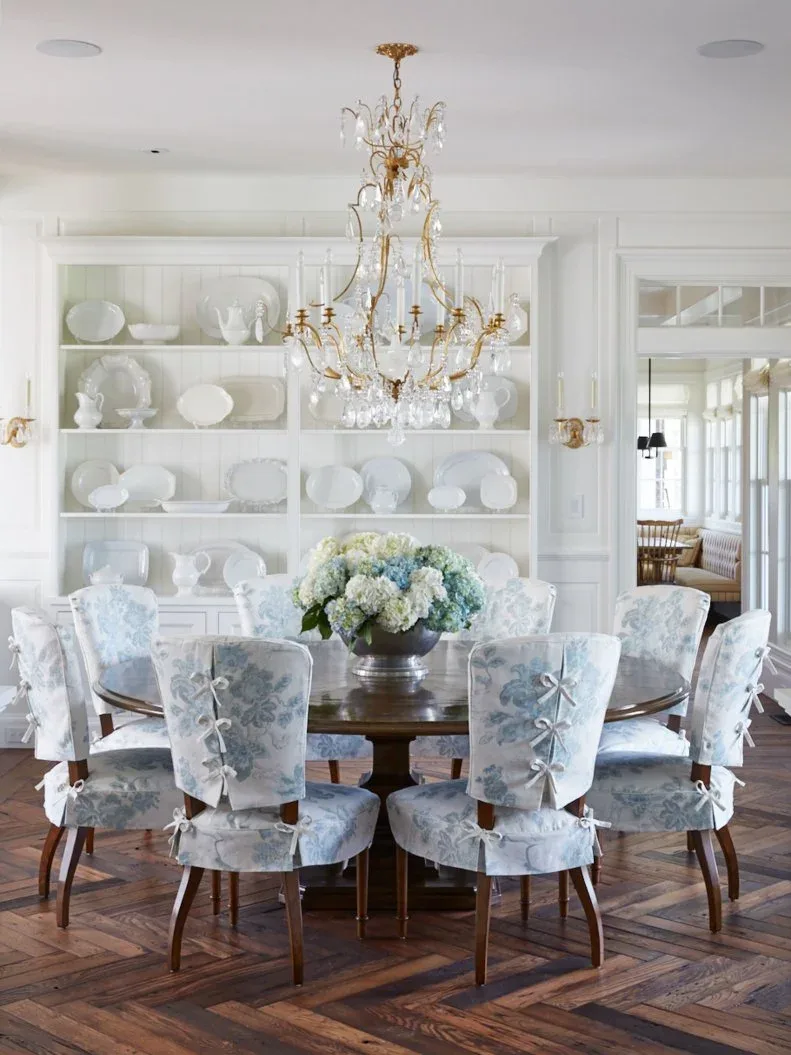
Make a Fitted Plate Display Part of the Wall
 SaveSupport Non AI Creator
Image credit: Photo: Victoria Pearson, Builder: Brian Glenn Construction, Architect: Jeremy Oury at Kibo Architects, Design by Lonni Paul. From: Lonni Paul
Pale dishes fill a broad white display above the lower cupboards. Repeated shelf lines organize plates, bowls, and vessels into a clear wall arrangement behind the round dark table. Blue-patterned chair covers introduce softer color around the seating. Flowers and an ornate chandelier add detail in front, while the mostly white collection keeps the built-in display connected with the room’s pale trim and walls.
Measure the largest plates and serving pieces before choosing shelf depth and spacing. Upright dishes need suitable supports so they do not tip when another item is removed. Leave enough room to handle each piece comfortably. Keep everyday crockery at an easy height and reserve upper shelves for occasional display, with a practical way to dust the collection safely.
IDEA 19 / 20
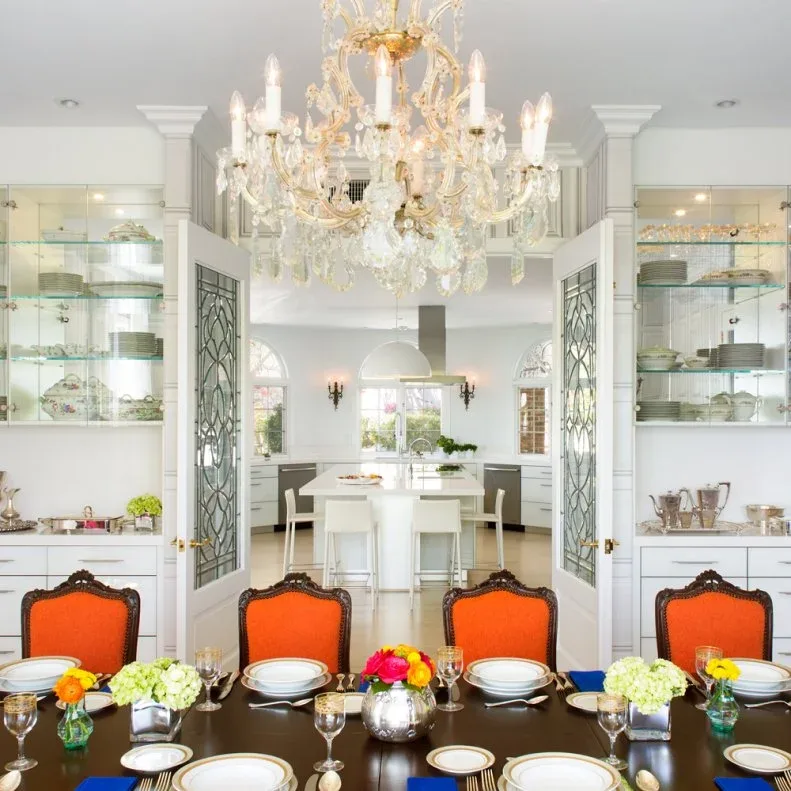
Line a Doorway with Glass-Front Displays
 SaveSupport Non AI Creator
Image credit: Photo: Dawson Design Group, Inc.. From: Dawson Design Group, Inc.
Glazed displays flank the open doors, holding dishes above rows of pale drawers. Their framing connects with the doorway trim, giving the passage a decorated edge without closing it. Orange chair upholstery adds a strong color beside the darker dining table. The cabinets keep the collection visible from the dining side, while the opening still shows the adjoining room beyond the doors.
Check the swing of both passage doors and cabinet doors before arranging storage around an opening. Keep drawer pulls and corners out of the main route. Interior lighting can make dishes easier to see, but it should be planned safely and remain accessible for maintenance. Avoid filling the shelves so densely that a single serving piece becomes difficult to remove.
IDEA 20 / 20
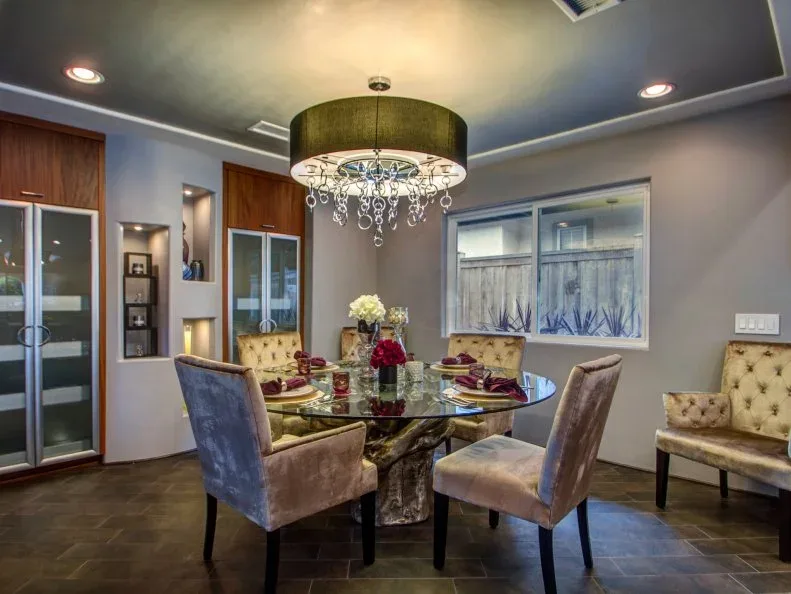
Separate Glazed Cabinets with Small Display Niches
 SaveSupport Non AI Creator
Image credit: Photo: Jackson Design and Remodeling ©. From: Jackson Design and Remodeling
Wooden cabinet fronts alternate with small open niches along the dining-room wall. The glazed doors provide contained storage, while the niches hold selected decorative objects without requiring a completely open bookcase. Gray walls and pale upholstered chairs create a quieter background around the glass table. The cabinet’s warmer finish gives the fitted wall a distinct presence beside those cooler surrounding colors and surfaces.
Use small niches for objects that fit comfortably and can be lifted out without scraping the edges. Keep frequently used dishes inside the more accessible glazed sections. If lighting is added within a niche, allow for safe wiring and future replacement rather than concealing connections permanently. Check reflections on the glass doors from the dining light before finalizing the cabinet layout.
BRING IT ALL TOGETHER
Plan the Contents Before the Cabinet Fronts
List what belongs in the dining room and measure the larger pieces before choosing a built-in layout. Dishes, books, linens, bottles, and work supplies need different shelf heights and opening methods. A combination of open display and closed cupboards often gives more flexibility than repeating one type of storage across the whole wall. Keep the most useful compartments easy to reach.
Test the cabinet layout with the table and chairs in their ordinary positions. Doors, drawers, curtains, and passageways must remain workable, and fitted benches need comfortable access at the ends. Have structural changes and work near fireplaces or stairs checked appropriately. A built-in earns its place when it helps the room function without making a meal harder to prepare, serve, or enjoy.