Modern bathroom tiles can create a clear arrangement without making every surface identical. A simple grid, a change in tile direction or one stronger color may be enough to define the shower and vanity. Start with the fixtures you are keeping and the cleaning you are willing to do before choosing a finish from a photograph.
These rooms show different ways to combine tiled walls, floors and useful storage. The visible pattern is a starting point, not a product specification. Confirm suitability for the intended location, including wet floors, and plan waterproofing, drainage and tile installation with the appropriate professional before ordering the full quantity.
PART 01
Use tile direction and pattern deliberately
IDEA 01 / 20
Keep a White Brick Pattern Quiet
 SaveSupport Non AI Creator
Image credit: Photography by Seth Smoot; Styling by Kendra Smoot
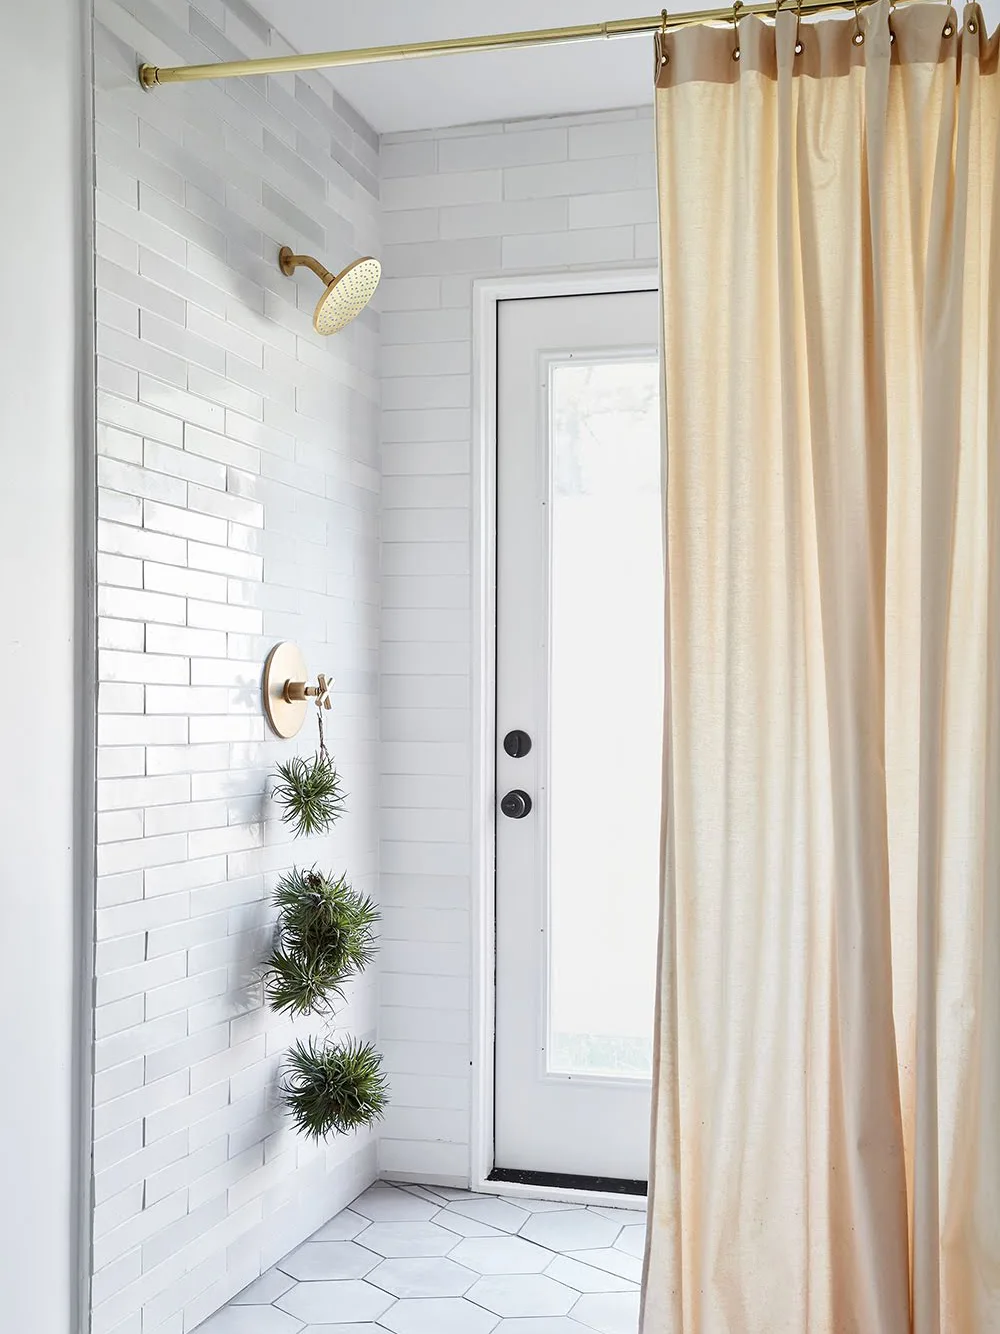
White rectangular tiles form a horizontal brick pattern around the shower, giving the wall a clear rhythm without another strong color. The pale curtain softens the tiled surroundings, while brass-colored fittings provide a warmer outline. A different geometric floor pattern adds detail below without competing with a second colored wall.
Compare the grout sample with the white tile before choosing how clearly each rectangle should read. Plan the curtain so it contains spray and can dry after use, rather than copying its decorative position. If the floor will change too, our bathroom floor tile ideas compare patterns alongside practical considerations for daily use.
IDEA 02 / 20
Arrange Brown Tiles in Alternating Directions
 SaveSupport Non AI Creator
Image credit: Photography by Ori Harpaz
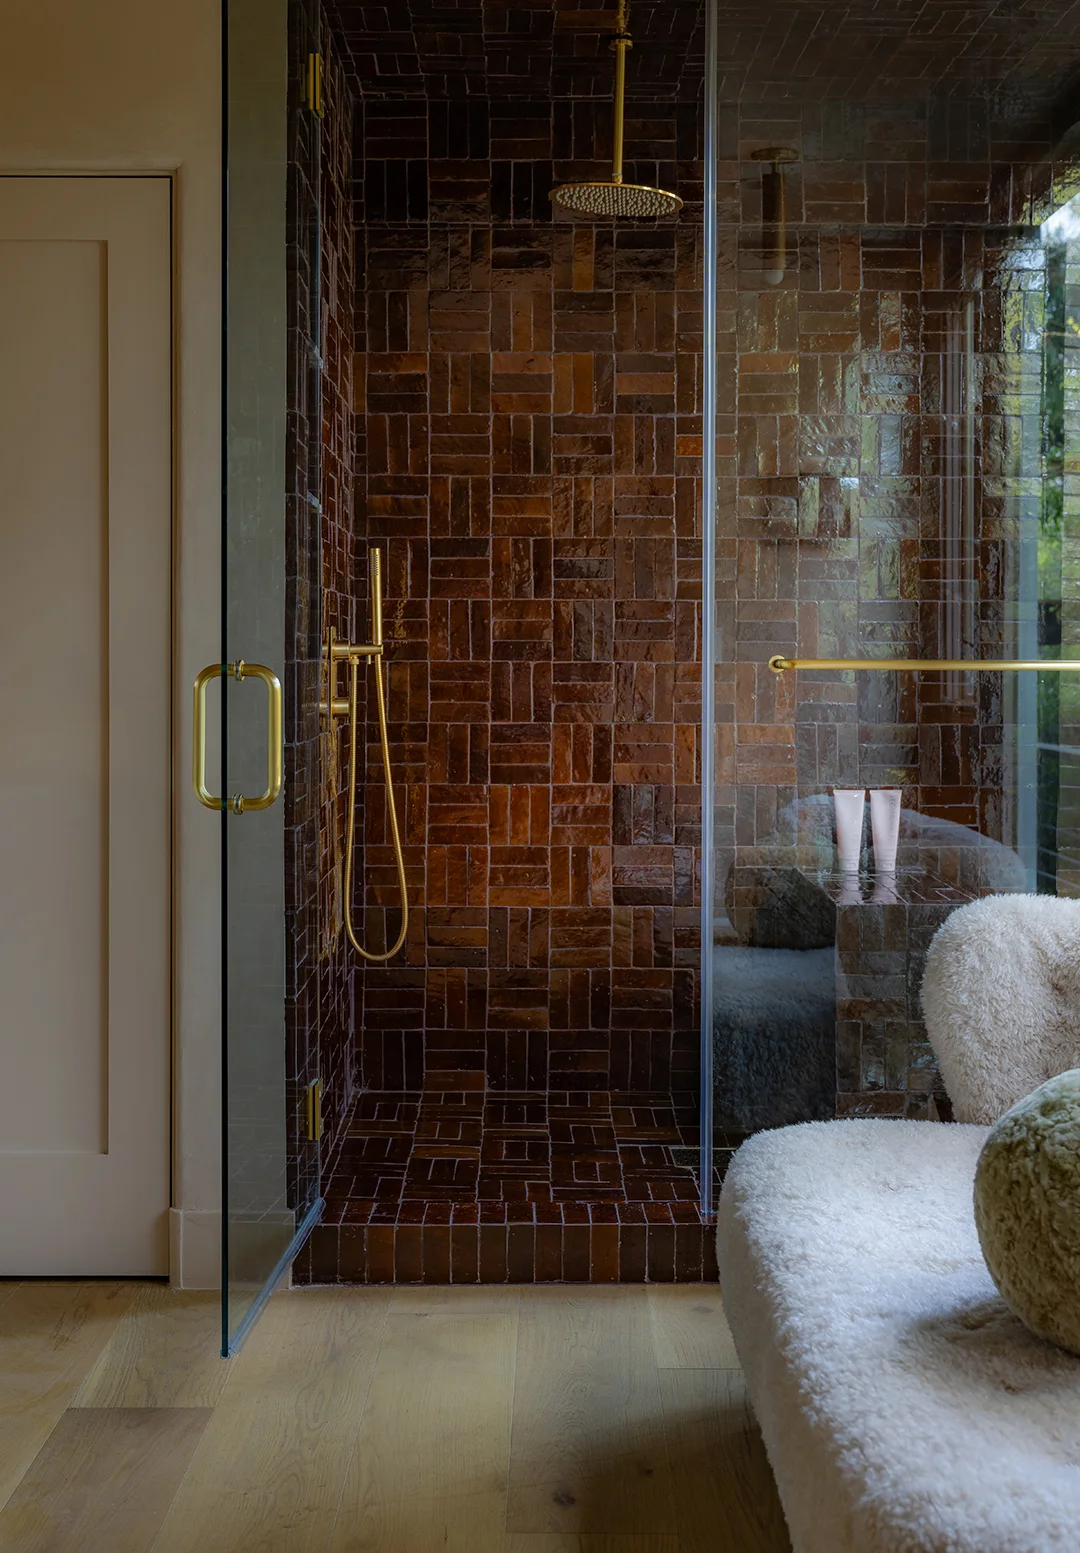
Dark brown tiles cover the shower walls and floor, with groups of rectangles alternating direction to create a woven-looking pattern. Glass leaves that arrangement visible from the adjoining room. The brass-colored shower fittings stand out against the deeper tile, while the lighter surface outside the enclosure provides a clear contrast.
Lay out enough samples to see a complete repeat before committing to a pattern with changing directions. Check whether the floor product is suitable for wet use; a matching appearance does not establish performance. Ask the installer to plan cuts around the drain and corners so the pattern remains deliberate where it meets the fittings.
IDEA 03 / 20
Put the Stronger Pattern Underfoot
 SaveSupport Non AI Creator
Image credit: Photography by Nikki Sebastian
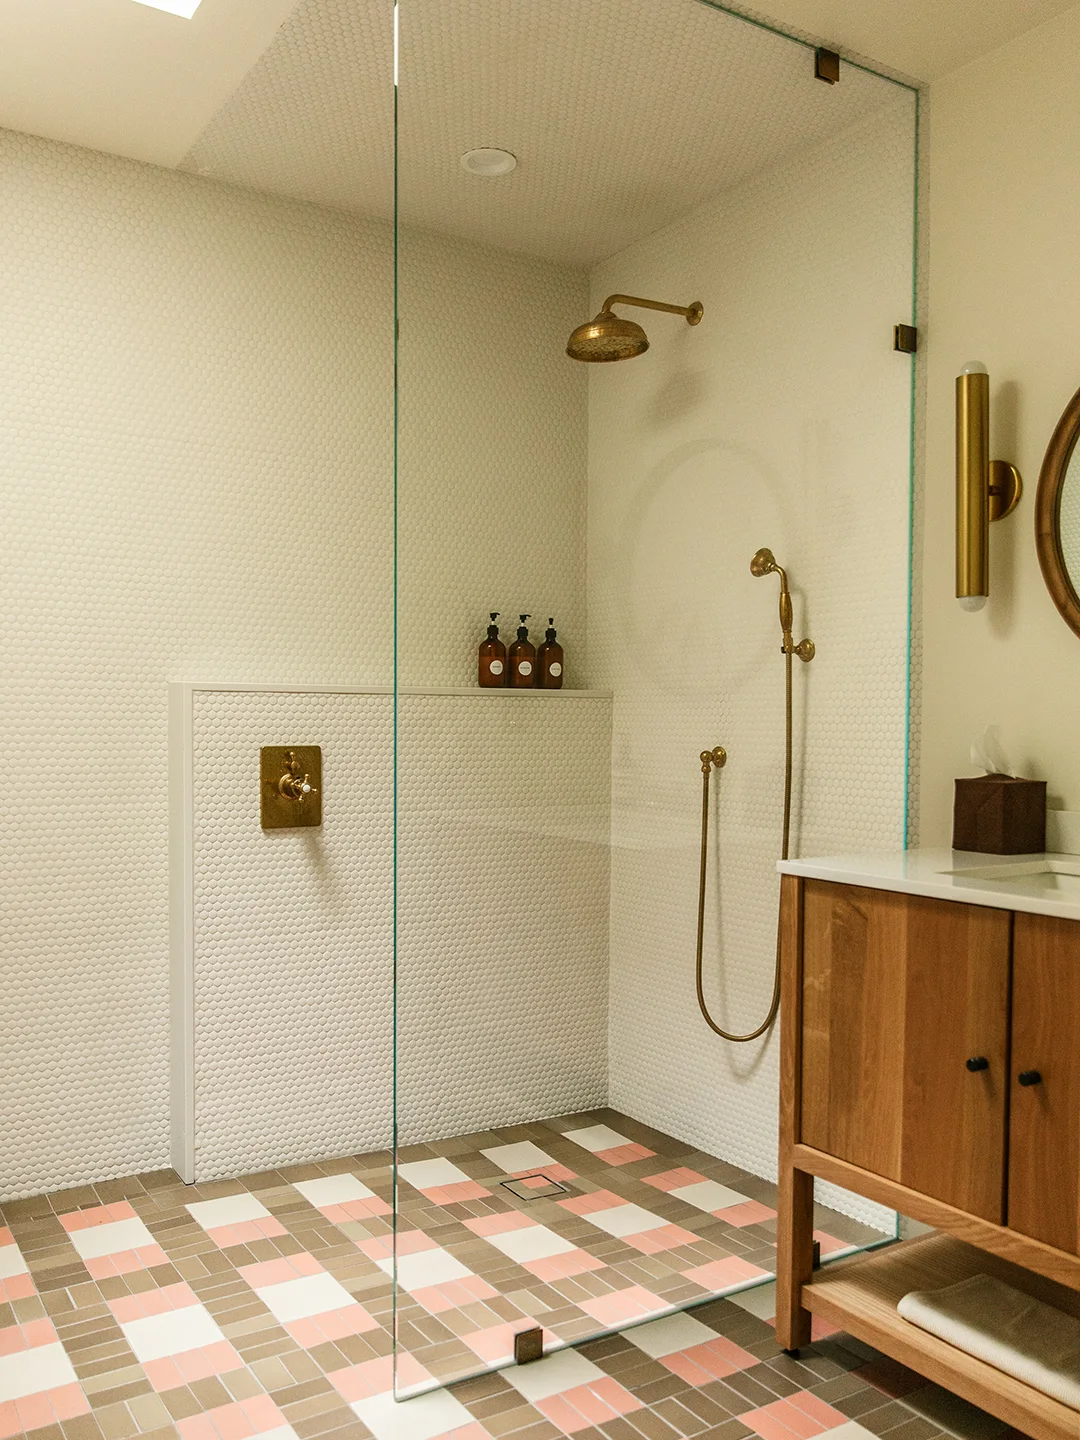
A checked floor introduces pink and muted brown into an otherwise pale shower. Small white tiles continue up the walls and across the recessed shelf, allowing the floor pattern to carry the stronger color. The wooden vanity beside the glass adds another warm surface without extending the checks across the entire room.
Plan a colored floor from a full repeat rather than a single square, especially where the shower entrance interrupts it. Keep wall samples beside the floor colors while deciding the grout. Pink bathroom tile ideas offer more ways to introduce that color, including arrangements that use a smaller accent instead of a patterned floor.
IDEA 04 / 20
Create Stripes with Two Restrained Colors
 SaveSupport Non AI Creator
Image credit: Photography by Heather Talbert; Design by Magda Rauscher; Styling by Kimberly Swedelius
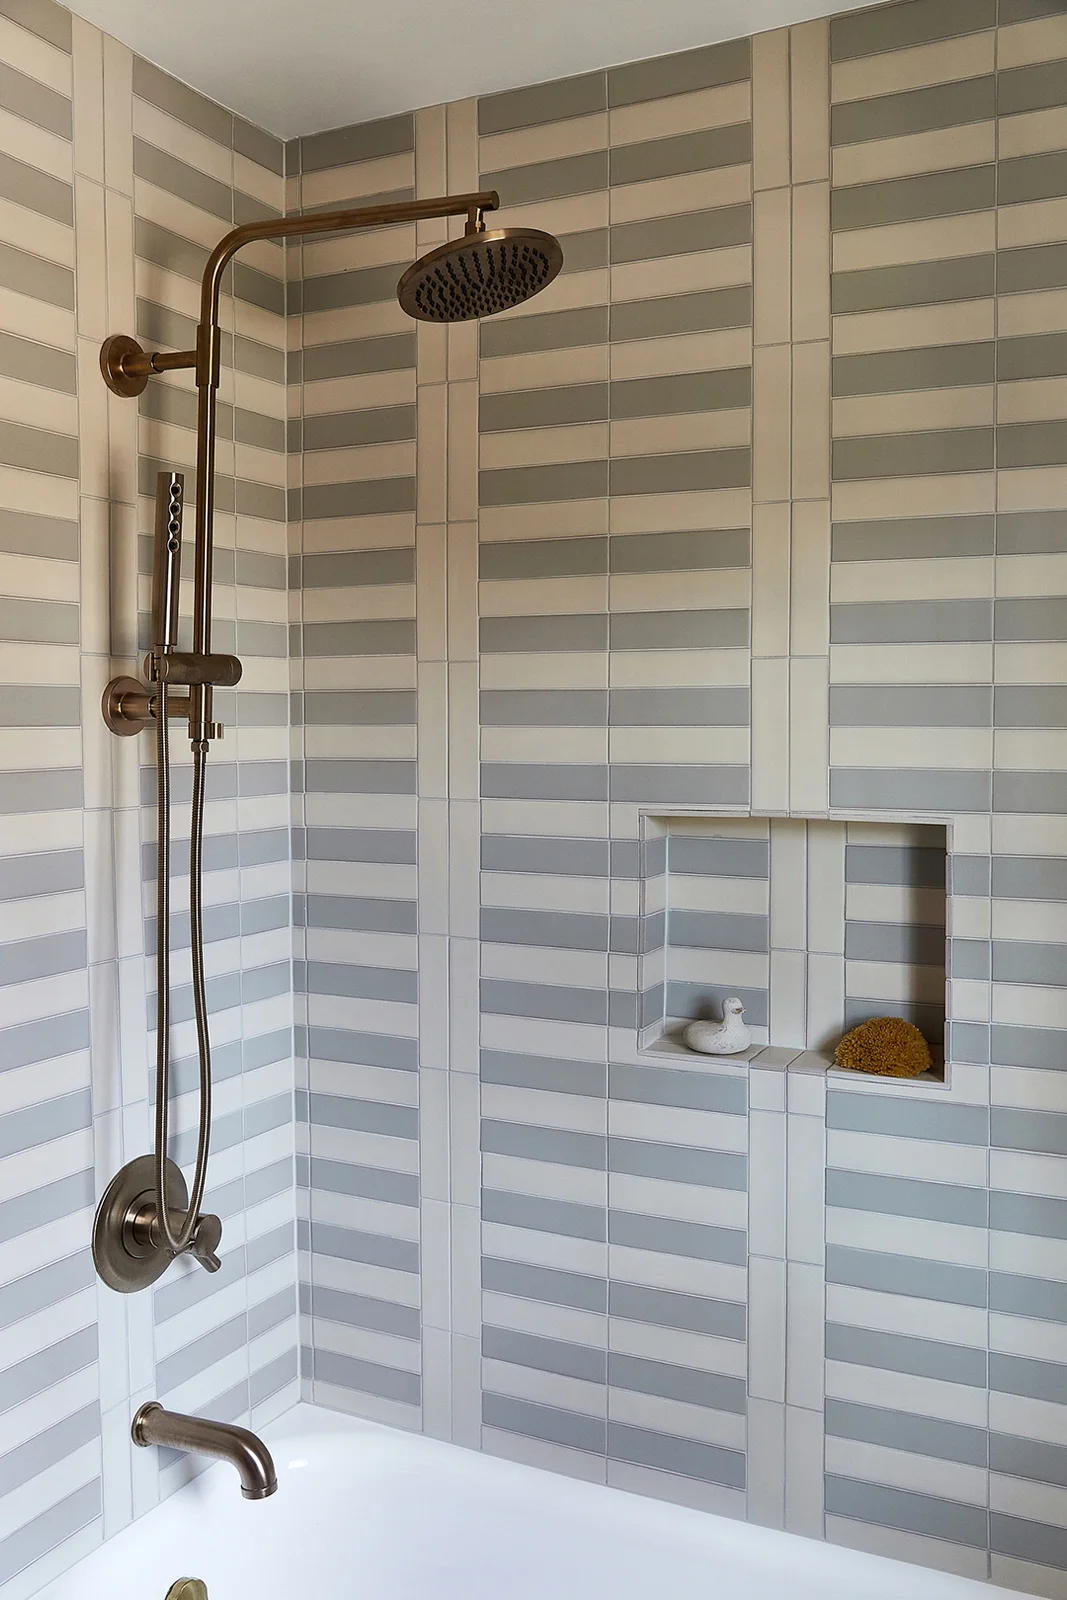
Alternating gray and pale tiles create horizontal stripes across the shower, with slim pale borders organizing the wall into larger panels. The recessed shelf sits within that pattern instead of introducing another decorative surface. Brass-colored fittings provide a contrasting outline, keeping the palette limited even though the arrangement has several visible lines.
Draw the stripe sequence across all shower walls before choosing the starting row. Check how the bands meet the shelf, tub edge and corners, since partial stripes can change the intended effect. Keep the grout choice restrained if the two tile colors already provide sufficient contrast, and choose shelf dimensions around the items actually stored there.
IDEA 05 / 20
Use Deep Green Inside the Shower
 SaveSupport Non AI Creator
Image credit: Design for Living
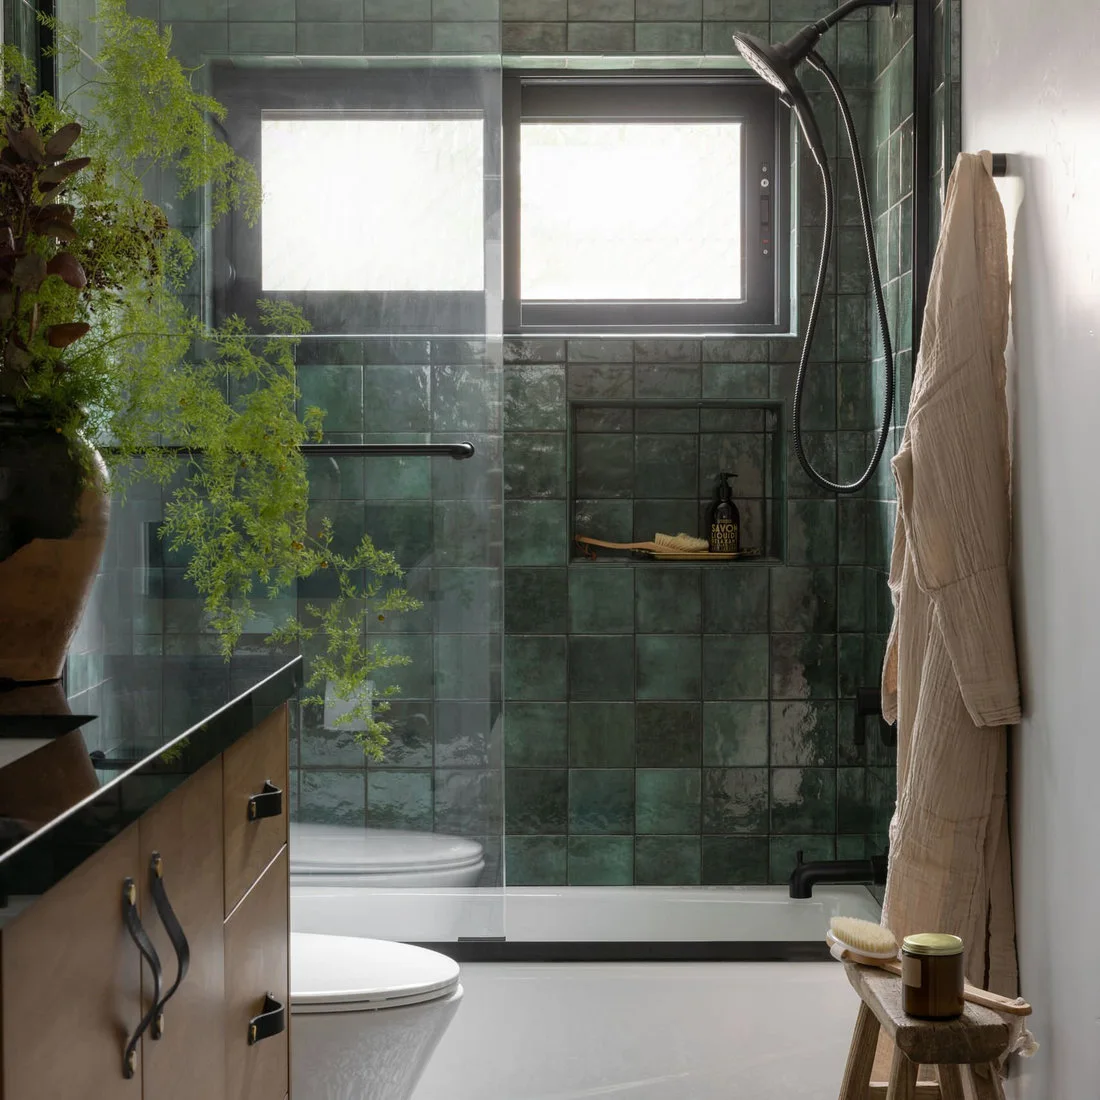
Deep green tiles concentrate the color inside the shower, with the window and recessed shelf interrupting the rectangular grid. The wood-fronted vanity brings warmth into the adjoining pale area. Dark fittings connect the different fixtures, while the light shower base prevents the lower part of the enclosure from becoming uniformly deep-toned.
Test the green sample beside the vanity finish and under the bathroom’s actual lighting. A reflective surface can look quite different near a window and in a darker corner. For a broader room palette, earthy bathroom ideas compare green accents with warmer cabinetry and quieter surroundings; decide which surface should carry the strongest color before adding more accessories.
PART 02
Balance tiled surfaces with useful furnishings
IDEA 06 / 20
Separate White Walls from a Dark Hexagonal Floor
 SaveSupport Non AI Creator
Image credit: Cameron Getter Design
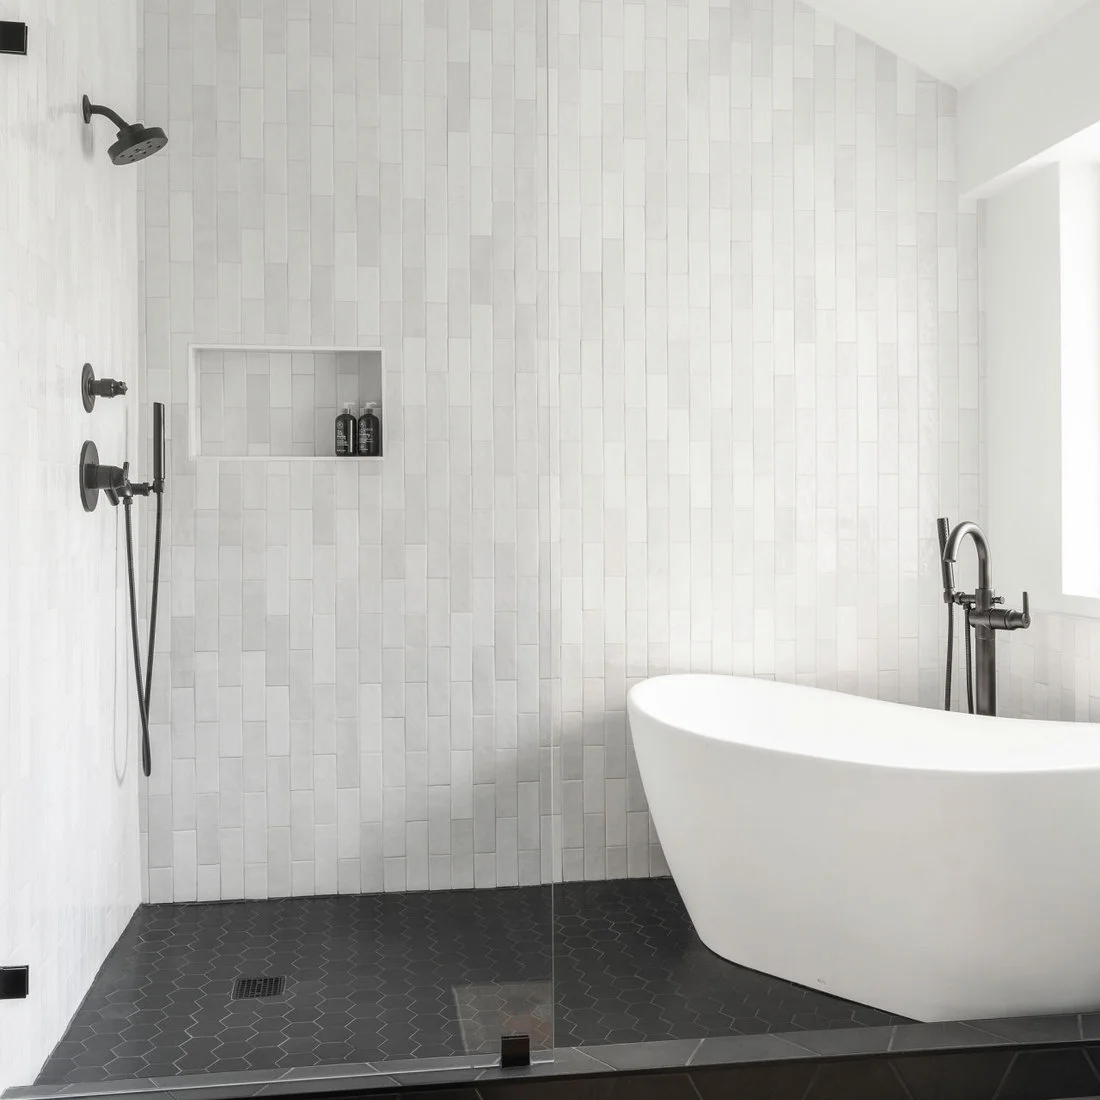
Vertically arranged white wall tiles keep the shower pale, while a dark hexagonal floor gives the lower surface a distinct pattern. The long recessed shelf creates one useful horizontal line through the wall. A freestanding white tub repeats the lighter color, linking the separate bathing areas without making their outlines identical.
Compare the proposed dark grout and tile combination together rather than assuming the floor will conceal marks. Check product suitability and the installer’s drainage plan within the shower. Keep the long niche sized around the bottles you use, and avoid choosing its length purely to match a photograph if the available wall construction requires another arrangement.
IDEA 07 / 20
Keep a Wide Shower Pale with a Long Shelf
 SaveSupport Non AI Creator
Image credit: DYM Builders Group, Inc.
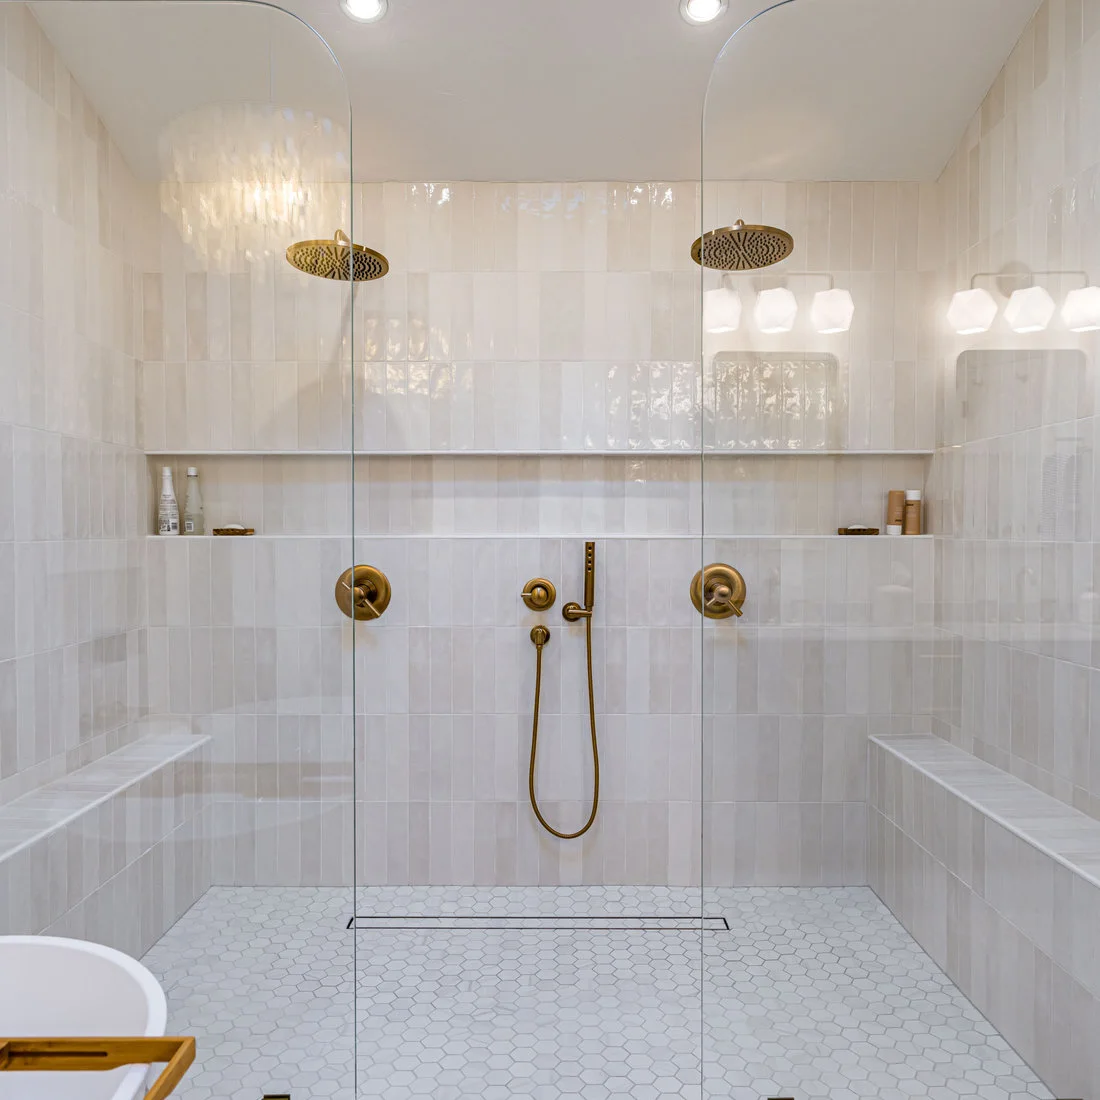
Pale vertical rectangles cover the wide shower walls, while the continuous niche forms a horizontal break between the upper tiles and fittings below. Two shower positions share the same restrained surfaces. A small hexagonal floor pattern introduces a different scale underfoot, allowing the larger wall area to remain visually straightforward.
A wide shower needs a practical storage and movement plan before the tile pattern is chosen. Discuss fitting positions, water requirements and drainage with the appropriate installer. Compare samples across a larger area so subtle surface variation is clear, and keep shelf contents limited enough that the long recess remains easy to wipe and use.
IDEA 08 / 20
Frame Pale Tiled Walls with Wood Storage
 SaveSupport Non AI Creator
Image credit: Imrie Design Studio
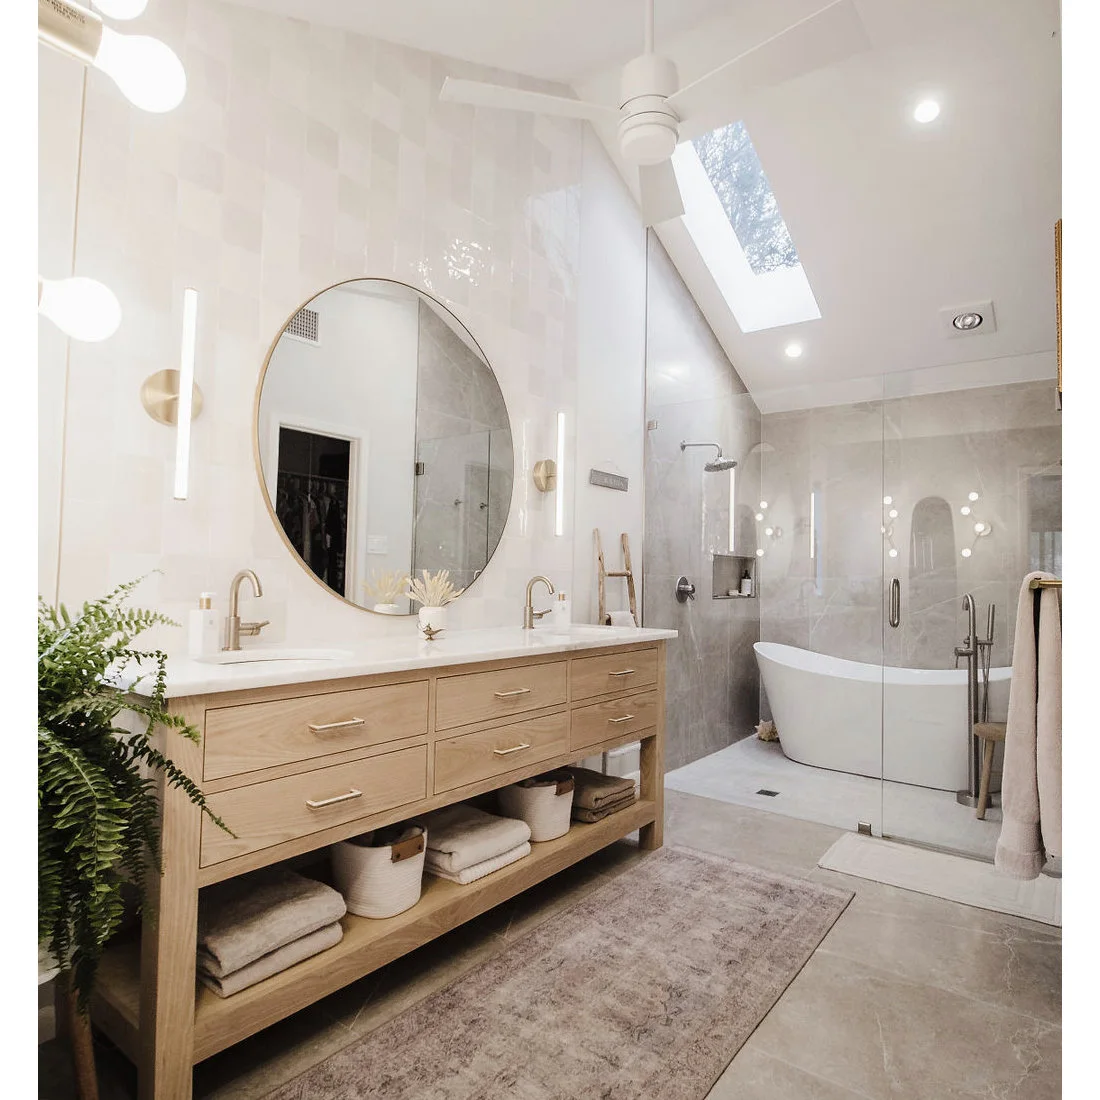
Pale tiles continue around the bathing area, giving the sloping ceiling and skylight room to stand out. The wood-fronted vanity adds a warmer band below a large round mirror. Open shelves hold baskets and folded towels, so the room’s visible detail comes from useful storage as well as the tile surfaces.
Compare pale wall tiles with the vanity’s actual finish rather than expecting all light neutrals to match. Check access around the bath and shower before selecting a deep storage unit. If towels will sit on open shelves, leave room to remove them comfortably and choose a placement that limits direct spray from the bathing area.
IDEA 09 / 20
Use Slender Vertical Tiles Around One Recess
 SaveSupport Non AI Creator
Image credit: Cathie Hong Interiors
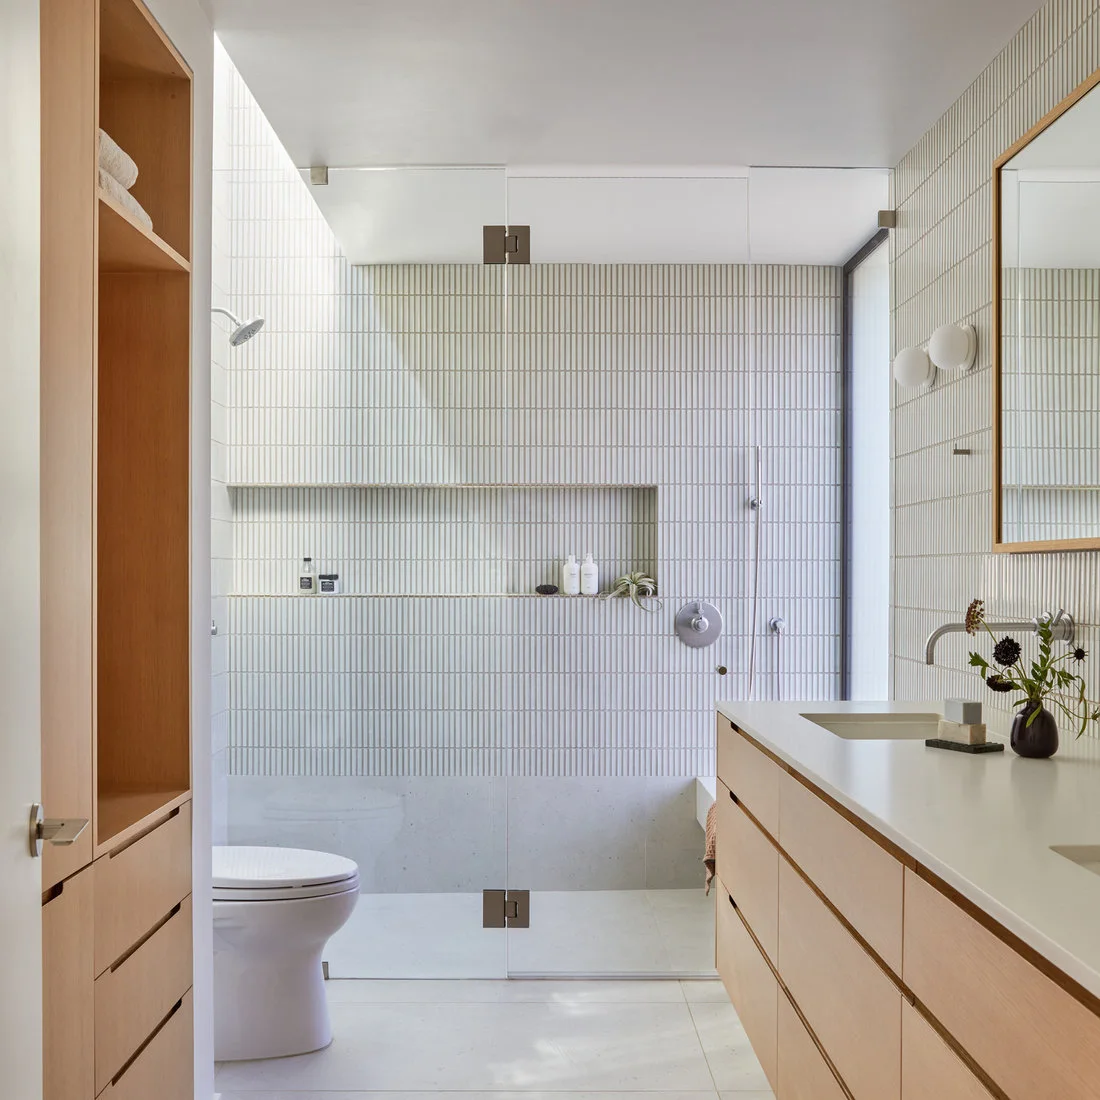
Slender pale tiles create closely spaced vertical lines around the shower, with a broad niche breaking the grid at a useful height. The glass door keeps those surfaces visible from the rest of the room. Wooden cabinetry on both sides supplies warmer color, leaving the shower itself free of another strong pattern.
A narrow tile format produces more visible joints than a large wall panel, so consider the cleaning routine alongside the appearance. Plan how the vertical grid meets the niche edges and door fittings before installation. Our classic bathroom ideas compare tiled surroundings with different fixtures and room details; use those alternatives to decide whether this finer pattern suits the room’s maintenance needs.
IDEA 10 / 20
Combine Plain Blue Tiles with a Textured Band
 SaveSupport Non AI Creator
Image credit: Design Theory Interiors, LLC
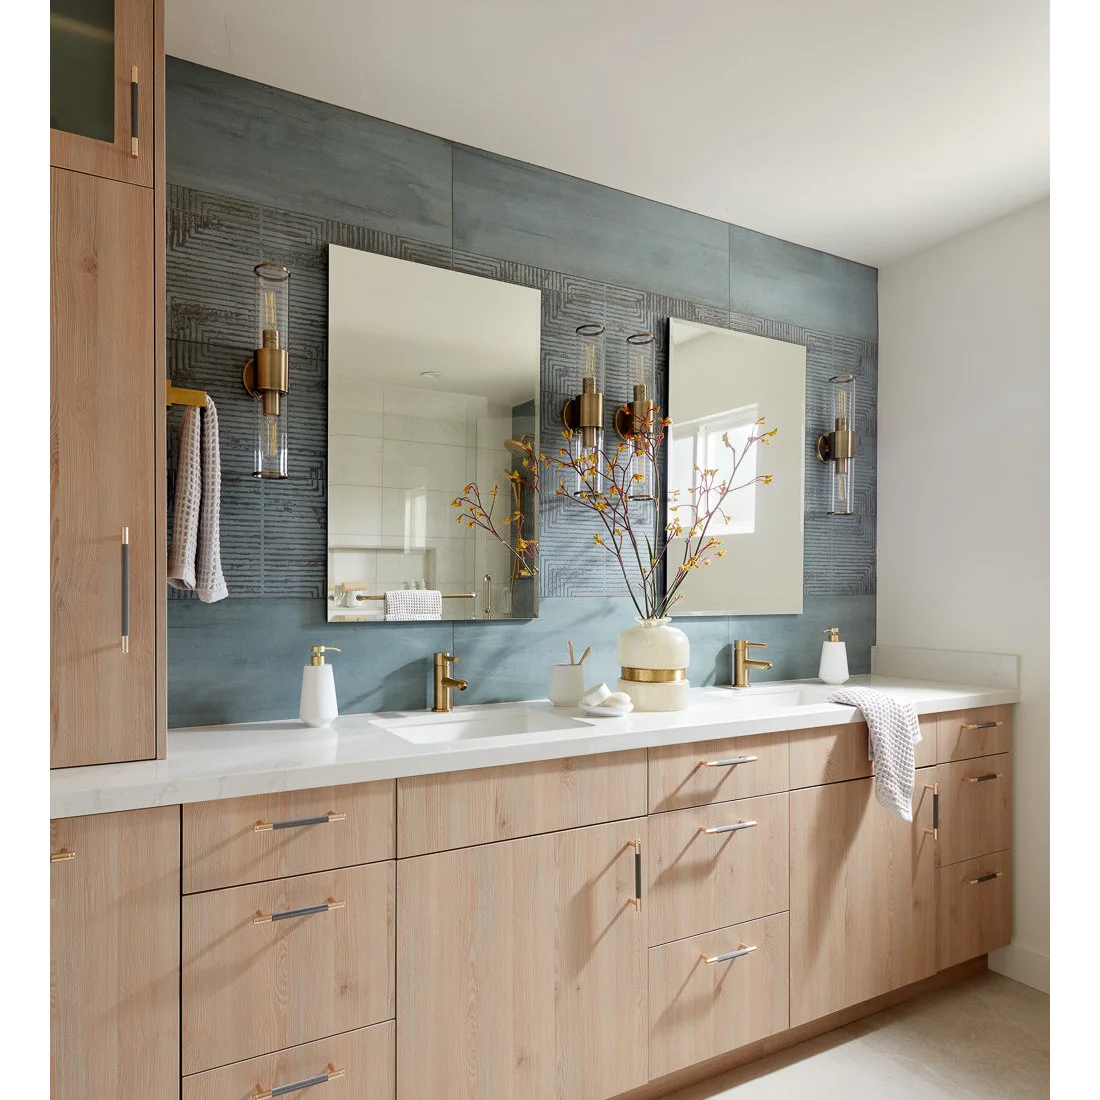
The blue wall uses both plain-looking rectangular tiles and a darker textured area around the mirrors. Pale wooden drawers bring a warmer surface below, while the light countertop keeps the basin area clear. Repeating the same broad color family allows the texture to change without introducing a separate competing wall color.
Compare both tile samples together and check how the textured surface can be cleaned near the vanity. Plan the change in pattern around mirror edges and wall fittings rather than leaving it to the final installation stage. Keep the countertop useful for daily routines, with decorative objects grouped where they do not obstruct access to the basins.
PART 03
Plan edges, storage and smaller rooms
IDEA 11 / 20
Repeat the Wall Tile Inside Useful Niches
 SaveSupport Non AI Creator
Image credit: Rebekah Nicole Interiors
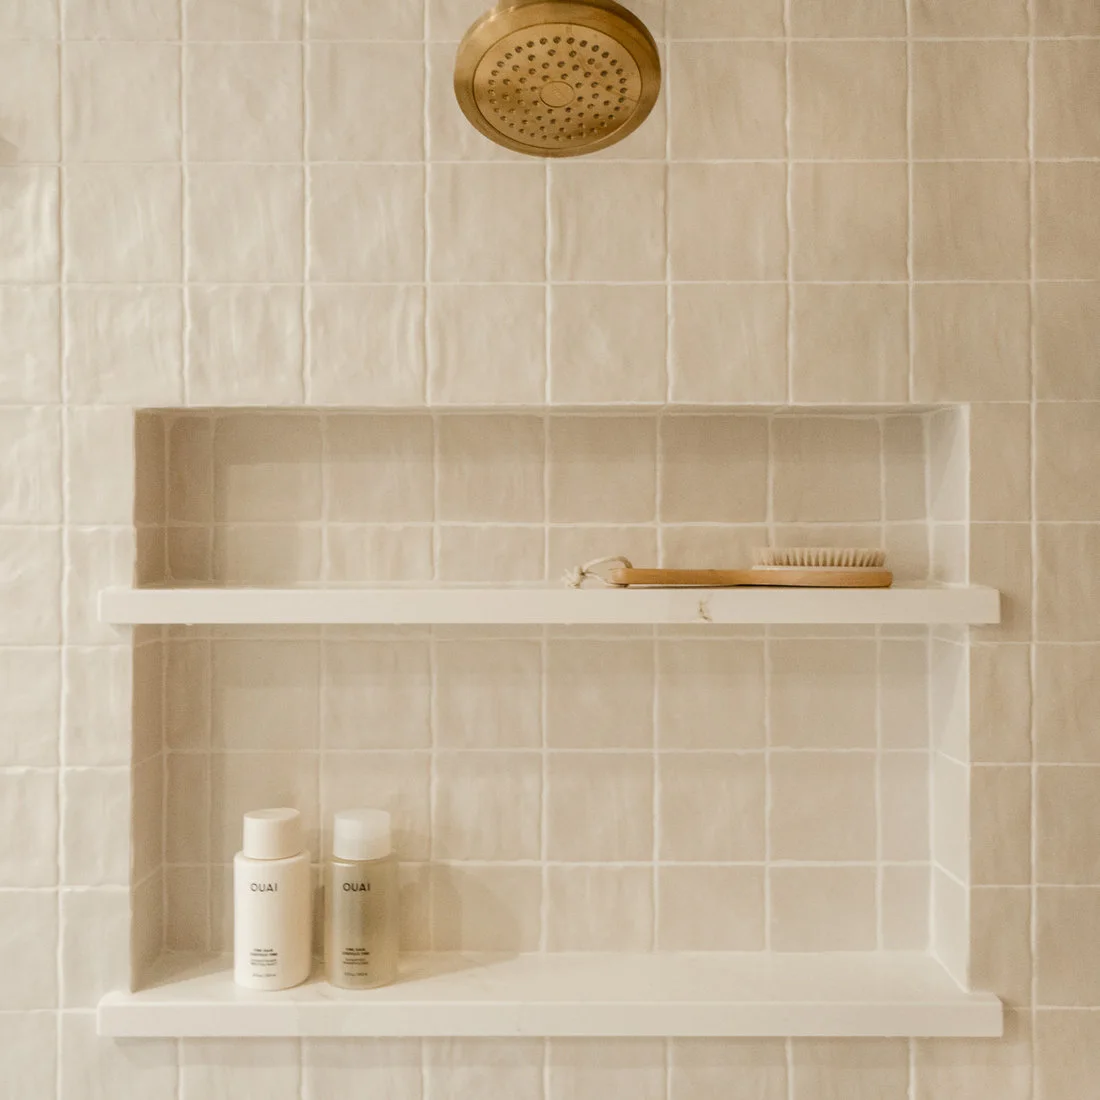
The pale wall tile continues inside two stacked niches, keeping storage connected with the surrounding grid. Light shelf edges distinguish the two levels without another strong color. A brass-colored showerhead adds a separate outline above, while the recesses provide room for bottles and a brush away from the main wall surface.
Choose niche heights and shelf spacing around actual bottles, including the taller containers that need to stand upright. Discuss waterproofing and edge detailing with the installer before tiling begins. Repeating wall tile inside the recess can simplify the palette, but still check the cuts and maintenance of the shelf surfaces where water and product residue collect.
IDEA 12 / 20
Combine Vertical White Tiles with a Wood Ceiling
 SaveSupport Non AI Creator
Image credit: Adapt Interior Design
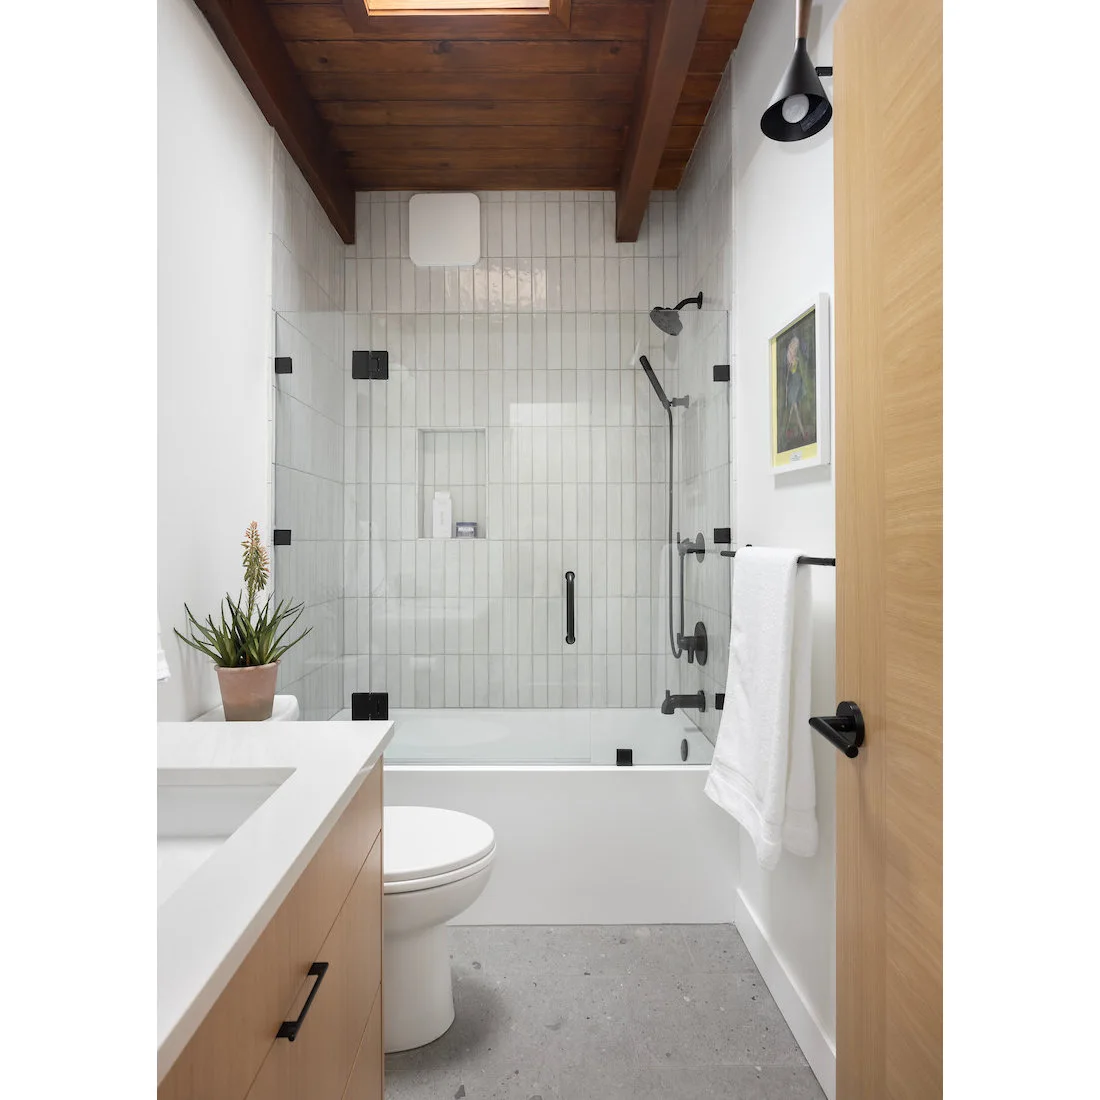
White vertical tiles make the tub enclosure a simple pale surface, while the wooden ceiling introduces warmth above. Black shower fittings and door hardware repeat a darker outline in a few places. The small recessed shelf uses the same restrained wall treatment, leaving the contrast between wood and white as the main feature.
Work with existing ceiling finishes when comparing tile colors, and obtain appropriate advice before changing a bathroom ceiling assembly. Plan the tile grid around the tub and shelf so the cuts remain consistent. Keep the darker fittings selective, and choose towel storage around reach and drying rather than filling the narrow room with matching accessories.
IDEA 13 / 20
Make a Black Glass Frame the Main Outline
 SaveSupport Non AI Creator
Image credit: C & L Construction Inc.
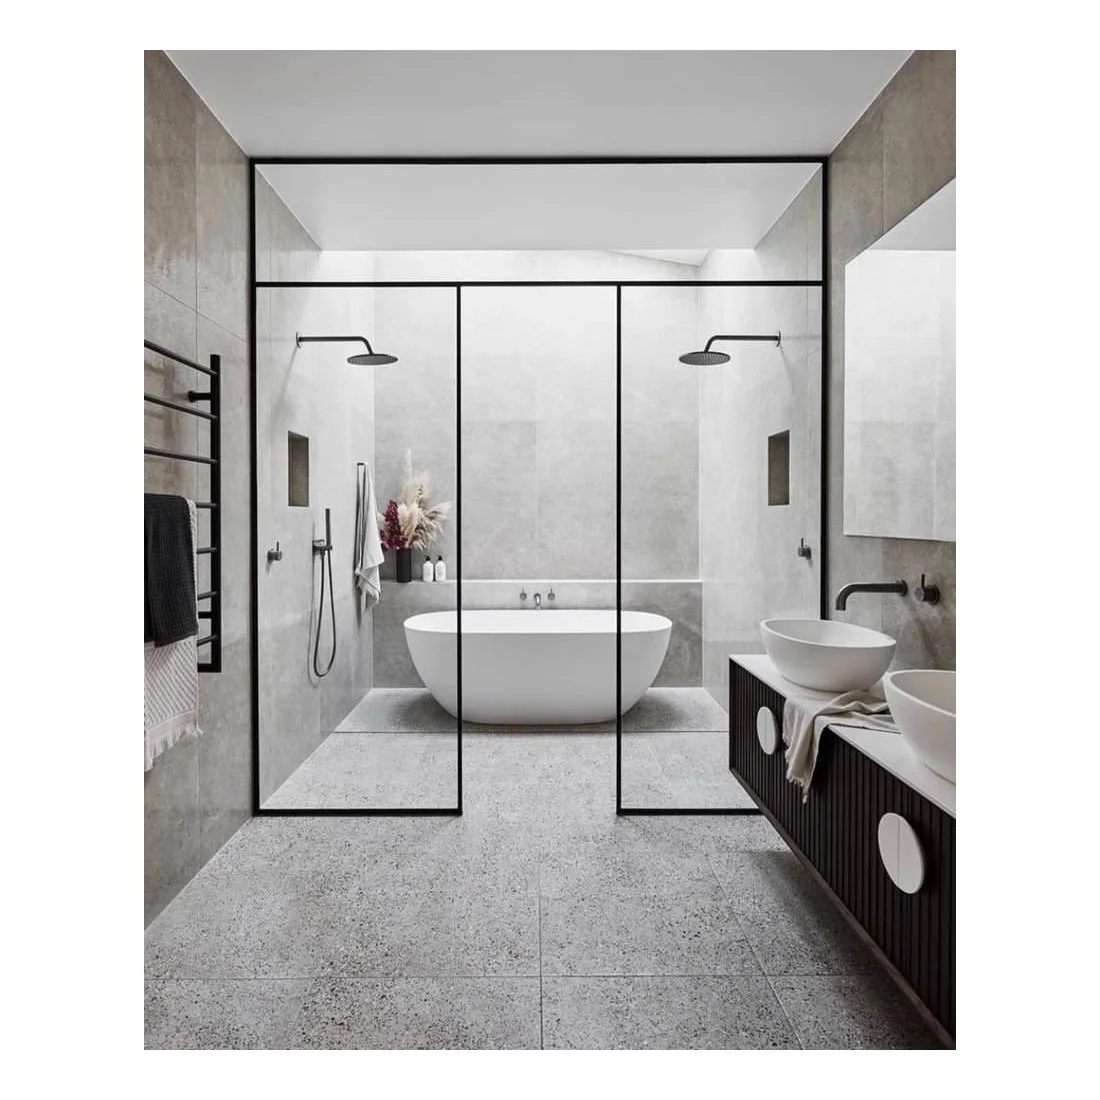
The black-framed enclosure provides a clear outline around the white tub, while pale large-format wall surfaces keep the interior quieter. The speckled gray floor introduces texture at a smaller scale. Round basins and circular cabinet details repeat softer shapes beside the stronger rectangular frame, preventing every feature from using the same geometry.
Compare the tile layout with the enclosure dimensions before ordering either, particularly where frame lines cross grout joints. Check clear access for cleaning around the tub and glass. Large wall tiles still require suitable preparation and careful edge planning; do not assume fewer joints remove the need to consider installation or regular maintenance.
IDEA 14 / 20
Use White Hexagons as a Single Patterned Wall
 SaveSupport Non AI Creator
Image credit: daniStudio
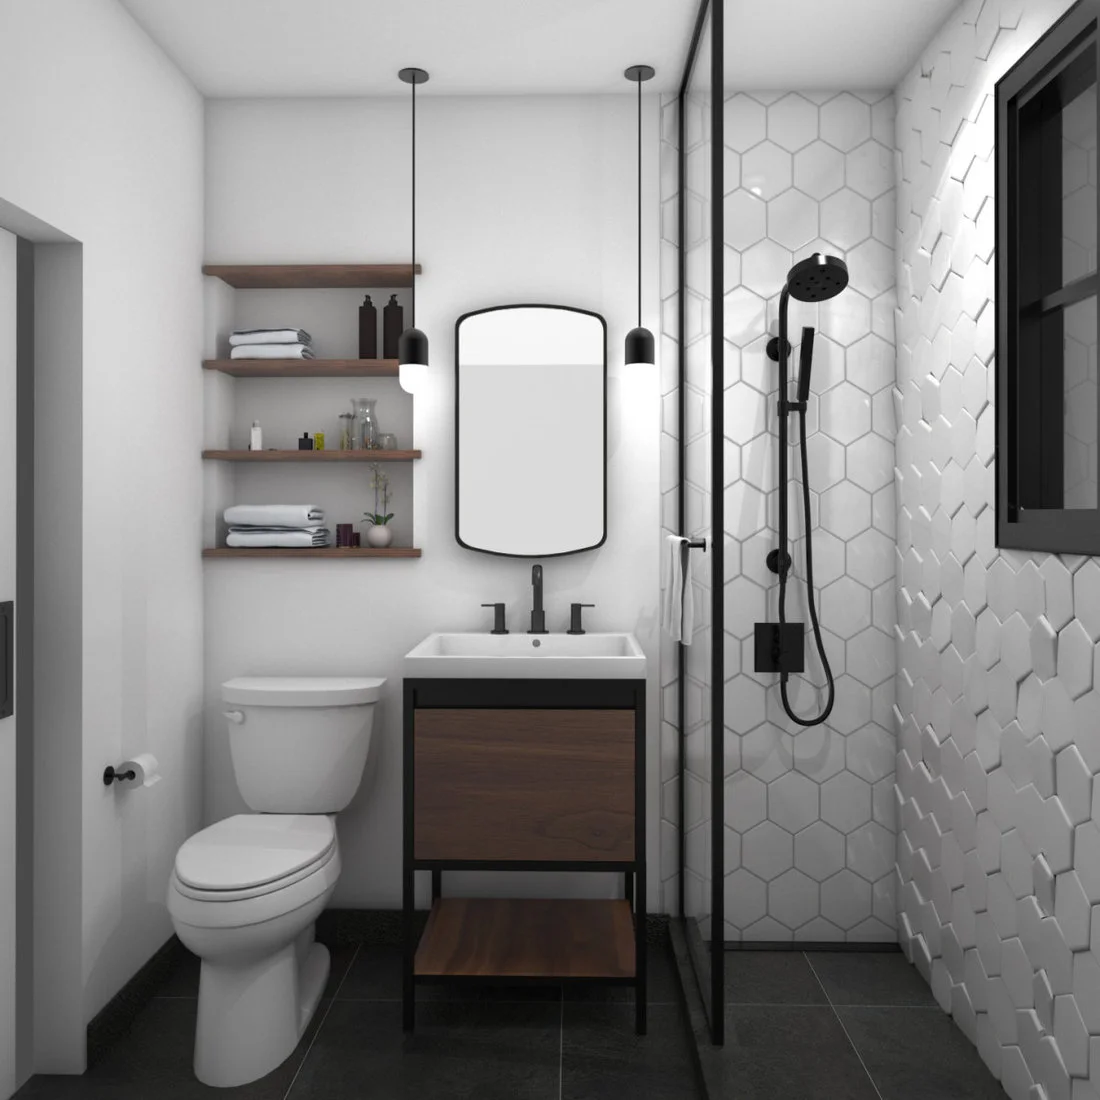
White hexagons give the shower one clearly patterned surface, while the other walls remain plain. Dark fittings connect the shower with the mirror and pendant outlines. The wood-fronted vanity and floating shelves add warmer color, making the small bathroom feel coordinated through repeated details rather than several different tile patterns.
Check how the hexagons finish at the shower opening and around fittings, because the outer cuts remain prominent. Keep open shelf contents manageable and allow towels to dry properly before stacking them. Choose the floor for its own intended use rather than automatically repeating the wall tile, and compare the two surfaces together before purchase.
IDEA 15 / 20
Contrast Narrow Wood-Look Strips with Pale Walls
 SaveSupport Non AI Creator
Image credit: Rebekah Nicole Interiors
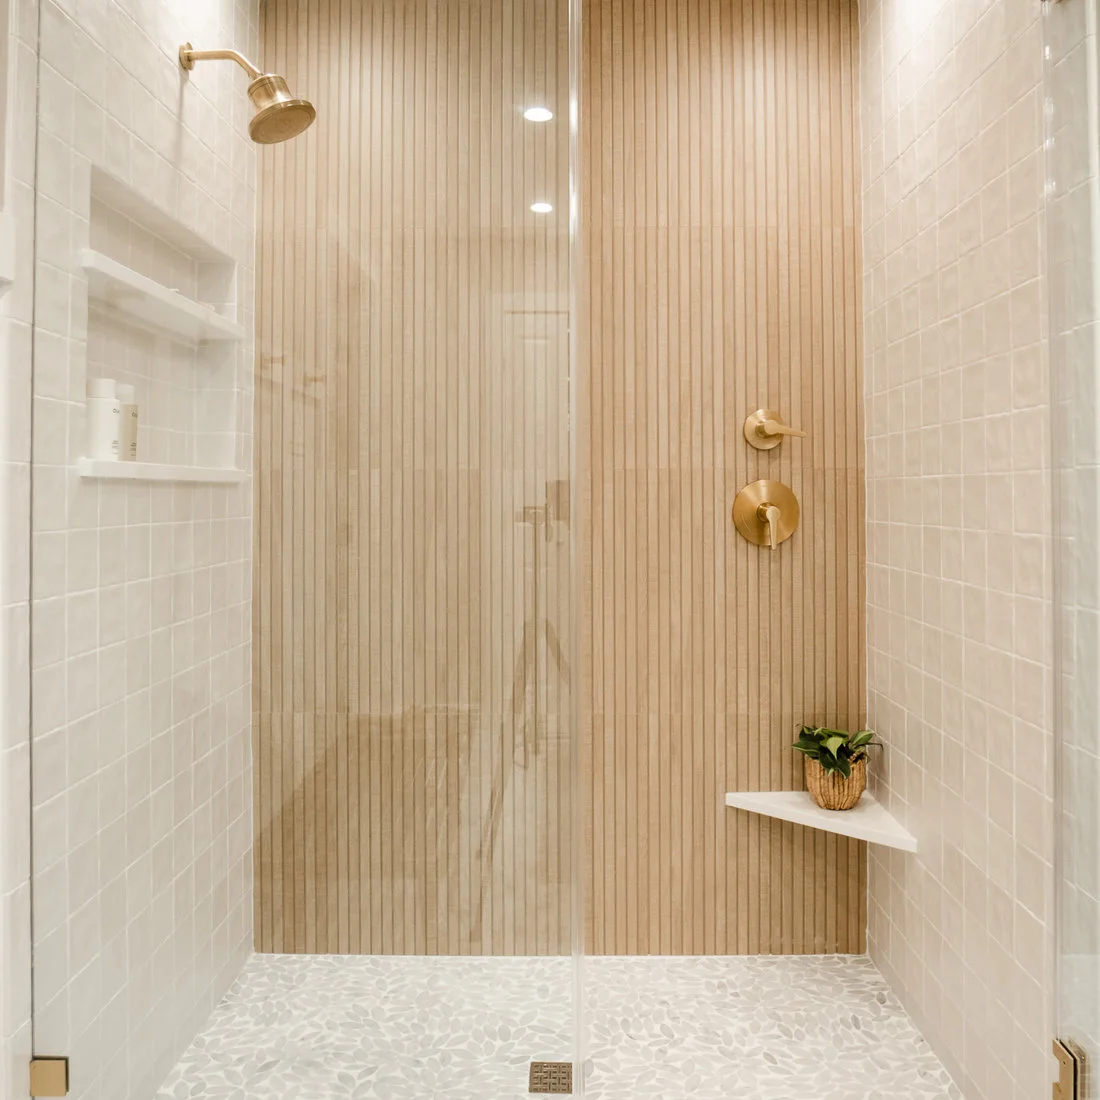
Narrow wood-look strips form the shower’s central feature, with pale rectangular tiles covering the adjoining walls. Brass-colored fittings sit against the warmer background, and a small corner shelf provides a place for one accessory. A different small-scale floor pattern gives the base its own texture without repeating the vertical arrangement.
Confirm the actual product rather than treating a wood-like appearance as evidence of timber or a particular tile material. Check its suitability for the shower and the cleaning guidance for the surface texture. Plan the meeting point between the strips and wider side tiles carefully, and make the shelf useful for reachable items rather than display alone.
PART 04
Add contrast without losing a clear layout
IDEA 16 / 20
Line a Niche with the Feature Tile
 SaveSupport Non AI Creator
Image credit: Build Design Center Kitchen & Bath Georgetown
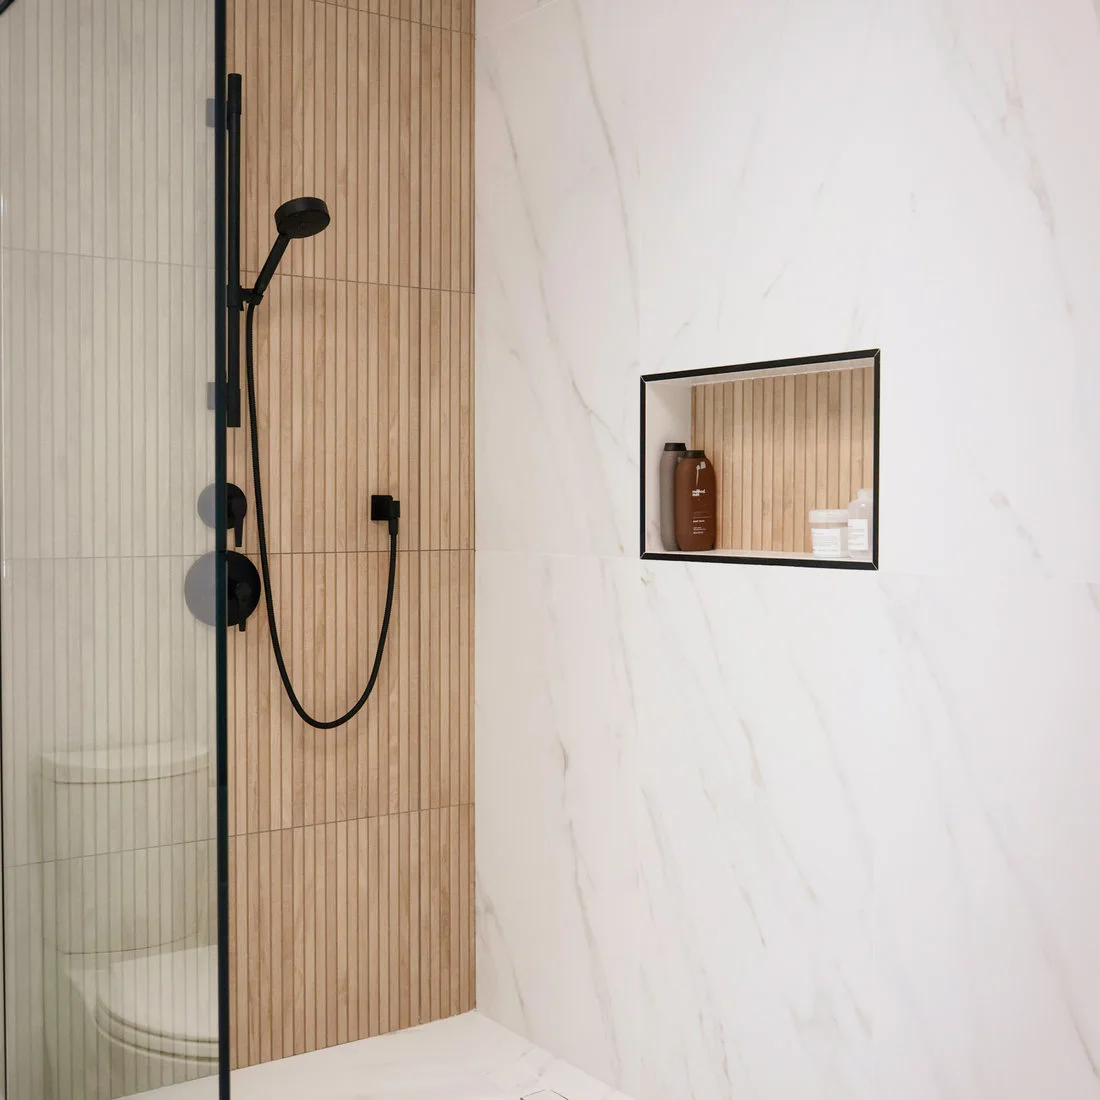
The wood-look vertical tiles provide a warmer shower background beside a pale veined wall. The niche repeats the vertical tile within a dark border, linking the two surfaces where they meet. Black fittings repeat that outline, while the larger pale wall keeps the fine vertical grid from filling the whole enclosure.
Compare full samples of both surfaces so the veining and fine grid are visible together. Ask the installer to plan niche cuts and waterproof detailing before selecting the final layout. Use bottles to test the recess dimensions, and keep the shelf easy to access without forcing every daily product into a decorative arrangement.
IDEA 17 / 20
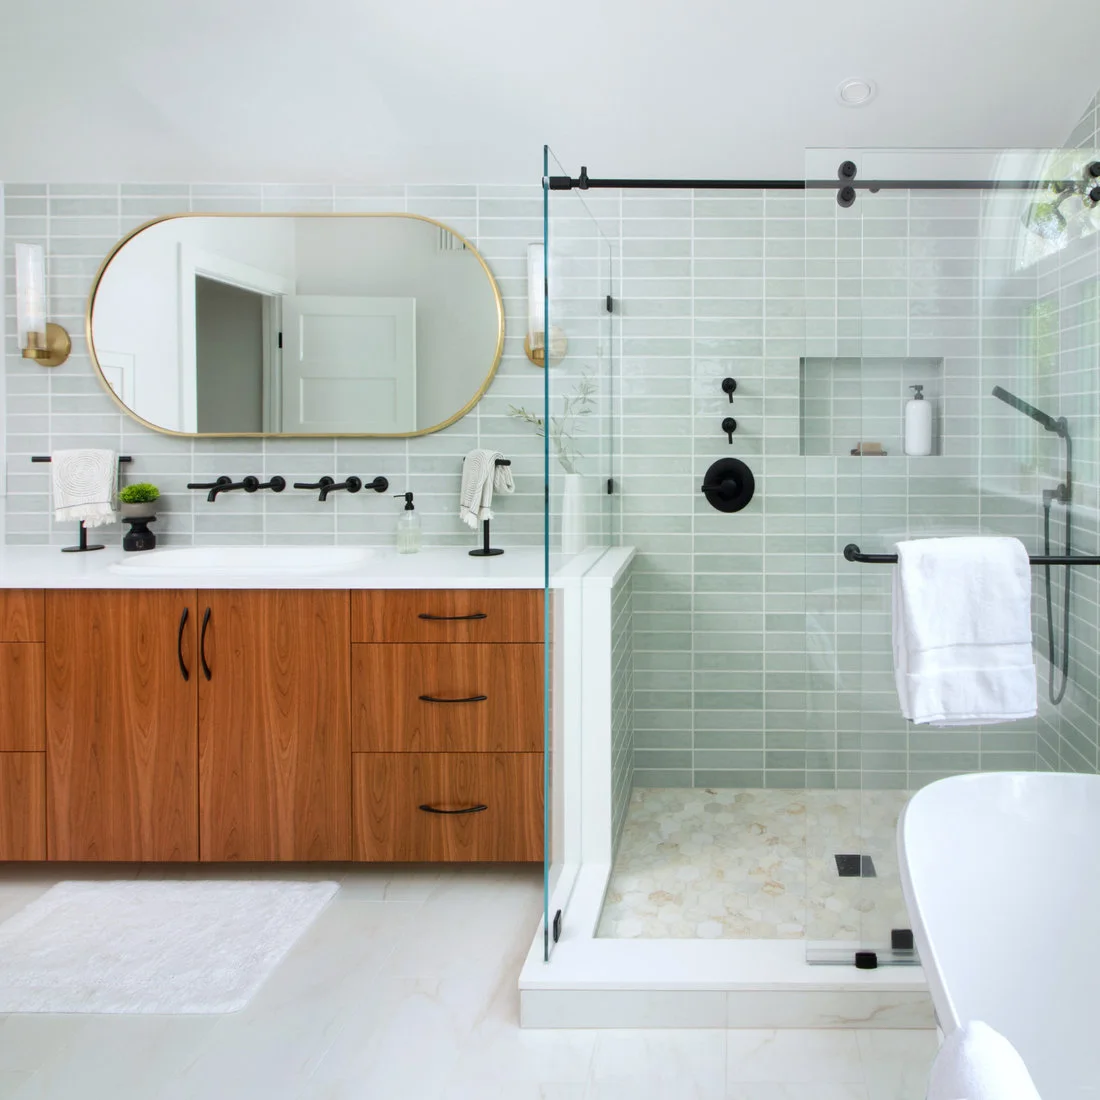
Pair Pale Green Rectangles with Warm Cabinetry
 SaveSupport Non AI Creator
Image credit: Morse Constructions
Pale green rectangular tiles connect the vanity wall with the shower, creating a consistent background around the room. A warm wood double vanity supplies a stronger color below the light countertop. Dark fittings and the rounded mirror outline repeat contrast in a few practical places, keeping the tiled wall from needing another decorative border.
Check the green tile beside the cabinet finish under the room’s actual lights before ordering. Plan where the tile ends at doorways and untreated wall areas so the arrangement feels complete. Keep storage adequate for both basin users, and leave the counter accessible rather than using matching accessories to occupy every available surface.
IDEA 18 / 20
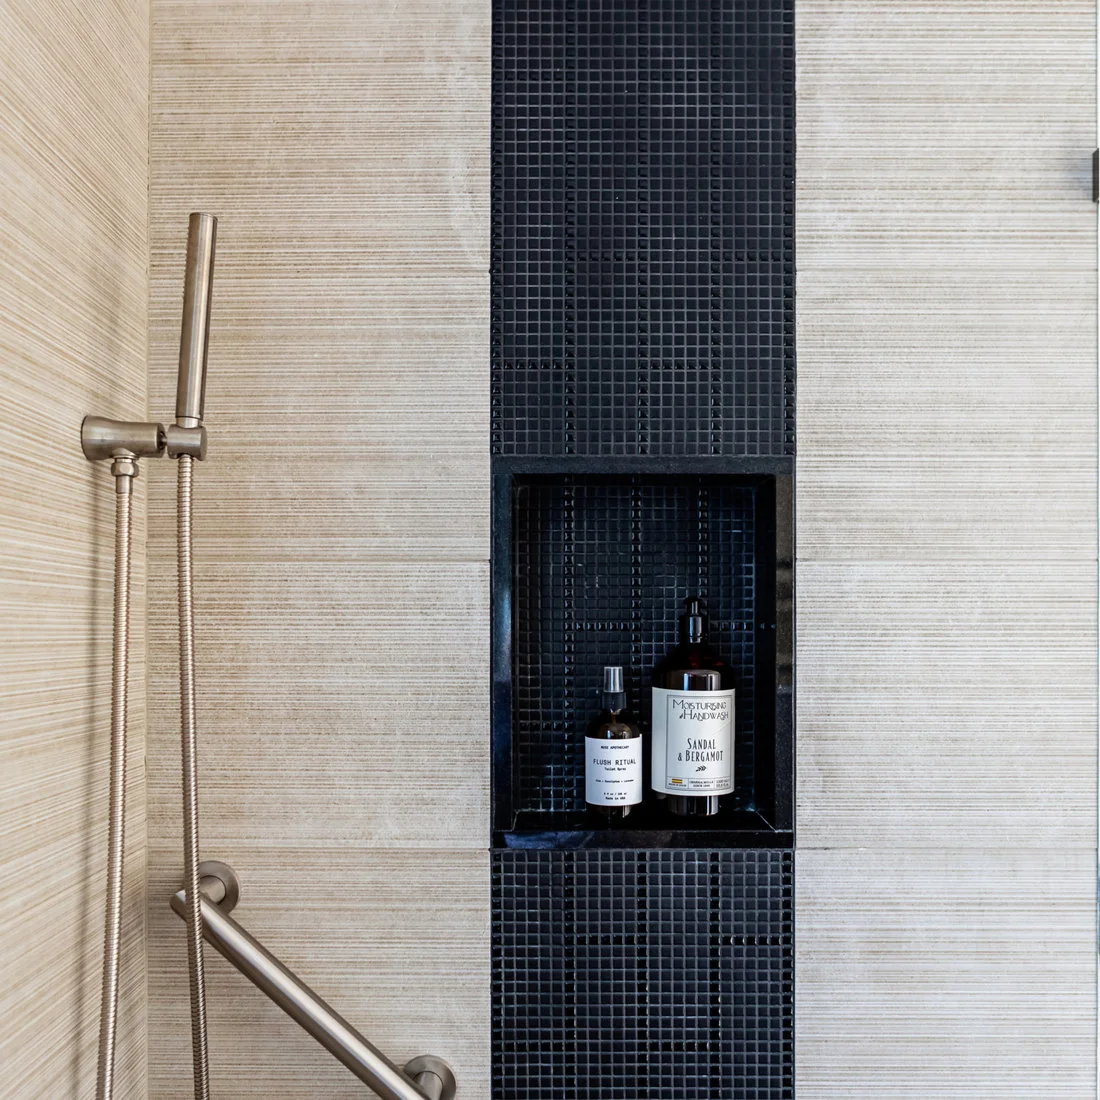
Put Dark Mosaic Inside a Vertical Strip
 SaveSupport Non AI Creator
Image credit: SH interiors
A narrow dark mosaic strip gives the shower a vertical center, with the recessed bottle shelf placed inside it. Pale horizontally textured walls provide a contrasting direction on either side. The handheld shower sits against the lighter background, so the smaller dark tiles can emphasize the storage area without covering every shower wall.
Plan the strip width around whole tile sheets and the niche edges before installation. More joints in the mosaic and texture on the side walls mean both surfaces need suitable cleaning guidance. Keep the shelf sized for the products used daily, and avoid relying on decorative bottle spacing when assessing how much storage the recess actually provides.
IDEA 19 / 20
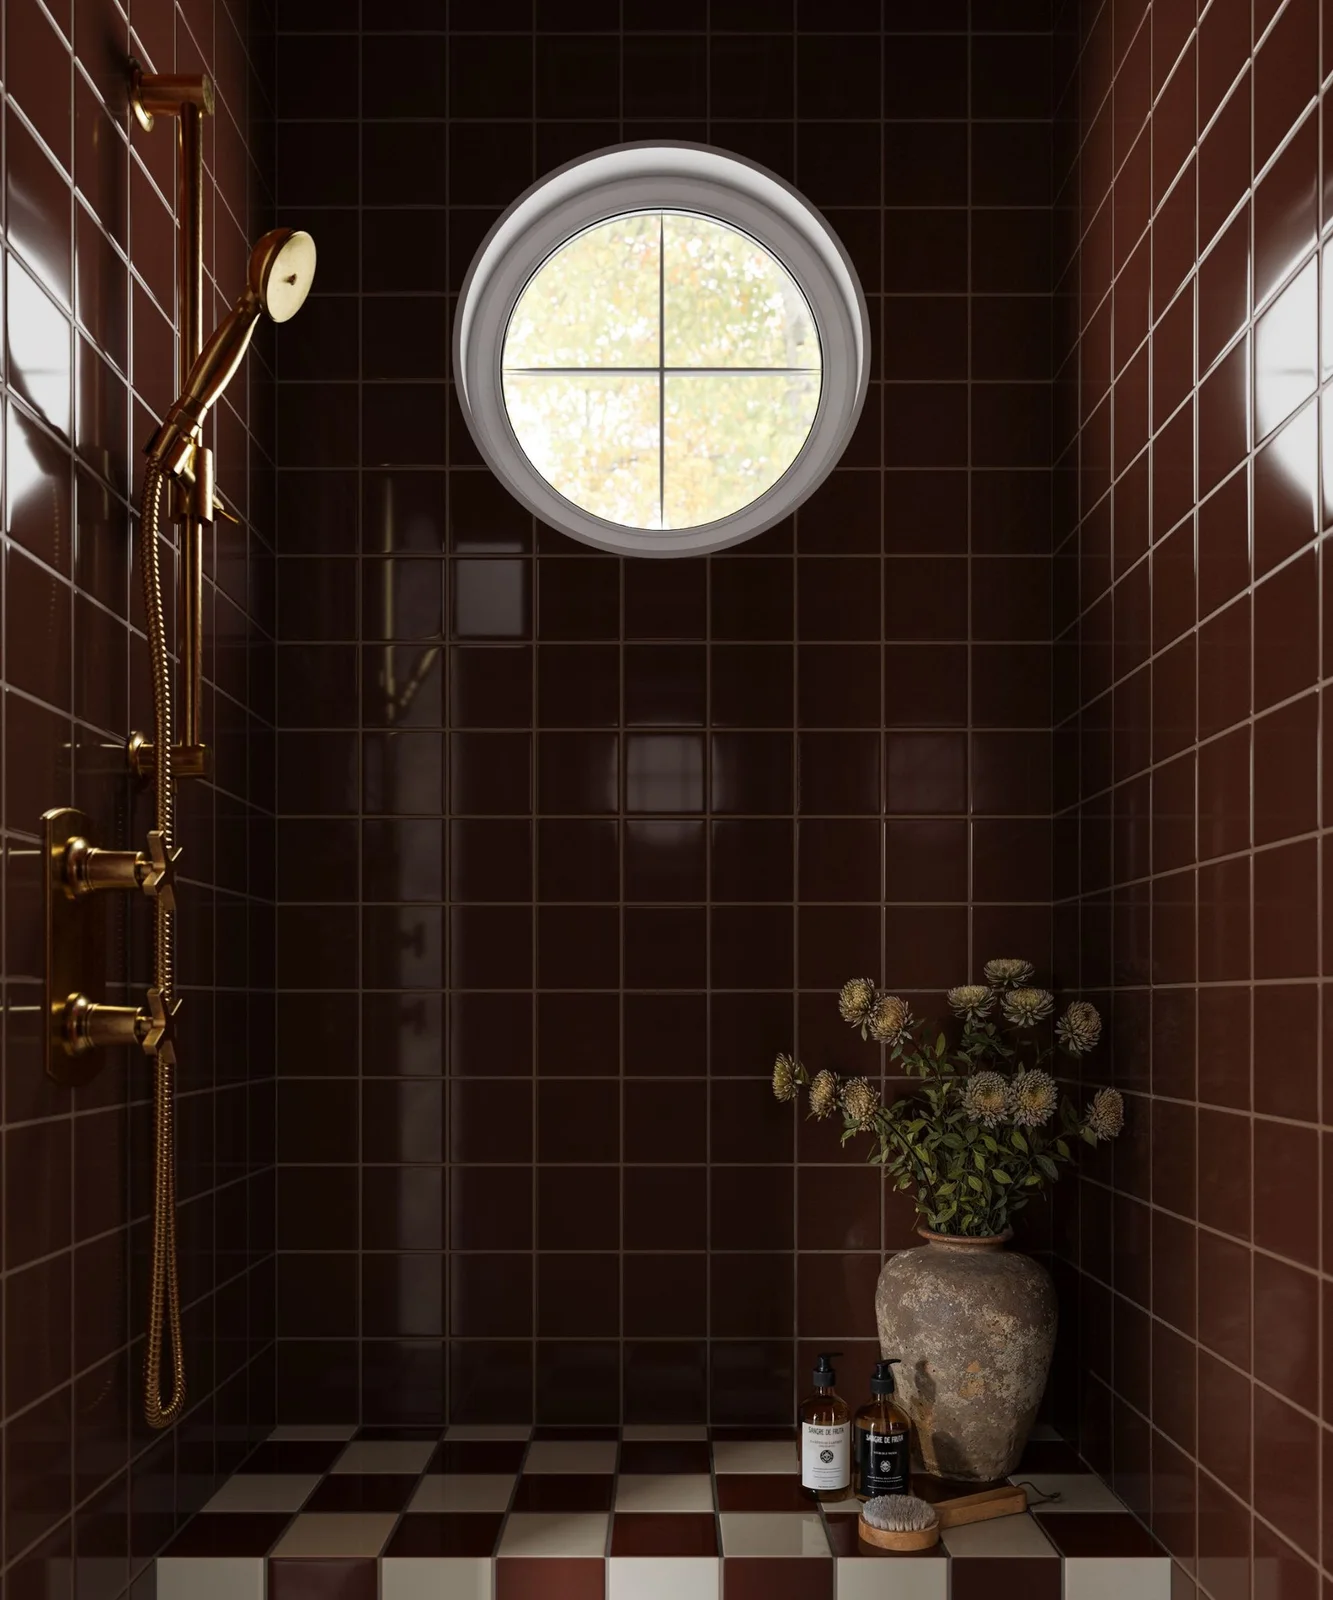
Keep a Deep Red Shower in a Simple Grid
 SaveSupport Non AI Creator
Image credit: Fireclay Tile
Deep red-brown square tiles form a regular grid around the round window, allowing the window shape to be the main interruption in the wall. Brass-colored fittings provide warmer highlights against the darker surface. The tiled ledge repeats the wall color, keeping the shower’s stronger effect concentrated in one consistent palette.
Compare the deeper tile in the bathroom’s less brightly lit areas as well as near the window. Check how the square grid finishes around the circular opening and any ledges before installation. Keep shelf styling separate from the practical storage plan, and choose grout that gives the intended contrast when viewed from the doorway.
IDEA 20 / 20
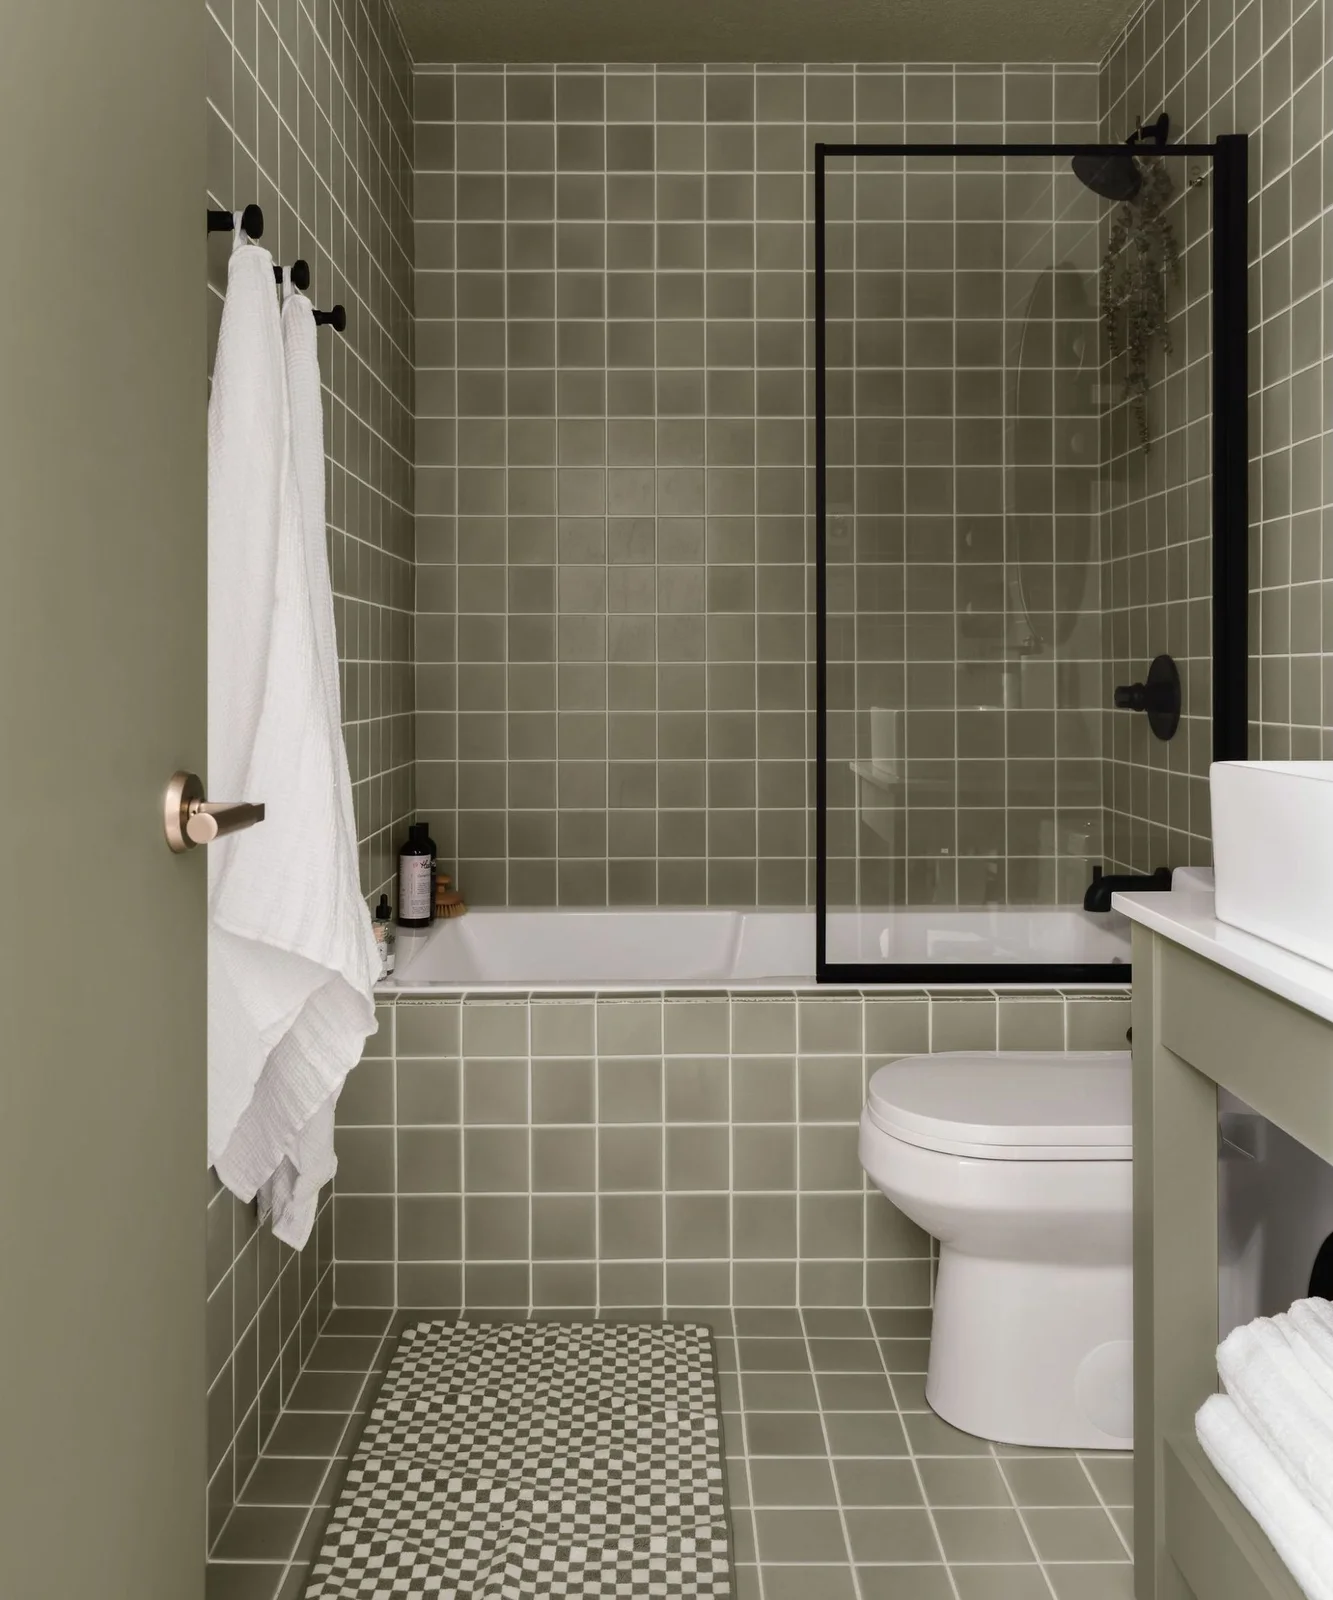
Use Light Grout to Clarify a Green Grid
 SaveSupport Non AI Creator
Image credit: Fireclay Tile
Muted green squares continue from the wall onto the tub front, with pale grout making the grid easy to see. Black fittings repeat a darker outline at the shower and nearby fixtures. A small checked floor introduces another pattern below, while plain pale surfaces outside the tiled area prevent the room from becoming uniformly busy.
Compare a cured grout sample before choosing this level of contrast, since every joint and cut will be noticeable. Draw how the wall grid meets the tub front and corners. If the floor also has a pattern, keep its colors related and verify the product’s suitability for the location instead of selecting it from appearance alone.
BRING IT ALL TOGETHER
Choose the arrangement and the upkeep together
Take several samples into the actual bathroom and compare them beside the vanity, floor and fittings. Look at both daylight and the light used in the evening. Draw the tile arrangement around corners, niches and fixtures, then discuss awkward cuts with the installer before buying enough material for the whole room.
Choose cleaning products and maintenance routines for the exact tile and grout rather than assuming a pale, glossy or textured surface behaves a certain way. Keep spare tiles from the same order where practical. A manageable layout with accessible storage usually serves the room better than adding another pattern that makes the daily routine harder.